Contents
The Features in this guide primarily apply to WebMaker Enterprise Edition and WebMaker Platform Edition. These editions, contain all the functionality in the WebMaker Pro Edition and also include the WebMaker Server Adapter technology. This Adapter provides powerful and intuitive data binding capabilities to enable you to map your data between your web pages and server controllers. These editions also include our graphical Application Map Feature that enables you to draw the relationships between your web pages and Java server controllers.
Please note, if you are using a partner license such as BizFlow WebMaker, your license will cover all functionality up to and including the Platform Edition within the scope of that license.
When information from pages is submitted, it is received by a server Controller. Which controller receives the information depends on the action that was fired and the application navigation that is defined within the Studio. Within these controllers, you can use the submitted information, perform additional business logic, access databases, call remote services, etc. You can also define how to return any information back to the browser and which page should be used to display the returned information.
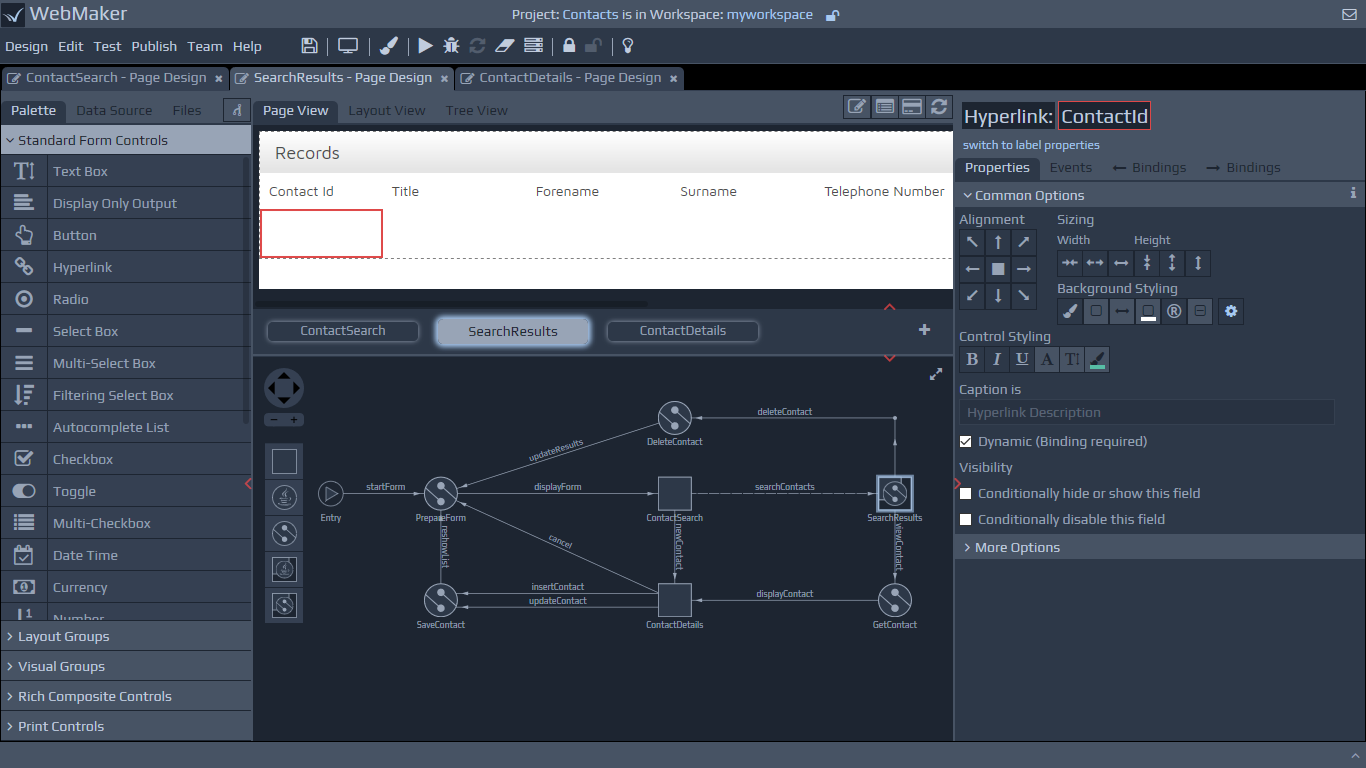 The Application Map diagram can be shown on any Page Design tab by expanding up the panel below the page thumbnails (click the red arrow). Alternatively, you can use the Preferences dialog to set the diagram to be visible by default.
With the Application Map diagram open you can access the controller details tab either by double clicking on a controller, or by using the right-click context menu options. Alternatively there are links in appropriate places within the Bindings and Events tabs that also provide access to the Controller Details tabs.
WebMaker Enterprise Edition provides support for Java controllers. WebMaker Platform Edition supports Java controllers as well as XML Controllers which make use of the rules engine provided by the WebMaker platform. Each controller type uses a different icon on the Apllication Map so they can be easily identified. If your licence allows, you can adjust the type of a specific Controller by using the Implementation Type options on the right-click context menu.
The Application Map diagram can be shown on any Page Design tab by expanding up the panel below the page thumbnails (click the red arrow). Alternatively, you can use the Preferences dialog to set the diagram to be visible by default.
With the Application Map diagram open you can access the controller details tab either by double clicking on a controller, or by using the right-click context menu options. Alternatively there are links in appropriate places within the Bindings and Events tabs that also provide access to the Controller Details tabs.
WebMaker Enterprise Edition provides support for Java controllers. WebMaker Platform Edition supports Java controllers as well as XML Controllers which make use of the rules engine provided by the WebMaker platform. Each controller type uses a different icon on the Apllication Map so they can be easily identified. If your licence allows, you can adjust the type of a specific Controller by using the Implementation Type options on the right-click context menu.
Receiving calls from other applications on the server
Each Action Link that is painted on the Application Map diagram is available for invocation over HTTP. The action request will be processed, together with any supplied parameters and forwarded to the linked Controller for further processing. The invocations can be via URL, basic HTTP or SOAP.
Java Controllers are identified by the Java icon for the Controller on the WebMaker Application Map diagram.
Each Java Controller needs to be implemented in a specific Java Class based on the controller name. WebMaker automatically generates a basic Java file for you which you can then update to include the required functionality.
Managing Controller Source Code
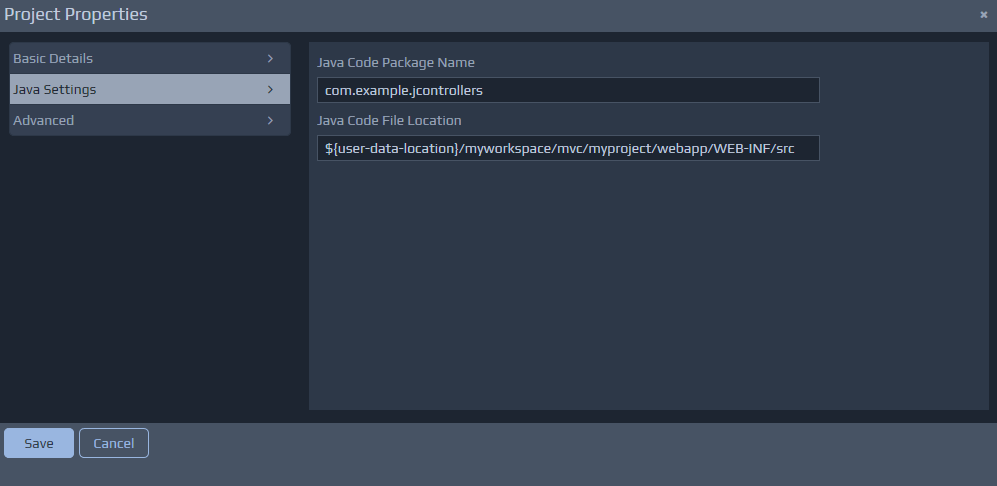
You can organise the source code for Java Controllers by using the Java Code File Location and Java Code Package Name entries under the Java Settings section of the Project Properties dialog. All the Java Controller classes within a project must be in the same Java package.
Controller Architecture
Before we start to explore the contents of Java Controllers, it is worth recapping on some of the relevant components within the WebMaker Runtime architecture. The diagram below provides a high-level view of this architecture, focusing on the data bindings and the flow of incoming and outgoing information between client (Browser) and server.
 WebMaker provides the ability to bind the data within a web page in two directions. When information is submitted from the browser, an arbitrary XML document structure can be populated with the information contained within the submitted XHTML form. When a page is sent to the browser, another arbitrary XML document structure on the server can be used to bind XML fields to HTML fields on the web page. This bi-directional binding can be performed graphically within the WebMaker Page Design - Bindings tabs. Controllers on the server handle the requests and also compose the response structures that are then transformed by WebMaker to produce the HTML response to the Browser.
Java Controllers provide the ability to write Java code to perform the desired tasks on the server. What you do here is dependent on your application scenario, technology standards and architecture.
The Java controller class must implement the JavaController interface. This interface defines a processRequest method which should be used to perform all the required processing. The general aim of this method should be to manipulate the incoming data so that it matches the format expected by the next screen.
The incoming information submitted from the screen is made available to the Java controller through the RequestData object passed as a parameter to the processRequest method.
The information between the client and server is bound for you. Therefore, by the time you receive the information it will be in the structured 'eForm' format that you see within the studio. By default, WebMaker deals with the data in XML format. An example incoming message might therefore look like:
WebMaker provides the ability to bind the data within a web page in two directions. When information is submitted from the browser, an arbitrary XML document structure can be populated with the information contained within the submitted XHTML form. When a page is sent to the browser, another arbitrary XML document structure on the server can be used to bind XML fields to HTML fields on the web page. This bi-directional binding can be performed graphically within the WebMaker Page Design - Bindings tabs. Controllers on the server handle the requests and also compose the response structures that are then transformed by WebMaker to produce the HTML response to the Browser.
Java Controllers provide the ability to write Java code to perform the desired tasks on the server. What you do here is dependent on your application scenario, technology standards and architecture.
The Java controller class must implement the JavaController interface. This interface defines a processRequest method which should be used to perform all the required processing. The general aim of this method should be to manipulate the incoming data so that it matches the format expected by the next screen.
The incoming information submitted from the screen is made available to the Java controller through the RequestData object passed as a parameter to the processRequest method.
The information between the client and server is bound for you. Therefore, by the time you receive the information it will be in the structured 'eForm' format that you see within the studio. By default, WebMaker deals with the data in XML format. An example incoming message might therefore look like:
<?xml version="1.0" encoding="UTF-8"?>
<mvc:eForm xmlns="http://www.hyfinity.com/xplatform" xmlns:mvc="http://www.hyfinity.com/mvc" xmlns:xg="http://www.hyfinity.com/xgate">
    <mvc:Control>
        <Page xmlns="http://www.hyfinity.com/mvc">ContactDetails.xsl</Page>
        <Controller xmlns="http://www.hyfinity.com/mvc">mvc-Contacts-JGetContactsList-Controller</Controller>
        <action xmlns="http://www.hyfinity.com/mvc">getJContactDetails</action>
        <unbound_param xmlns="http://www.hyfinity.com/mvc">value</unbound_param>
    </mvc:Control>
    <mvc:Data>
        <mvc:formData>
            <mvc:forename></mvc:forename>
            <mvc:surname></mvc:surname>
        </mvc:formData>
        <GetContactRequest Successful="" Version="" xmlns="http://www.hyfinity.com/schemas/tutorial" xmlns:demo="http://www.hyfinity.com/schemas">
            <Contact>
                <ContactId>10346</ContactId>
            </Contact>
        </GetContactRequest>
    </mvc:Data>
</mvc:eForm>
The final response data after the controller has completed processing should be in this same format, and this complete document is transformed to produce the response pages, as defined within WebMaker. Please remember that any submitted elements that failed to bind will be placed under the Control/unbound_param element.
Let's now return to an example Java Controller generated by WebMaker:
package com.example.jcontrollers;

import com.hyfinity.java.JavaController;
import com.hyfinity.java.RequestData;
import com.hyfinity.utils.RequestIdentification;
import com.hyfinity.xagent.XAgentCallback;

public class Controller_1 implements JavaController
{

    /**
     * Perform any initialisation required for the Java Controller.
     * @param acb Callback interface to access platform services.  Will be null if the full platform is not available.
     */
    public void init(XAgentCallback acb)
    {

    }

    /**
     * Main processing method.
     * @param rd This provides all the data for this request.  This should be updated in place as required.
     *           See the RequestDetail docs for details.
     * @param requestId details the session Id and request ID values for the current request.
     */
    public void processRequest(RequestData rd, RequestIdentification requestId)
    {

        rd.setPageName("MainForm");


    }

    /**
     * Used to handle any shutdown requirements.
     */
    public void shutdown()
    {

    }

}
}
Within each Java Controller, it is the processRequest method that needs to be implemented to perform the required functionality.
The rd incoming parameter is the RequestData object providing access to the incoming data. The infomation this contains should be updated accordingly during the processing of the processRequest method.
Controlling Page Flow
The RequestData object provides a simple method (setPageName) for setting which page to display next. As shown above, this method takes in a single parameter specifying the name of the page to display. Once the processRequest method has completed, the page name from the very last call to setPageName will be used to actually render the page and display it to the user.
If you wish to know the name of the action that has been invoked to determine which processing to perform, then this can be easily obtained using the RequestData getActionName method.
Accessing the data values
As mentioned above, WebMaker internally processes the data in XML format, and if you are happy with this approach, you can easily get at the data in this way by using the getAsXML method on the RequestData object. This will return an XDocument object which wraps a DOM representation of the XML data and provides some additional helper methods.
Alternatively, you can access the incoming data in JSON format by using the getAsJSON method on the RequestData object instead. This will return a JSONObject containing the incoming data. Only one data access method can be used for a given request.
To help illustrate how these two approaches can be used, the following fragments provide an example of how you could combine two submitted 'formData' values to produce a third value for later display on screen.
XML Approach
XDocument data = rd.getAsXML();
data.addNamespace("mvc", "http://www.hyfinity.com/mvc");
String forename = data.selectString("/mvc:eForm/mvc:Data/mvc:formData/mvc:forename");
String surname = data.selectString("/mvc:eForm/mvc:Data/mvc:formData/mvc:surname");

Element fullNameElem = data.getDocument().createElementNS("http://www.hyfinity.com/mvc", "fullName");
com.hyfinity.utils.xml.DOMUtils.setText(fullNameElem, forename + " " + surname);

data.selectSingleNode("/mvc:eForm/mvc:Data/mvc:formData").appendChild(fullNameElem);
JSON Approach
JSONObject data = rd.getAsJSON();

JSONObject fd = (JSONObject) new JSONPointer("/eForm/Data/formData").queryFrom(data);
fd.put("fullName", fd.get("forename") + " " + fd.get("surname"));
Note: Even when using the JSON data format within your Java controller, WebMaker will convert this back to XML data internally in order to perform the transformation that renders the next screen. In certain scenarios, this transformation process may alter the ordering of child elements from the original XML data. If this occurrs, it is unlikely to cause any issues, but you can always fall back to the getAsXML approach instead.
Compiling and Running Java Controllers
You can use the in-built WebMaker Editor or a Java Development tool of your choice to author and compile the Java classes for each controller. WebMaker will autoamtically create a sample Apache Ant build.xml file for compiling the code, but you are free to use whatever tool suits your workflow. You will need to ensure that the WebMaker xplatform.jar file is on your classpath for the code to compile successfully. This jar is located within the {Install Location}\design\tomcat-design\lib directory of a standard WebMaker installation.
The easiest way to ensure your classes are picked up when testing or publishing the project is to place the compiled code within the webapp directory for the project. eg {Install Location}\users\{user name}\{workspace name}\mvc\{project name}\webapp\WEB-INF\classes\lib. If you use the default code location and the generated build script then this will happen automatically.
This compiled code will then be included correctly when you use the Run Test or Publish actions in the WebMaker Studio. You can use the Debugger to check execution details via the View Debugger tab. This will also show details of any errors, including the inability to locate the controller or inability to execute the controller, etc. You may need to adjust the Platform Log Level to debug in the Test Settings or Publication Settings dialogs as appropriate to make sure you are getting all available information logged to help resolve any errors.
Important: If you are using a runtime environment that runs multiple applications within one Java webapp (such as the default BizFlow WebMaker publication) then the compiled code will not be automatically picked up as above, and you will instead need to manually ensure the code can be loaded by the application server in use.
Note: Previous versions of WebMaker supported a more restrictive form of Java Controllers based around a JController base class. This format is now deprecated. Any existing implementations will continue to function for now, but the new approach described above should be used going forward.
XGate is a WebMaker server component that handles requests from the browser, performs data-bindings and forwards requests to server controllers. XGate also sends responses back to the browser. In both directions, XGate has the ability to use plug-ins to intercept and alter behaviour based on your custom code.
XGate can also act as a gateway to remote service invocations, including calls to SOAP and REST services. (Requires XML Controllers).
XGate Configuration
The XGate configuration details reside in the deployment descriptor file of the Web application.
If {webapps_location}
is the web application deployment area of the Web server, the XML deployment descriptor of a {myapp}
application can be found under {webapps_location}/{myapp}/WEB-INF/web.xml
.
An example web.xml file is shown below:
<?xml version="1.0" encoding="ISO-8859-1"?>
<!DOCTYPE web-app PUBLIC "-//Sun Microsystems, Inc.//DTD Web Application 2.3//EN"
    "http://java.sun.com/dtd/web-app_2_3.dtd">
<web-app>
    <servlet>
        <servlet-name>xgate</servlet-name>
        <servlet-class>com.hyfinity.xgate.HTTP2Java</servlet-class>
        <init-param>
            <param-name>morphyc</param-name>
            <!-- Sets the Morphyc configuration file to use for this application -->
            <param-value>c:/jprogramfiles/hyfinity/runtime/morphyc/helloworld_morphyc.xml</param-value>
        </init-param>
        <load-on-startup>10</load-on-startup>
    </servlet>
    <servlet-mapping>
        <servlet-name>xgate</servlet-name>
        <!-- Set all incoming requests to be handled by XGate.
             For an MVC application the mapping would be '*.do' to not pick up CSS, image, etc requests-->
        <url-pattern>/*</url-pattern>
    </servlet-mapping>
    <session-config>
        <session-timeout>30</session-timeout>
    </session-config>
</web-app>
XGate also accepts a second configuration file stored in {webapps_location}/{myapp}/doc/xgate.xml
. This file is optional. If omitted, all the settings this file could contain default to 'false'. If defined, this file can be accessed via the Include Local File options on the Files tab of Page Design, and then navigating to the relevant location.
An example of this configuration file is below.
<?xml version="1.0" encoding="UTF-8"?>
<xgate xmlns:xg="http://www.hyfinity.com/xgate" xmlns:xfact="http://www.hyfinity.com/xfactory">
    <product>mvc</product>
    <plug-ins>
        <!--Turn on SXForms processing for binding HTTP Parameters into XML structure -->
        <sxforms mark_unbound="true" delete_bound="true">true</sxforms>
        <!--Ensure HTML output is returned to the browser -->
        <ensure_html_response>true</ensure_html_response>
        <!--Output the XHTML 1.0 Transitional Doctype-->
        <output_doctype doctype_system="http://www.w3.org/TR/xhtml1/DTD/xhtml1-transitional.dtd" doctype_public="-//W3C//DTD XHTML 1.0 Transitional//EN">true</output_doctype>
        <!-- disable pre processing of soap requests
             If this is enabled, then a transform can be applied to incoming SOAP requests to format them for
             processing as standard HTML parameter based requests.-->
        <soap_preprocessing>false</soap_preprocessing>
        <!-- If true, automatically set the Language control field based on the user's locale -->
        <set_locale>false</set_locale>
        <!-- Enables file upload support for this application. The two attributes are optional, and not provided by default.-->
        <file_upload upload_dir="c:\temp\uploads" plugin_class="com.example.MyFileUploadPlugin">true</file_upload>
        <!-- Define any custom plug-ins required -->
        <custom_plugins>
            <custom_plugin name="My Plug-in" runtime_instance="com.test.MyPlugin" priority="10"/>
        </custom_plugins>
    </plug-ins>
</xgate>
This file provides control over a number of in-built features and the ability to define your own custom plug-ins. These plug-ins reside between the browser and server and allow interception and inspection of the data received from the browser, and the response being sent back to the browser. For example, a plug-in could be used to enforce custom security checks before allowing access to the controllers. See the next section for more details on writing custom plug-ins.
Both of these configuration files are automatically set up when applications are published from the WebMaker Studio. You can change these files and place copies within the relevant locations under the webapp
directory for your project in the repository. This ensures your changed files will be reused for future test and publish operations.
XGate also makes use of other configuration files that are located within the doc directory within particular webapp structures, but these files should be managed automatically by the WebMaker Studio.
You can learn more about XGate plug-ins on the WebMaker Forum. Search for "xgate".
Adding Custom Plug-ins
Custom plug-ins allow you to write your own Java code to augment the standard functionality provided by the XGate Servlet.
Each custom plug-in needs to implement the com.hyfinity.xgate.XGatePlugin interface, the JavaDoc for which is available here. This interface defines two methods that require implementation, processInput
and processOutput
. The first will be called on each incoming request to give you the option to manipulate the request before it is passed to server controllers for processing, whereas the second will be called with the response received from server controllers (usually HTML content) to perform any final manipulation before the response is returned to the browser.
You can define as many custom plug-ins as you need by listing each one as a custom_plugin element in the xgate.xml file as shown below.
<xgate>
...
<plug-ins>
    ...
    <custom_plugins>
        <custom_plugin name="my plug-in" priority="10" runtime_instance="com.company.MyPlugin"/>
        <custom_plugin name="custom plug-in 2" priority="70" runtime_instance="com.company.MyPlugin2"/>
    </custom_plugins>
</plug-ins>
</xgate>
The name attribute provides a friendly name for the plug-in that is output to the Debugger logs, the runtime_instance attribute provides the classname for your plug-in, and the priority configures the order in which the plug-ins will execute. Plug-ins with a lower priority number will be called first. All the in-built plug-ins that handle the data binding process, etc., have a fixed priority of 50. Therefore, if you add your custom plug-in with a priority less that this, the message it receives will generally be a flat list of parameters sent from the browser, whereas if you use a priority value over 50, the message will look like the structured XML you see in the various binding screens.
If you need to return non-HTML content (e.g. to return a PDF file), you can do this from the processOutput
method. You need to output your content to the response object directly, and then set the output document to null (output.setDocument(null)) to prevent XGate from attempting to return the normal content.
Once you have written your plug-in you will need to ensure it is compiled successfully and available to your deployed/published application. One way to do this is to place your compiled classes/jar within the WEB-INF directory under the webapp directory for your project in the repository. All the jars needed to compile your code can be found in the <install_dir>/design/tomcat-design/common/lib directory.
When you are trying to debug custom plug-ins, it is useful to switch the logging level to debug via the Test Settings menu option. You will then be able use the Debugger to see the state of the message before and after calling each plug-in. This is normally suppressed for applications during development.
Details on Previewing and Exporting pages were covered earlier. In this section we will provide additional details on the features that are available for testing and publishing your applications.
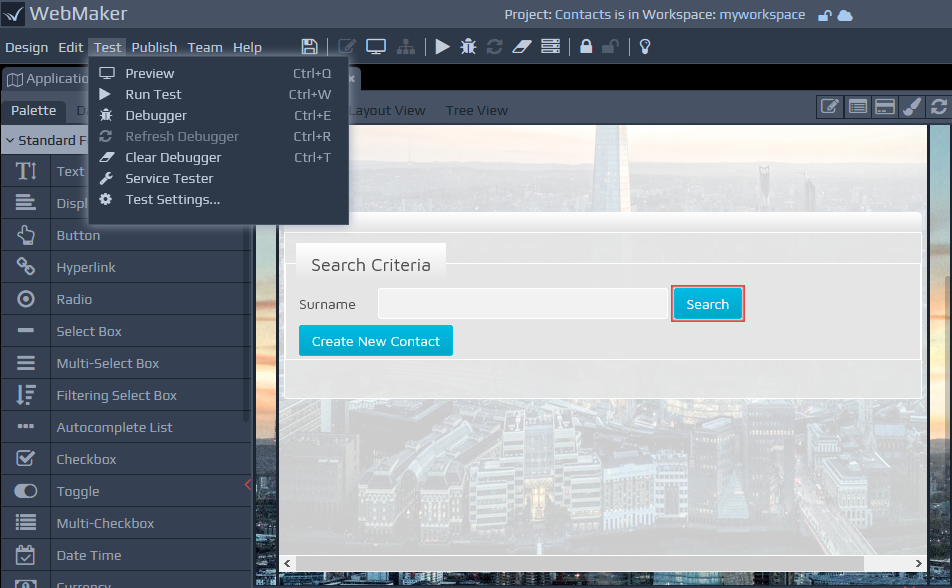
Testing Pages
When you are happy with the look-and-feel of your pages within the Preview, you can use the Run Test button on the Toolbar (or Test | Run Test menu entry) to run your complete application on the local test environment. This will open up a new tab, initially showing the 'start' page in your project. At this point you are now viewing the pages within a running application, including the application of all dynamic settings. Therefore, you can now test the navigation between pages, etc.
 When testing your projects in this way, you can use the Debugger to obtain more information about your running application.
Once you are happy that the project is working correctly, the Publish functionality can be used to package your application for installation on production environments.
You can locate more comprehensive information on testing, publishing, debugging, configuring and monitoring your applications within different server environments, later in this documentation.
When testing your projects in this way, you can use the Debugger to obtain more information about your running application.
Once you are happy that the project is working correctly, the Publish functionality can be used to package your application for installation on production environments.
You can locate more comprehensive information on testing, publishing, debugging, configuring and monitoring your applications within different server environments, later in this documentation.
For additional details on testing, debugging and publishing your applications, please see the following sections:
You can create pages that make asynchronous calls to server Controllers, refreshing only parts of a full page. In order to achieve this, you need to add a partial page, which will provide the asynchronously updated page content. Once the Application Map has been displayed (expand it up on any Page Design tab) you can add a new Partial Page using the icons on the left side palette. There are two partial page icons for the different server implementation types available (see below for details). The implementation type for an existing partial page can be easily changed if needed using the right-click context menu options.
The design of partial pages is very similar to normal page design, whereby you can access server controller functionality, perform automatic bindings and also use schema-driven data sources to accelerate page design.
Some of the key differences between full and partial pages include:
In almost all cases, partial pages will be linked to from full pages. The partial pages represent a part of the full page.
Each partial page has an integrated server controller because a partial page generally requires a call to something (database, web service, etc) to enable a refresh of the part of the full page that it is dealing with. You can access the controller details from the right-click context menu for the Partial Page on the Application Map diagram. A Partial Page can contain either a Java controller (Enterprise or Platform Editions) or an XML Rules controller (Platform Edition). The development process for the server component of a Partial Page is the same as that for a standalone server controller.
You may notice that the partial page previews do not show the main page that they are called from. They simply show the partial page content.
In order to make an asynchronous call to the server from a partial page, you have to use the AJAX submission option within the Events tab of the Page Design screen. Against this submission type, you will notice the need to provide a Target Group as well as a Source Type. The target group represents the area of the screen that will be refreshed with the response from the server. You should ensure that you have a suitable container group to receive the response of the AJAX Submission. The palette contains some default containers that have been preconfigured e.g. Partial Page Container
. You will also notice a Source Type option. This allows you to submit a part of the full page as the request data, or the full page if this is more appropriate depending on the data required by the Partial Page.
WebMaker allows you to decompose large applications into multiple projects. This provides a more manageable application specification and can aid better understanding during development and maintenance. This section details the options available to integrate these multiple projects to produce a single application.
Each project within WebMaker has its own set of assets and can communicate with other projects.
There are scenarios when two or more projects may wish to 'communicate' with each other. These scenarios typically fall into two categories:
Call Remote Page - A screen in one project contains a button (or other event) that shows a screen from another project.
Call Remote Controller - A controller in one project wishes to call a controller in another project.
Important Note: A key requirement for integrating multiple projects is that all the action names (Action links on the Application Map) used across your projects must be unique. One way to achieve this is to simply add a project-specific prefix to the action names for example.
Considerations for Test Settings
Blueprint Specification part - The Test Settings screen (representing the underlying Morphyc.xml file) represents the control file for an application and lists all projects within the same application context. Multiple projects can be configured to save their deployment configuration information into the same morphyc file. Assuming one of the projects acts as the master/parent project, this can be done by selecting the Test Settings - Location Details from the menu for a 'child' project, and updating the value for the Test Settings File Location and the Test Web Server Location to the values from the 'parent' project, before hitting the Save button. To populate the changed settings for the 'child' project into the 'parent' project, you need to perform a Run Test to setup the necessary runtime test environment details.
This needs to be repeated for each 'child' project to ensure they are successfully referenced in the same morphyc configuration file in the 'parent' project. This is a one off process. Once the correct entries has been placed in the required morphyc file via Test Settings, they will be maintained in future.
Call Remote Page
Once the Test Settings steps have been completed, the running 'parent' project should contain all the included projects, and it becomes possible to make calls between pages in different project as if they were in the same project. To check the setup, go to the Test Settings screen for the 'parent' project and view the Projects in this Environment. You should see the 'parent' project and all the 'child' projects that are referenced.
You can then use the Action name that you want to call (in the target project) as the URL that is called from the source page, whether this be through form or ajax submission or just a standard anchor link. WebMaker currently does not list the actions of a second project using the Form Submission action type within the Page Design screen. Instead, you should select the Enter action name option and then type in the action name manually.
Call Remote Controller
In order to achieve the second type of project interaction, you need to create what is known as an Inter-Project Proxy. These are controllers that work in a very similar way to Web Service Proxies, but rather than representing remote external service URLs, inter-project proxies are used to represent a controller in another project. In the (source) project that wishes to call the controller in the second (target) project you need to create an 'empty' controller, which will act as the proxy to the real controller within the target project. As far as the first project is concerned, this new 'empty' controller will appear the real controller in the second project, and can be called directly as required. At runtime, any calls to Inter-Project Proxy controllers will actually be handled by the real controller in the second project.
In order to achieve this, the 'empty' (no rules processing) Proxy Controller needs to be set-up correctly. This can be achieved by opening the Project Settings tab and clicking on the Runtime Patterns tab. Typically, click on the Model layer to set-up a Remote Proxy Controller. Type in the New Filename for the reference to the Controller you want to call e.g. {RemoteControllerName_Proxy}
and click on the Clone Pattern button. This will display a further screen that allows you to select the Base Pattern to be used - In this case the Remote_Service_Proxy.xml
file. Finally, click on the Clone Pattern button to create the Controller.
Once this is done, open the Test Settings and select the Agent Types menu option. Click on the Agent Id for the Controller just created, and then change its Agent Type to the Inter Project Proxy
option and enter the Target Agent Id as the full Agent Id of the Controller in the target project. This will appear something like mvc-{project}-{pattern}-{agent}
. Note: This value can be seen in the Debugger logs of the 'target' project.
Finally, Click on the Change Agent Type to commit the change.
Inter-Project Proxies versus Web Service Proxies
Please Note: Use of Inter Project proxies requires that the deployment settings mentioned above are completed to ensure both projects are running within the same application server and in the same Java Virtual Machine (JVM). If you need to communicate between projects that are running on different machines, then you should deploy the 'empty' controller as a Web Service Proxy
using the http service
option, and the target controller should be deployed as a Web Service
. This will allow you to treat the proxy controller as if it was the Agent in the target project and call it directly, even though in reality it is deployed to a separate machine and will be accessed via HTTP.
Rendering Pages in Remote Projects
The details above explained how you can call an action in another project by adjusting the event definition for the relevant trigger button. This works fine when you know at design time that you will always be navigating to another project, but what about the situation where you need to decide on the server which page (from multiple projects) to render? When you are dealing with a single project, you can make these decisions on the server by changing the value of the Page
control field in the bindings message structure. But when you want to render a page in a second project it is a bit more complicated. To do this, you will need to create an inter-project proxy to the 'view' controller of the 'target' project. Then, when you need to render the page from the second project, you need to adjust the Page control value, and then call this view proxy to tell the target project to render the correct page. It is important to note however that when this is done, the HTML information returned from the target 'view' controller will still flow back through the controller in the 'controller' and 'view' layers of the current project before being returned to the browser. The rules within the local controller may need to be adjusted to alter the data structure if required.
Binding Considerations When Calling Pages in Remote Projects
You are able to provide different binding structures for each action submission from a page. A WebMaker Project does not know about actions you may wish to call in external projects. You will therefore not see actions in such external projects within the Bindings tab. As a result, actions to external projects will simply submit data that will have no bindings and resort the default binding structure, ending up in the Control section of the bindings document, instead of the formData section.
The best approach to ensure your submission data is structured, even when such data is submitted to remote projects, is to set the required bindings structure for one of the actions. Then set the Set bindings and structure based on another action? option in the Advanced Bindings Mode section for ALL other actions and use the settings for the base action defined earlier. This triggers WebMaker to use the same binding structure for all actions, even for actions it does not know about, such as those being called in remote projects.
WebMaker enables translations, post development. This can be achieved by setting up translation files, which map information on the various pages to their translations in the required language and locale. WebMaker attempts to locate translation files for locales first and, if not present, will then attempt to access general translation files for the language (e.g. if the en-GB
) translation file is not available, then WebMaker will seek to process file en
). If the translation file is not present then the originally developed content for the page will be displayed.
The first step is to create a web application based on one of the languages you need to support, ideally the most commonly used language. Then add language/locale specific XML translation files for each language, to apply new
labels, group names, tool-tips and drop-down list options for the additional languages.
For full details on how to set this up, please refer to the Forum entry - How do I set-up Multi-Lingual Forms for Languages and Locales? .