 Whether you are setting up a new environment or editing an existing environment you will be presented with the same information within the Environment Details page shown below. You will notice that some of the sections are very similar to those previously defined in the Test Settings screen.
The publication environment details will also include the Environment Name at the top of the screen if you are editing an existing environment.
The publication environments are detailed within underlying configuration files, which work in conjunction with Apache Ant Build process.
Whether you are setting up a new environment or editing an existing environment you will be presented with the same information within the Environment Details page shown below. You will notice that some of the sections are very similar to those previously defined in the Test Settings screen.
The publication environment details will also include the Environment Name at the top of the screen if you are editing an existing environment.
The publication environments are detailed within underlying configuration files, which work in conjunction with Apache Ant Build process.
Location Details
The pre-defined environment types should include Tomcatand
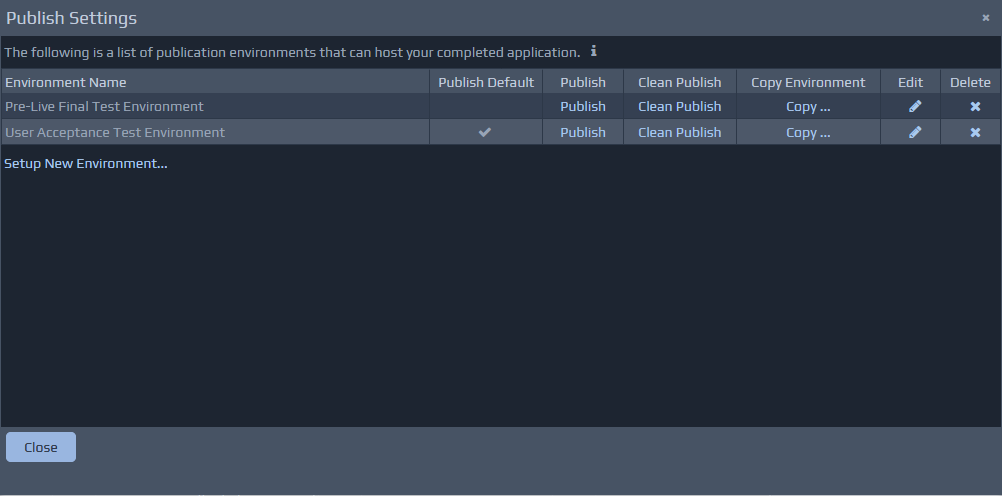
WARtypes as a minimum. Other options may be available, depending on the specific version of WebMaker you are using. The environment details are defined and held against the project specification within the repository. If you setup multiple publication environments, it is also possible to configure a default environment to publish to when the Publish button is pressed on the WebMaker command bar.
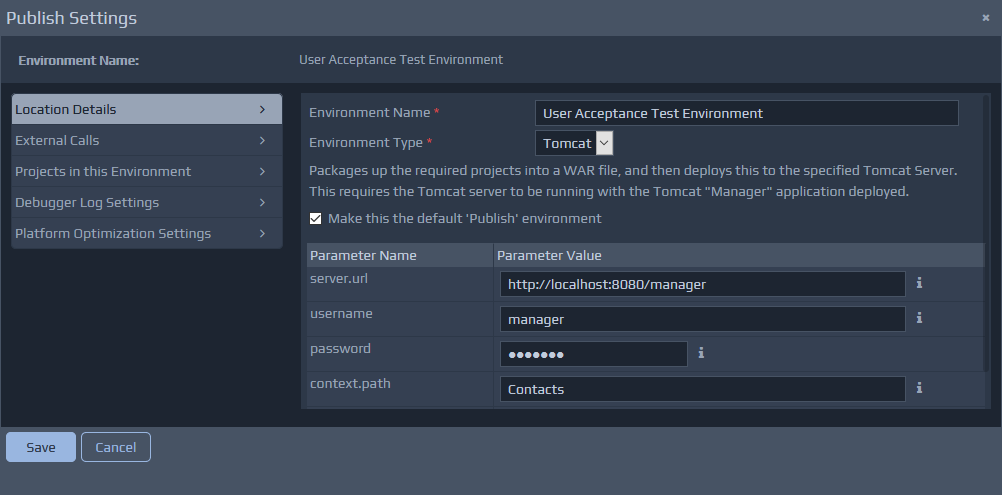 Depending on the environment type selected, there will be a number of required Parameters. These parameters will depend on the target publication environment. For example, you will need a WAR file-name and the output directory for the WAR file. You can use the hint messages for each parameter to get some additional details on what should be entered. The Tomcat environment type allows the application to be published to a remote server. The WAR option will create a WAR file that will then be typically installed onto a remote application server e.g. IBM WebSphere, Oracle, etc.
External Calls
This section allows you to re-configure the details of External Calls. This section displays the Agents that represent database connections, remote web service details, etc. These details are similar to those found on the Test Settings screen. You can change the details for each of these Agents in this section. You will typically change these details to ensure the application is published with the correct runtime details for a server environment. This may mean different database connection details, server URLs for some Agents that are published into different user acceptance, test or live production environments. It is common to have different SQL Database instances or Web Services depending on different types of environments. Only existing External Call information can be edited.
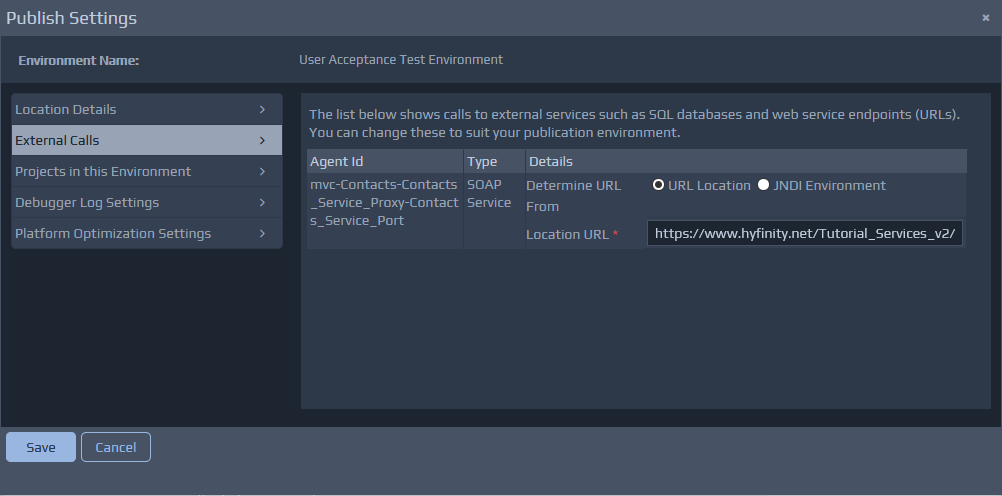 You may also find that some of the details are more secure in these environments and require different setup steps. The publication environments allow you to define JNDI Resource details for SQL Database connections and Web Service URL location details, without the need to hold such details in the application specification. By default, the settings are based on those defined in the Test Settings screen, but can also be altered to JNDI Resource Details if required. If the JNDI Resource details are defined, it is important to ensure that these definitions have already been pre-configured on the J2EE Application Server that hosts the publication environment. The following section covers the configuration of JNDI resources in more detail:
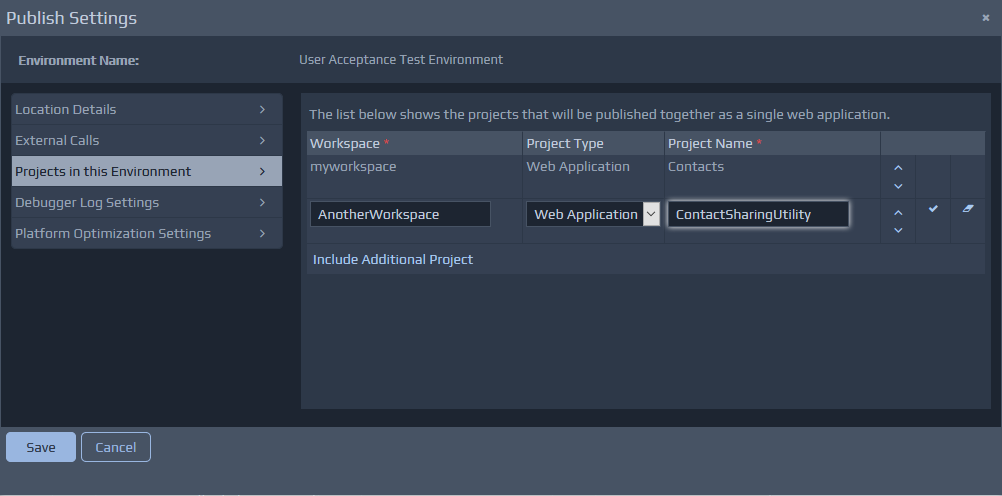
Projects in this Environment
The final specific section on this tab is Projects in this Environment. Within this section, you should see at least the currently selected project. You may also wish to Publish additional projects that are required for the overall published application. Within WebMaker you can define many projects that can be used to breakdown larger applications. These projects may have been linked together via inter-projects proxies. Where an application is composed of multiple projects, you will need to include all such projects within this section. This is totally independent for any multiple-project setup performed for a test environment via the Test Settings screen. By adding the additional projects here, means you only need to publish the one main project to create a WAR (for example) containing all the required projects.
 Please note that most of the environment set-up and configuration needs to be setup only once and modified as necessary. Most of the time you will simply be selecting a publication environment and clicking Publish. If new Agents are added to your project that have different External Call details, then you will need to edit the environment to override these as appropriate.
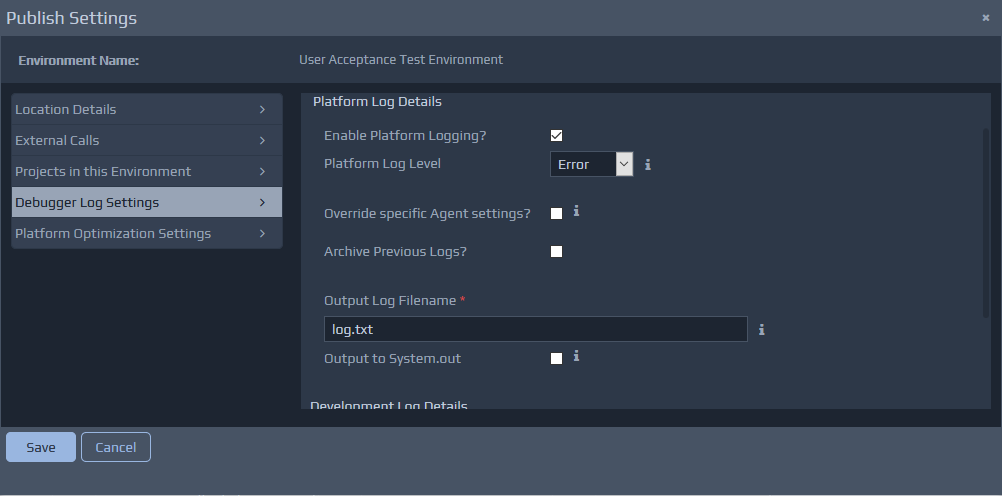
Debugger Log Settings
This section enables you to optimise various settings for the publication environment. You may need to adjust these settings because certain elements will require very different behaviour during design and testing, compared to the live production environments. For example, you will need much more detailed logging during development, compared to the live environment.
For user acceptance and production environments, most of the logging details are switched off. WebMaker will default the settings to appropriate values. For such environments, the platform logs are usually the only details left active, but only to report Platform Log Level of Erroror
Fatal. The development and administration logging is normally turned off by default.
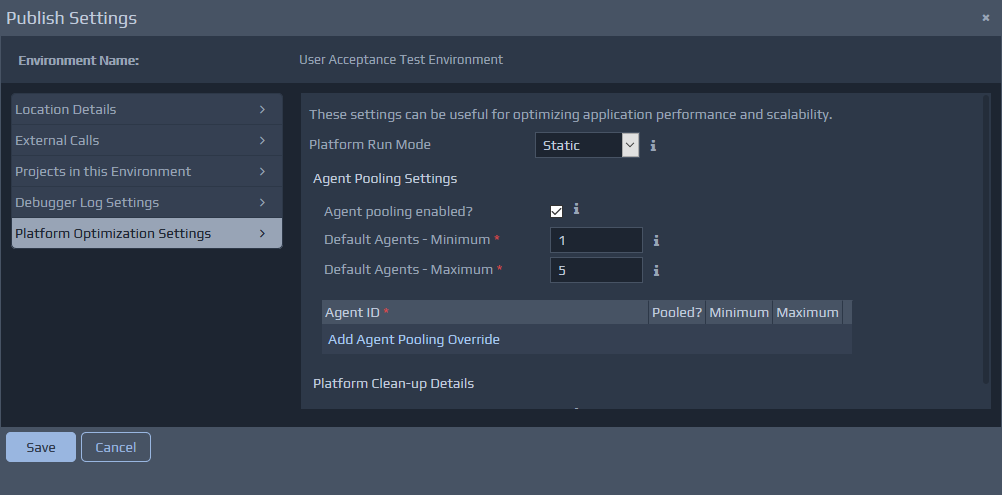
Platform Optimisation Settings
For published applications, one of the more important elements is the Platform Run Mode. This should be set to Staticor
On-Demandrather than
Dynamic. You may also want to configure pooling settings to finely adapt the live runtime environment to better suit the usage patterns of a particular target environment. If there are hundreds or thousands of concurrent users then it is likely that the pooling defaults will need to be adjusted to ensure the application performance is finely tuned and adaptable. See the Test Settings - Platform Optimisation Details section for more details.