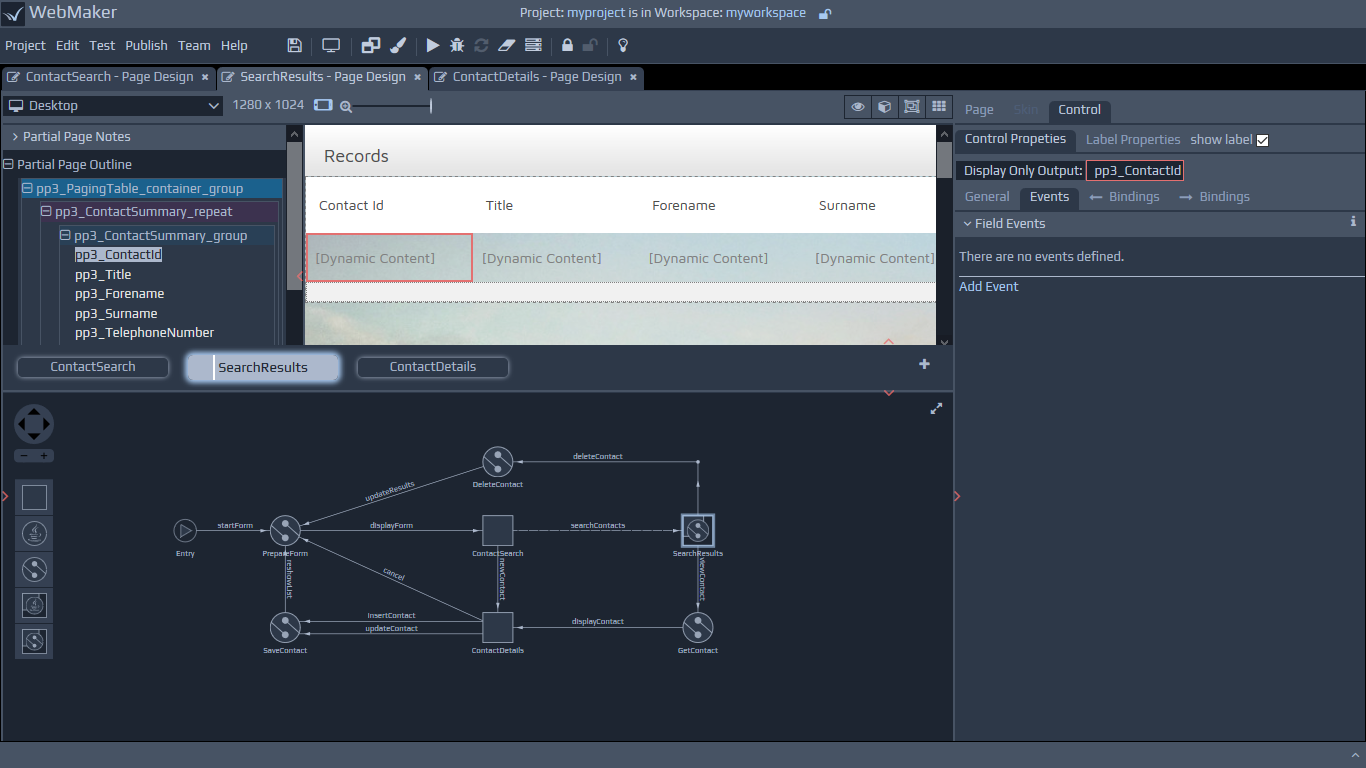
 The Application Map diagram can be shown on any Page Design tab by expanding up the panel below the page thumbnails (click the red arrow). Alternatively, you can use the Preferences dialogue to set the diagram to be visible by default.
With the Application Map diagram open you can access the controller details tab either by double clicking on a controller, or by using the right-click context menu options. Alternatively there are links in appropriate places within the Bindings and Events tabs that also provide access to the Controller Details tabs.
WebMaker enables you to create different server controller types. Each controller type uses a different icon on the Application Map to enable easier identification. If your licence allows, you can adjust the type of a specific Controller by using the Implementation Type options on the right-click context menu.
The Application Map diagram can be shown on any Page Design tab by expanding up the panel below the page thumbnails (click the red arrow). Alternatively, you can use the Preferences dialogue to set the diagram to be visible by default.
With the Application Map diagram open you can access the controller details tab either by double clicking on a controller, or by using the right-click context menu options. Alternatively there are links in appropriate places within the Bindings and Events tabs that also provide access to the Controller Details tabs.
WebMaker enables you to create different server controller types. Each controller type uses a different icon on the Application Map to enable easier identification. If your licence allows, you can adjust the type of a specific Controller by using the Implementation Type options on the right-click context menu.
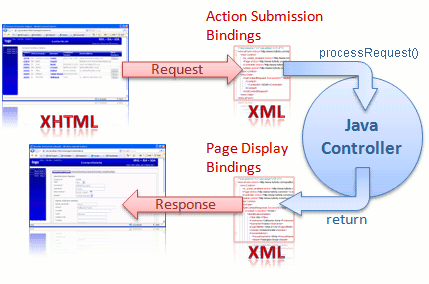 WebMaker provides the ability to bind the data within a web page in two directions. When information is submitted from the browser, an arbitrary XML document structure can be populated with the information contained within the submitted XHTML form. When a page is sent to the browser, another arbitrary XML document structure on the server can be used to bind XML fields to HTML fields on the web page. This bi-directional binding can be performed graphically within the WebMaker Page Design - Bindings tabs. Controllers on the server handle the requests and also compose the response structures that are then transformed by WebMaker to produce the HTML response to the Browser.
Java Controllers provide the ability to write Java code to perform the desired tasks on the server. What you do here is dependent on your application scenario, technology standards and architecture.
The Java controller class must implement the JavaController interface. This interface defines a processRequest method which should be used to perform all the required processing. The general aim of this method should be to manipulate the incoming data so that it matches the format expected by the next screen.
The incoming information submitted from the screen is made available to the Java controller through the RequestData object passed as a parameter to the processRequest method.
The information between the client and server is bound for you. Therefore, by the time you receive the information it will be in the structured 'eForm' format that you see within the studio. By default, WebMaker deals with the data in XML format. An example incoming message might therefore look like:
WebMaker provides the ability to bind the data within a web page in two directions. When information is submitted from the browser, an arbitrary XML document structure can be populated with the information contained within the submitted XHTML form. When a page is sent to the browser, another arbitrary XML document structure on the server can be used to bind XML fields to HTML fields on the web page. This bi-directional binding can be performed graphically within the WebMaker Page Design - Bindings tabs. Controllers on the server handle the requests and also compose the response structures that are then transformed by WebMaker to produce the HTML response to the Browser.
Java Controllers provide the ability to write Java code to perform the desired tasks on the server. What you do here is dependent on your application scenario, technology standards and architecture.
The Java controller class must implement the JavaController interface. This interface defines a processRequest method which should be used to perform all the required processing. The general aim of this method should be to manipulate the incoming data so that it matches the format expected by the next screen.
The incoming information submitted from the screen is made available to the Java controller through the RequestData object passed as a parameter to the processRequest method.
The information between the client and server is bound for you. Therefore, by the time you receive the information it will be in the structured 'eForm' format that you see within the studio. By default, WebMaker deals with the data in XML format. An example incoming message might therefore look like:
<?xml version="1.0" encoding="UTF-8"?>
<mvc:eForm xmlns="http://www.hyfinity.com/xplatform" xmlns:mvc="http://www.hyfinity.com/mvc" xmlns:xg="http://www.hyfinity.com/xgate">
    <mvc:Control>
        <Page xmlns="http://www.hyfinity.com/mvc">ContactDetails.xsl</Page>
        <Controller xmlns="http://www.hyfinity.com/mvc">mvc-Contacts-JGetContactsList-Controller</Controller>
        <action xmlns="http://www.hyfinity.com/mvc">getJContactDetails</action>
        <unbound_param xmlns="http://www.hyfinity.com/mvc">value</unbound_param>
    </mvc:Control>
    <mvc:Data>
        <mvc:formData>
            <mvc:forename></mvc:forename>
            <mvc:surname></mvc:surname>
        </mvc:formData>
        <GetContactRequest Successful="" Version="" xmlns="http://www.hyfinity.com/schemas/tutorial" xmlns:demo="http://www.hyfinity.com/schemas">
            <Contact>
                <ContactId>10346</ContactId>
            </Contact>
        </GetContactRequest>
    </mvc:Data>
</mvc:eForm>
The final response data after the controller has completed processing should be in this same format, and this complete document is transformed to produce the response pages, as defined within WebMaker. Please remember that any submitted elements that failed to bind will be placed under the Control/unbound_param element.
Let's now return to an example Java Controller generated by WebMaker:
package com.example.jcontrollers;

import com.hyfinity.java.JavaController;
import com.hyfinity.java.RequestData;
import com.hyfinity.utils.RequestIdentification;
import com.hyfinity.xagent.XAgentCallback;

public class Controller_1 implements JavaController
{

    /**
     * Perform any initialisation required for the Java Controller.
     * @param acb Callback interface to access platform services.  Will be null if the full platform is not available.
     */
    public void init(XAgentCallback acb)
    {

    }

    /**
     * Main processing method.
     * @param rd This provides all the data for this request.  This should be updated in place as required.
     *           See the RequestDetail docs for details.
     * @param requestId details the session Id and request ID values for the current request.
     */
    public void processRequest(RequestData rd, RequestIdentification requestId)
    {

        rd.setPageName("MainForm");


    }

    /**
     * Used to handle any shutdown requirements.
     */
    public void shutdown()
    {

    }

}
}
Within each Java Controller, it is the processRequest method that needs to be implemented to perform the required functionality.
The rd incoming parameter is the RequestData object providing access to the incoming data. The infomation this contains should be updated accordingly during the processing of the processRequest method.
XDocument data = rd.getAsXML();
data.addNamespace("mvc", "http://www.hyfinity.com/mvc");
String forename = data.selectString("/mvc:eForm/mvc:Data/mvc:formData/mvc:forename");
String surname = data.selectString("/mvc:eForm/mvc:Data/mvc:formData/mvc:surname");

Element fullNameElem = data.getDocument().createElementNS("http://www.hyfinity.com/mvc", "fullName");
com.hyfinity.utils.xml.DOMUtils.setText(fullNameElem, forename + " " + surname);

data.selectSingleNode("/mvc:eForm/mvc:Data/mvc:formData").appendChild(fullNameElem);
JSON Approach
JSONObject data = rd.getAsJSON();

JSONObject fd = (JSONObject) new JSONPointer("/eForm/Data/formData").queryFrom(data);
fd.put("fullName", fd.get("forename") + " " + fd.get("surname"));
Note: Even when using the JSON data format within your Java controller, WebMaker will convert this back to XML data internally in order to perform the transformation that renders the next screen. In certain scenarios, this transformation process may alter the ordering of child elements from the original XML data. If this occurrs, it is unlikely to cause any issues, but you can always fall back to the getAsXML approach instead.
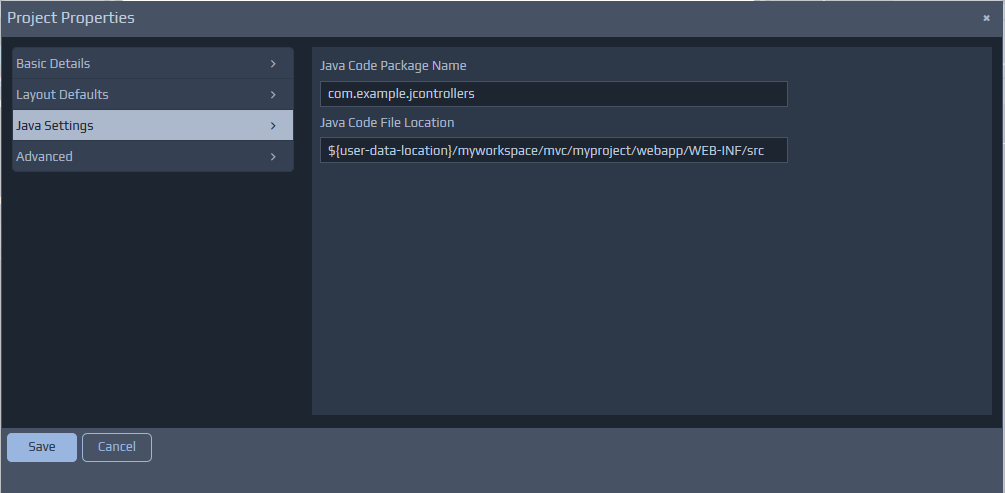
{webapps_location}is the web application deployment area of the Web server, the XML deployment descriptor of a
{myapp}application can be found under
{webapps_location}/{myapp}/WEB-INF/web.xml. An example web.xml file is shown below:
<?xml version="1.0" encoding="ISO-8859-1"?>
<!DOCTYPE web-app PUBLIC "-//Sun Microsystems, Inc.//DTD Web Application 2.3//EN"
    "http://java.sun.com/dtd/web-app_2_3.dtd">
<web-app>
    <servlet>
        <servlet-name>xgate</servlet-name>
        <servlet-class>com.hyfinity.xgate.HTTP2Java</servlet-class>
        <init-param>
            <param-name>morphyc</param-name>
            <!-- Sets the Morphyc configuration file to use for this application -->
            <param-value>c:/jprogramfiles/hyfinity/runtime/morphyc/helloworld_morphyc.xml</param-value>
        </init-param>
        <load-on-startup>10</load-on-startup>
    </servlet>
    <servlet-mapping>
        <servlet-name>xgate</servlet-name>
        <!-- Set all incoming requests to be handled by XGate.
             For an MVC application the mapping would be '*.do' to not pick up CSS, image, etc requests-->
        <url-pattern>/*</url-pattern>
    </servlet-mapping>
    <session-config>
        <session-timeout>30</session-timeout>
    </session-config>
</web-app>
XGate also accepts a second configuration file stored in {webapps_location}/{myapp}/doc/xgate.xml. If this file is not present, a version will be generated the first time a Run Test or Publish operation is performed. If defined, this file can be accessed via the Include Local File options on the Files tab of Page Design, and then navigating to the relevant location. An example of this configuration file is below.
<?xml version="1.0" encoding="UTF-8"?>
<xgate xmlns:xg="http://www.hyfinity.com/xgate" xmlns:xfact="http://www.hyfinity.com/xfactory">
    <product>mvc</product>
    <plug-ins>
        <!--Turn on SXForms processing for binding HTTP Parameters into XML structure -->
        <sxforms mark_unbound="true" delete_bound="true">true</sxforms>
        <!--Ensure HTML output is returned to the browser -->
        <ensure_html_response>true</ensure_html_response>
        <!--Output the HTML 5 Doctype-->
        <output_doctype doctype_system="" doctype_public="">true</output_doctype>
        <!-- disable pre processing of soap requests.
             If this is enabled, then a transform can be applied to incoming SOAP requests to format them for
             processing as standard HTML parameter based requests.-->
        <soap_preprocessing>false</soap_preprocessing>
        <!-- If true, automatically set the Language control field based on the user's locale -->
        <set_locale>false</set_locale>
        <!-- If set to true, this enables the cookie handling functionality -->
        <process_cookies>false</process_cookies>
        <!-- Enables file upload support for this application. The two attributes are optional, and not provided by default.-->
        <file_upload upload_dir="c:\temp\uploads" plugin_class="com.example.MyFileUploadPlugin">true</file_upload>

        <!-- Define any custom plug-ins required -->
        <custom_plugins>
            <custom_plugin name="My Plug-in" runtime_instance="com.test.MyPlugin" priority="10"/>
        </custom_plugins>
    </plug-ins>
</xgate>
This file provides control over a number of in-built features and the ability to define your own custom plug-ins. These plug-ins reside between the browser and server and allow interception and inspection of the data received from the browser, and the response being sent back to the browser. For example, a plug-in could be used to enforce custom security checks before allowing access to the controllers. See the next section for more details on writing custom plug-ins.
Both of these configuration files are automatically set up when applications are published from the WebMaker Studio. You can change these files and place copies within the relevant locations under the webappdirectory for your project in the repository. This ensures your changed files will be reused for future test and publish operations. XGate also makes use of other configuration files that are located within the doc directory within particular webapp structures, but these files should be managed automatically by the WebMaker Studio. You can learn more about XGate plug-ins on the WebMaker Forum. Search for "xgate".
<eForm xmlns="http://www.hyfinity.com/mvc">
    <Control>
        ...
        <Cookies>
            <Cookie name="JSESSIONID" value="61EF3E000F8A491327BA7DEE7258FE66"/>
            <Cookie name="mycookie" value="cookievalue"/>
        </Cookies>
        ...
Secondly, before returning the response to the client, any changes to ths Cookies fragment will be detected and processed. If the value attribute for a cookie has been updated, this new value will be sent to the browser. If a Cookie element is removed completely, then the cookie will also be removed from the browser. If a new Cookie element is inserted into this Control fragment, then the browser will be sent the new cookie.
When creating a new cookie, there are a number of extra attributes that can be used if required to further configure the new cookie:
<Cookie name="NewCookie" value="123" comment="cookie comment" domain="mydomain.com" path="/myapp" maxAge="1800" secure="true" httpOnly="true" xmlns="http://www.hyfinity.com/mvc" />
processInputand
processOutput. The first will be called on each incoming request to give you the option to manipulate the request before it is passed to server controllers for processing, whereas the second will be called with the response received from server controllers (usually HTML content) to perform any final manipulation before the response is returned to the browser. You can define as many custom plug-ins as you need by listing each one as a custom_plugin element in the xgate.xml file as shown below.
<xgate>
...
<plug-ins>
    ...
    <custom_plugins>
        <custom_plugin name="my plug-in" priority="10" runtime_instance="com.company.MyPlugin"/>
        <custom_plugin name="custom plug-in 2" priority="70" runtime_instance="com.company.MyPlugin2"/>
    </custom_plugins>
</plug-ins>
</xgate>
The name attribute provides a friendly name for the plug-in that is output to the Debugger logs, the runtime_instance attribute provides the classname for your plug-in, and the priority configures the order in which the plug-ins will execute. Plug-ins with a lower priority number will be called first. All the in-built plug-ins that handle the data binding process, etc., have a fixed priority of 50. Therefore, if you add your custom plug-in with a priority less that this, the message it receives will generally be a flat list of parameters sent from the browser, whereas if you use a priority value over 50, the message will look like the structured XML you see in the various binding screens.
If you need to return non-HTML content (e.g. to return a PDF file), you can do this from the processOutputmethod. You need to output your content to the response object directly, and then set the output document to null (output.setDocument(null)) to prevent XGate from attempting to return the normal content. Once you have written your plug-in you will need to ensure it is compiled successfully and available to your deployed/published application. One way to do this is to place your compiled classes/jar within the WEB-INF directory under the webapp directory for your project in the repository. All the jars needed to compile your code can be found in the <install_dir>/design/tomcat-design/common/lib directory. When you are trying to debug custom plug-ins, it is useful to switch the logging level to debug via the Test Settings menu option. You will then be able use the Debugger to see the state of the message before and after calling each plug-in. This is normally suppressed for applications during development. Details on Previewing and Exporting pages were covered earlier. In this section we will provide additional details on the features that are available for testing and publishing your applications.
 When testing your projects in this way, you can use the Debugger to obtain more information about your running application.
Once you are happy that the project is working correctly, the Publish functionality can be used to package your application for installation on production environments.
You can locate more comprehensive information on testing, publishing, debugging, configuring and monitoring your applications within different server environments, later in this documentation.
When testing your projects in this way, you can use the Debugger to obtain more information about your running application.
Once you are happy that the project is working correctly, the Publish functionality can be used to package your application for installation on production environments.
You can locate more comprehensive information on testing, publishing, debugging, configuring and monitoring your applications within different server environments, later in this documentation.
Partial Page Container. You will also notice a Source Type option. This allows you to submit a part of the full page as the request data, or the full page if this is more appropriate depending on the data required by the Partial Page.
{RemoteControllerName_Proxy}and click on the Clone Pattern button. This will display a further screen that allows you to select the Base Pattern to be used - In this case the
Remote_Service_Proxy.xmlfile. Finally, click on the Clone Pattern button to create the Controller. Once this is done, open the Test Settings and select the Agent Types menu option. Click on the Agent Id for the Controller just created, and then change its Agent Type to the
Inter Project Proxyoption and enter the Target Agent Id as the full Agent Id of the Controller in the target project. This will appear something like
mvc-{project}-{pattern}-{agent}. Note: This value can be seen in the Debugger logs of the 'target' project. Finally, Click on the Change Agent Type to commit the change.
Web Service Proxyusing the
http serviceoption, and the target controller should be deployed as a
Web Service. This will allow you to treat the proxy controller as if it was the Agent in the target project and call it directly, even though in reality it is deployed to a separate machine and will be accessed via HTTP.
Pagecontrol field in the bindings message structure. But when you want to render a page in a second project it is a bit more complicated. To do this, you will need to create an inter-project proxy to the 'view' controller of the 'target' project. Then, when you need to render the page from the second project, you need to adjust the Page control value, and then call this view proxy to tell the target project to render the correct page. It is important to note however that when this is done, the HTML information returned from the target 'view' controller will still flow back through the controller in the 'controller' and 'view' layers of the current project before being returned to the browser. The rules within the local controller may need to be adjusted to alter the data structure if required.
en-GBtranslation file is not available, then WebMaker will seek to process file
en). If no translation files are present at all, then WebMaker will use the original language used during development. To use translations, the first step is to create a web application based on one of the languages you need to support. This should ideally be the most commonly used language. Then add language and locale specific XML translation files for each language. You can apply translations to elements, including labels, captions, tool-tips, drop-down list options, etc. The translation files, which we also refer to as dictionary files, are written in XML. An example is shown in the listing below:
<translations xmlns="http://www.hyfinity.com/translate" language_code="en" direction="ltr">
	<global>
		<translation_item id="username" action="replace">
		    <part type="label" value="translated username label"/>
		</translation_item>
	</global>
	<page id="NewForm">
		<translation_item id="title" action="replace">
			 <part type="label" value="translated title label"/>
			 <part type="field_tip" value="Translated field tip"/>
			 <part type="custom_attribute" data_value="currency" value="EUR" />
		</translation_item>
		<translation_item id="submit_button" action="replace">
			<part type="caption" value="translated caption"/>
		</translation_item>
		<translation_item id="output_field" action="replace">
			<part type="caption" value="translated output value"/>
		</translation_item>
		<translation_item id="radio_1" action="replace" >
		    <part type="label" value="This is a question?" />
			<part type="select_option" data_value="Y" value="Yes" />
			<part type="select_option" data_value="N" value="No" />
		</translation_item>
		<translation_item id="select_box" action="replace">
			<part type="select_option" dynamic_value="Value1" value="Translated Value1"/>
			<part type="select_option" dynamic_value="Value2" value="Translated Value2"/>
		</translation_item>
		<translation_item id="date_2" action="replace">
			<part type="date_format" dynamic_value="MM/dd/yyyy" value="dd-MM-yyyy" />
		</translation_item>
		<translation_item id="tab_control" action="replace">
			<part type="select_option" data_value="tab1" value="Translated Tab 1" />
			<part type="select_option" data_value="tab2" value="Translated Tab 2" />
		</translation_item>
		<translation_item id="show_hide_details" action="replace">
			<part type="caption" value="translated Section Details"/>
			<part type="custom_attribute" data_value="showLabel" value="translated Show"/>
			<part type="custom_attribute" data_value="hideLabel" value="translated Hide"/>
		</translation_item>
		<translation_item id="accordion_pane2" action="replace">
			<part type="custom_attribute" data_value="title" value="translated Pane 2" />
		</translation_item>
		<translation_item id="paragraph_1" action="replace">
			<part type="paragraph">
		        <p>Replacing some paragraph text including HTML embedded content.</p>
		    </part>
		</translation_item>
	</page>
</translations>
The root element of the translations file is translations, which has two attributes, the language_code and the direction. The direction attribute can be ltr (Left-To-Right) or rtl (Right-To-Left). The default is ltr and rtl is used for languages such as Arabic. The global section defines translations to be used throughout the application, applicable to all pages. This is followed by a number of page sections, one for each page that contains elements requiring translations. Each translatable field is identified by a translation_item element, whose id attribute must match the field or group name as defined in the WebMaker Studio. For each field, a number of options can be translated if required, by specifying part tags. As shown in the example above, the type attribute indicates what kind of string is being translated (the field's label for example) and the value attribute contains the translated string to use. To translate a set of radio buttons or select box options, set the type attribute to select_option and the data_value attribute to identify the data value the translation applies to. You can then specify your translation for this part in the value attribute. For example:
For English:
 <part type="select_option" data_value="G" value="Green"/>
 <part type="select_option" data_value="B" value="Blue"/>

For Russian:
 <part type="select_option" data_value="G" value="зеленый"/>
 <part type="select_option" data_value="B" value="синий"/>
You need to create one dictionary file for each language you wish to support in your application. The files need to be named in the format dictionary_[language code].xml. For example, to support English, French and Spanish, you would need the following three dictionary files: dictionary_en.xml, dictionary_fr.xml, and dictionary_es.xml. If you are using locale values then the filenames would be dictionary_[language code]-[locale].xml. For example, English-British would be: dictionary_en-GB.xml Table : List of items that can be translated, where you can locate them in the WebMaker Studio, and the XML definitions that should be used.
| Control Attributes on the Properties Panel | Part Type | Translation Details |
| Label | label | <part type="label" value="translated title label"/> |
| Data Constraints - Options(Enumerations). Applies to Radio, MultiCheckbox, Select Box (DropDown List) | select_option |
<part type="select_option" data_value="Y" value="Yes" />
Note: You need one part for each option that needs to be translated. You can use either the data_value or dynamic_value attribute as appropriate to indicate which entry to translate. If data_value is used this will be compared to the underlying value in the data, whereas dynamic_value will be compared to the string that would otherwise be displayed. These map to the DataValue and Display Text options shown on the General Properties tab for the control. |
| Accessibility Options - Field Tip (Generally applicable for almost all Controls) | field_tip | <part type="field_tip" value="Translated field tip"/> |
| Custom Attributes (Generally applicable for almost all Controls) | custom_attribute |
<part type="custom_attribute" data_value="title" value="translated Pane 2" />
Note: The data_value is the name of the custom_attribute. There can be multiple custom_attributes. |
| Button and Anchor Controls - Caption | caption | <part type="caption" value="translated submit button"/> |
| Display Only Control | caption |
<part type="caption" value="translated output value"/>
If your output field can display a dynamic set of values (e.g. status values), then add the dynamic_value attribute. E.g. <part type="caption" dynamic_value="Active" value="Active Translation"/> <part type="caption" dynamic_value="Complete" value="Complete Translation"/> |
| Currency Amount | custom_attribute | <part type="custom_attribute" data_value="currency" value="EUR" /> |
| Value Conversions - Dates - Display format | date_format |
<part type="date_format" dynamic_value="MM/dd/yyyy" value="dd-MMyyyy" />
Note: The dynamic_value relates to the base forms Display Date format. The value is the required format for the language. |
| Tabs - Tab control field | select_option |
<part type="select_option" data_value="tab2" value="Translated Tab 2" />
Notes: Tabs use the Data Constraints for the definition of the Tab names. |
| Accordion - Bar titles defined as a custom attribute | custom_attribute | <part type="custom_attribute" data_value="title" value="translated Pane 2" /> |
| Collapsible Section - toggle button | caption custom_attribute | <translation_item action="replace" id="show_hide_details"> <part type="caption" value="translated Section Details"/> <part type="custom_attribute" data_value="showLabel" value="translated Show"/> <part type="custom_attribute" data_value="hideLabel" value="translated Hide"/> </translation_item> |
| Paragraph | paragraph |
<part type="paragraph"><p>Replacing some paragraph text including HTML embedded content.</p></part>
Note: The paragraph contains the HTML content of the rich text paragraph editor. |
| Repeats, e.g. Tables | repeat_no_data | <part type="repeat_no_data" value="translated No data available for display"/> |
| Display Variables with default values | display_variables | <translation_item action="replace" id="display_variables"> <part type="var1" value="translated Display Variable value"/> <part type="var2" value="translated Display Variable value"/> </translation_item> |
| Error Message Override | error_message | <part type="error_message" value="translated Error Display message"/> |
| Default Error Messages | default_error_messages |
<translation_item action="replace" id="default_error_messages">
<part type="1" value="translated Invalid Type"/>
<part type="2" value="translated This Field Is Required"/>
<part type="3" value="translated Missing number"/>
</translation_item>
See validationError.js for a complete listing of type values. |
| Placeholder Text | placeholder | <part type="placeholder" value="translated Placeholder Text"/> |
| Hints | hint |
<part type="hint" value="translated Hint Text"></part>
<part type="hint"><b>Replacing some hint text including HTML embedded content.</b></part>
Note: The second part in the above example allows for HTML content rather than just static translated text. |
| Menu Controls | select_option hint |
Use select_option part types to translate the displayed text for each menu item, in the same way as for select box/radio button controls. This will work for static menu options configured on the General Properties tab, as well as for more complex mult level menus created using the dynamic option.
In addition, you can add matching hint type part entries to translate any hint messages provided through the dynamic menu configuration structure. <translation_item id="menu" action="replace"> <part type="select_option" data_value="about" value="Translated About"/> <part type="select_option" dynamic_value="Products" value="Translated Products"/> <part type="hint" data_value="about" value="Translated About Hint Message"/> <part type="hint" dynamic_value="Products" value="Translated Products Hint Message"/> </translation_item> |
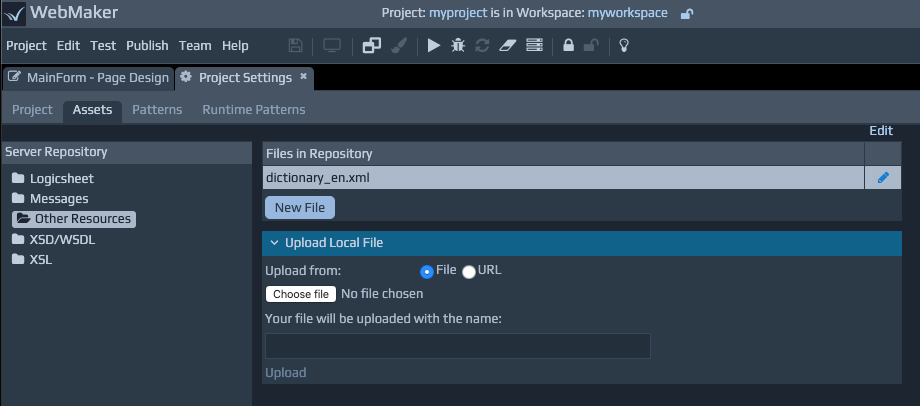 5. Once you have uploaded your files to the repository, you need to let the WebMaker Page Painter know that these files need to be used during runtime execution to translate your pages. To do this:
6. Click the views link within Runtime Patterns.
7. Now click the view link in the views list.
8. Select the View Node Details radio option for Double Click Action and then double-click on the Page_Painter view icon.
5. Once you have uploaded your files to the repository, you need to let the WebMaker Page Painter know that these files need to be used during runtime execution to translate your pages. To do this:
6. Click the views link within Runtime Patterns.
7. Now click the view link in the views list.
8. Select the View Node Details radio option for Double Click Action and then double-click on the Page_Painter view icon.
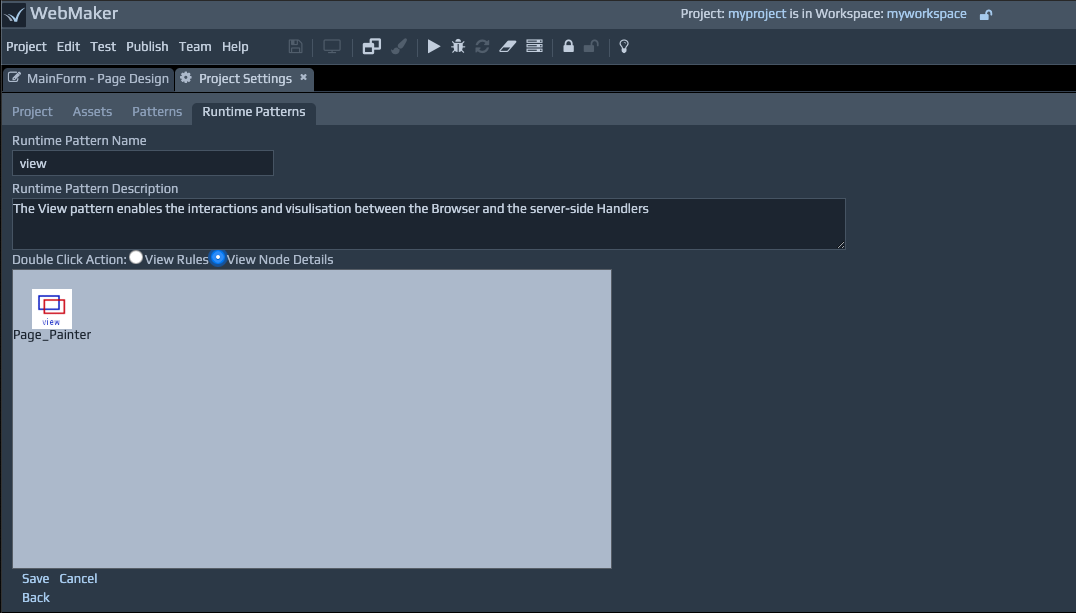 Now click the View Engine & Resource Details link. You should see a screen as shown below.
9. Select the Other Resources of your project from the Available Resource Categories list under the Resource Details section.
Now click the View Engine & Resource Details link. You should see a screen as shown below.
9. Select the Other Resources of your project from the Available Resource Categories list under the Resource Details section.
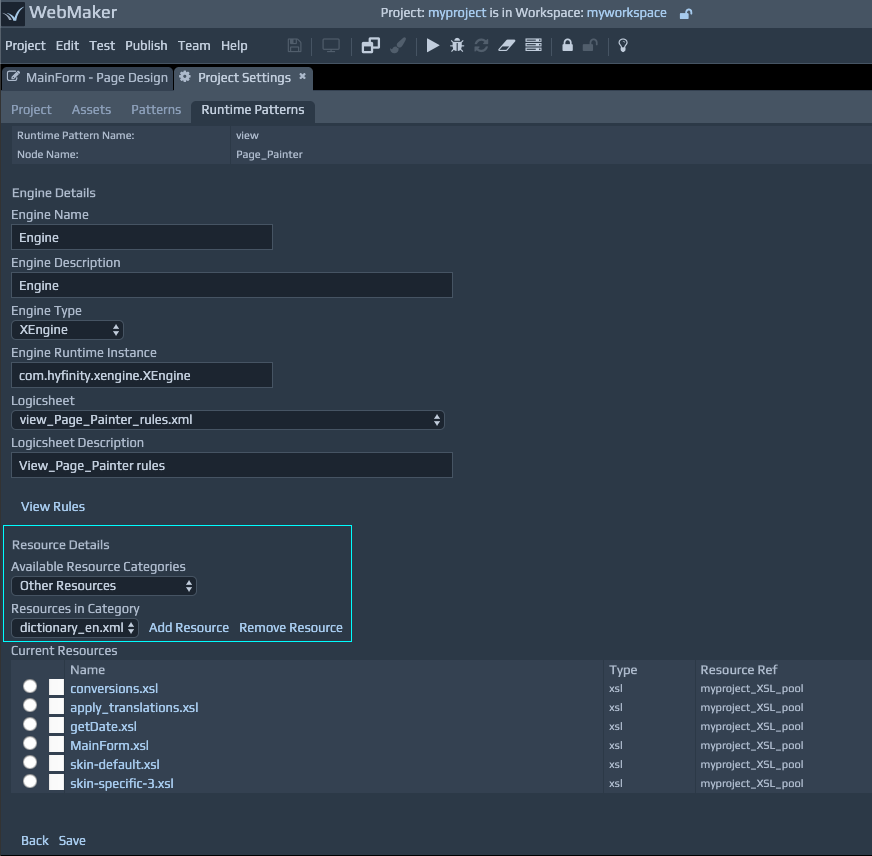 10. You should now be able to include your translation files from the Resources in Category dropdown. You should be able to select and add each of your files using the Add Resource button. As you add each file, they should appear under the Current Resources section.
11. When you have finished adding all your files, you can click Save.
You can test your translations using a parameterised approach (http://localhost:7080/Example/start.do?Language=en). You can also configure your application to automatically recognise the user's locale setting.
To enable the automatic option, you need to ensure the set_locale element is set to true in the xgate.xml configuration file. If you do not yet have this file in your project repository, then create a new
directory called doc under the existing webapp folder for your project, (e.g. [Install Location]/users/user[number]/[workspace]]/mvc/[project]]/webapp). You can now copy
the default xgate.xml file from the deployed project location (e.g. [Install Location]\runtime\tomcat-runtime\webapps\[project]\doc\xgate.xml) into this new directory. Copying this file to your repository makes sure that any changes you make to the file will be used for all future deploy and publish
operations.
You can verify your translations setup by using the Debugger. Simply check the Language
value in the Control block of the messages.
10. You should now be able to include your translation files from the Resources in Category dropdown. You should be able to select and add each of your files using the Add Resource button. As you add each file, they should appear under the Current Resources section.
11. When you have finished adding all your files, you can click Save.
You can test your translations using a parameterised approach (http://localhost:7080/Example/start.do?Language=en). You can also configure your application to automatically recognise the user's locale setting.
To enable the automatic option, you need to ensure the set_locale element is set to true in the xgate.xml configuration file. If you do not yet have this file in your project repository, then create a new
directory called doc under the existing webapp folder for your project, (e.g. [Install Location]/users/user[number]/[workspace]]/mvc/[project]]/webapp). You can now copy
the default xgate.xml file from the deployed project location (e.g. [Install Location]\runtime\tomcat-runtime\webapps\[project]\doc\xgate.xml) into this new directory. Copying this file to your repository makes sure that any changes you make to the file will be used for all future deploy and publish
operations.
You can verify your translations setup by using the Debugger. Simply check the Language
value in the Control block of the messages.