Setting up a Rest Service Proxy
The first step is to setup a proxy controller for the remote Rest Service.
In order to achieve this, an 'empty' (no rules processing) Proxy controller needs to be setup. This can be achieved by opening the Project Settings tab and clicking on the Runtime Patterns tab. Typically, click on the Model layer to set-up a Remote Proxy Controller that will be mapped to the physical Rest Service. Type in the New Filename for the reference to the controller you want to call, e.g. {RemoteControllerName_Rest_Proxy}and click on the Clone Pattern button. This will display another screen that enables the selection of the Base Pattern to be used - In this case the
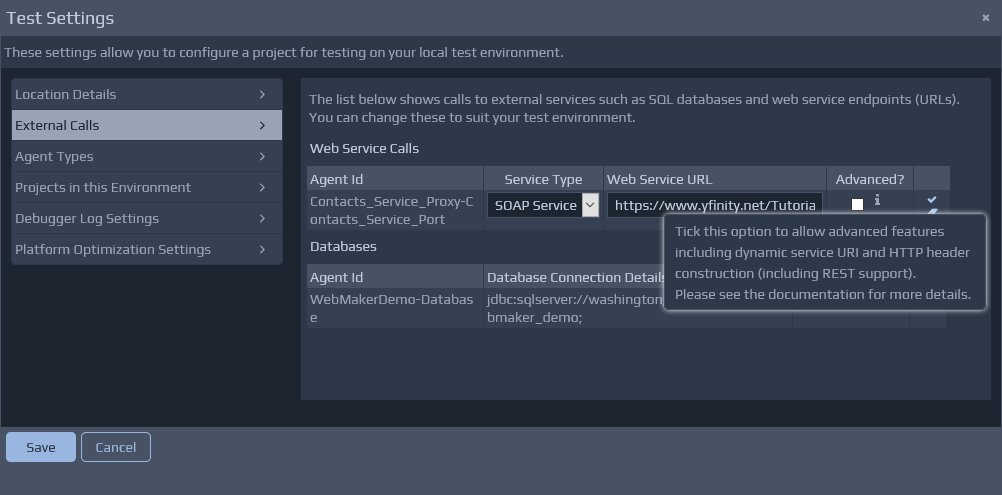
Remote_Service_Proxy.xmlfile. Finally, click on the Clone Pattern button to create the controller. Once this is done, open the Test Settings and select the Agent Types menu option. Click on the Agent Id for the controller just created, and then change its Agent Type to
Web Service Proxy. The Service Type field should be correctly defaulted to
HTTP Service. Enter the Web Service URI as the full URL for the Rest Service. Ensure you tick the Allow Advanced Features option if you need to dynamically alter the URL for the Rest Service at runtime, or need to pass dynamic
Parametersto the service. Then click on the Change Agent Type to commit the changes. Finally, this proxy controller, in the model layer, can then be configured for invocation from other controllers using an Invoke Service action. This proxy controller acts as a gateway to the actual Rest Service. This means that the URL (or at least the static part of the URL) can be amended in the External Calls section within the Publish Settings for different publication targets.
Setting up Dynamic Rest Service Calls
 An HttpHeader fragment can be used to dynamically set http header attributes and direct payloads to dynamically constructed URLs. The HttpHeader fragment will typically be created in a controller within the Access Service or Controller layers, calling a proxy to a remote URI. This fragment should be included in the request payload to be sent for the External Call.
If the Advanced? option is ticked then WebMaker will search for the HttpHeader fragment in the FactBase and parse it to create a URI dynamically, set the http attributes before sending the payload. After processing, the HttpHeader fragment is removed from the message before the payload is sent.
The following example XML fragment can be placed within the payload to change the default behaviour:
An HttpHeader fragment can be used to dynamically set http header attributes and direct payloads to dynamically constructed URLs. The HttpHeader fragment will typically be created in a controller within the Access Service or Controller layers, calling a proxy to a remote URI. This fragment should be included in the request payload to be sent for the External Call.
If the Advanced? option is ticked then WebMaker will search for the HttpHeader fragment in the FactBase and parse it to create a URI dynamically, set the http attributes before sending the payload. After processing, the HttpHeader fragment is removed from the message before the payload is sent.
The following example XML fragment can be placed within the payload to change the default behaviour:
<xg:HttpHeader xmlns="http://www.hyfinity.com/xgate" xmlns:xg="http://www.hyfinity.com/xgate">
    <xg:url action="" merge_option="replace" request_method="GET">http://anyValidUrlString</xg:url>
    <xg:params>
        <xg:param name="command">login</xg:param>
        <xg:param name="error_dest">client</xg:param>
    </xg:params>
    <xg:attributes>
        <xg:attribute name="HTTPHeaderAttrib1">attribute value</xg:attribute>
        <xg:attribute name="HTTPHeaderAttrib2">attribute Value</xg:attribute>
    </xg:attributes>
</xg:HttpHeader>
URL attributes
@action - If a non-empty string value is specified then this overrides the static action specified by default in the Invoke Service rule configuration. If an empty string value is specified then this still overrides the static action that is specified during deployment and sets the action header attribute with an empty string. If this attribute is missing then the static action value will not be overridden. If you do not want an action HTTP Header to be set at all, then set this attribute to the value NONE.
@merge_option - options are
The params will be appended to the URL in replaceor
append. When set to
replacethe static url specified during web service set-up will be replaced by the URL constructed using this HttpHeader fragment above. If the
appendoption is specified then the static url supplied will be extended with the dynamic url constructed using this HttpHeader fragment definition. @request_method - The HTTP request method to fire. This can be one of the strings
GET,
POST,
PUTor
DELETE. If a value is not supplied or an empty string is supplied then the default will be
POST.
name=valuepairs separated by "&" after a "?" has been inserted between the URL and the params. e.g. http://anyValidUrlString?command=login&error_dest=client The attributes will be set in the request http header before a request is made to the URL. The name attribute indicates the name of the http header attribute and the value is the value to be set for this header attribute.
Dealing with JSON Data
If your service deals with JSON formatted data, then you can use additional rule actions to convert the JSON string to XML, and vice versa.
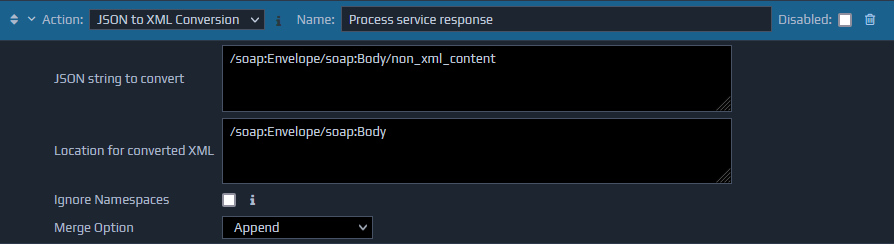
If your service returns a JSON response, then the JSON string will be available in your Controller rules within a non_xml_content element in the service response. To convert this into a structured XML format for easy binding to page fields you would use a JSON to XML Conversion action.
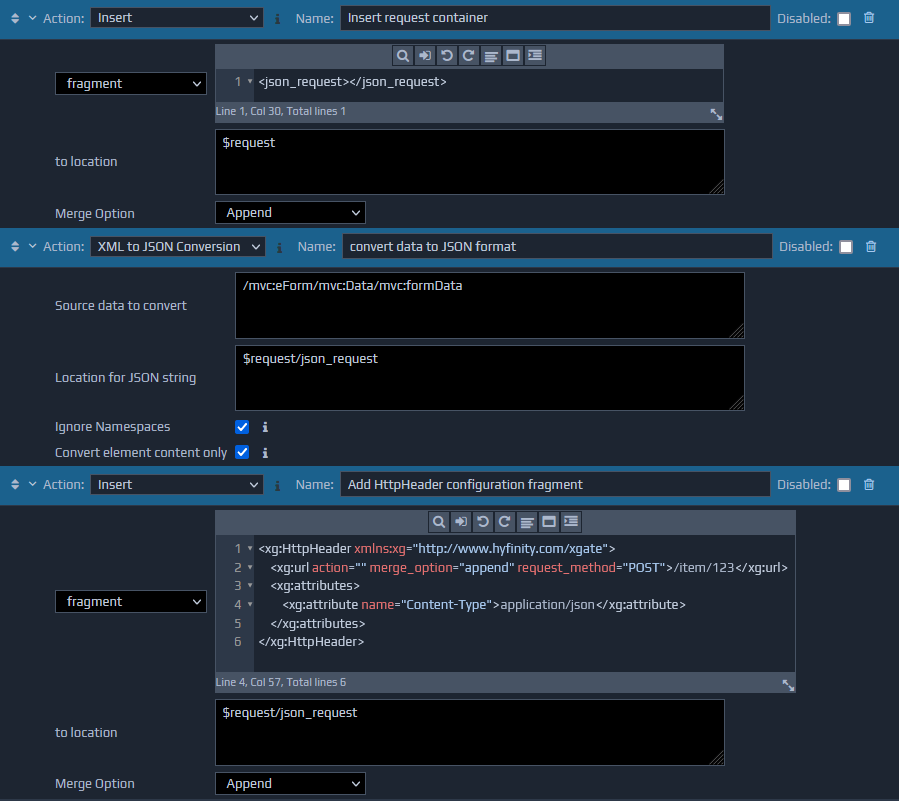
 If you are trying to post a JSON request to a service then you will need to configure the HTTPHeader as described above so that a
 Content-Typerequest header of
application/jsonwill be set. The XML data to be sent should be converted to JSON using an XML to JSON conversion action, and placed within a
json_requestelement. The HttpHeader fragment should also be placed within the json_request before this element is sent to the Rest Service Proxy.