Contents
The contents of this guid primarily apply to WebMaker Platform Edition, which includes everything in the Enterprise Edition and provides the additional benefits of XML Server Controllers. This Edition includes the Rules Designer and Runtime Platform, enabling you to natively map XML information flows between the front end and back end controllers. WebMaker Platform Edition enables you to create complete end-to-end enterprise applications, including leveraging of your existing databases and other common enterprise systems.
The WebMaker Platform provides a scalable environment for creating and hosting XML server controllers. XML controllers compliment the native XML data-binding capabilities for WebMaker applications and such controllers can be used to write native XML rules. Rules can be used for many purposes, including access to enterprise data stores, remote web services, business logic, etc. The WebMaker Studio contains features that can be used to create rules within the same graphical, drag-and-drop environment that is used for web page design and the Studio provides an integrated view of the overall application, from the client through to the server controllers and back again. The whole execution cycle can be visualised using the Debugger's tracing facilities.
The collection of rules within a controller is often referred to as a RuleBase. The data within each controller, processed by the RuleBase is often referred to as the FactBase. Once all rules within a controller have been executed the resulting information is returned to the calling process, whether that is another controller or the web browser.
Rules are based on an IF ... {condition} THEN ... {action} structure. Conditions are optional.
You can open Rules Design tabs from the Application Map diagram by double-clicking the relevant Controller icon, or by using its right-click context menu option. You can also use the links against Form Submission and Ajax Submission actions in the Events tab, to open the rules for target controllers. Another option is to use the View Rules...
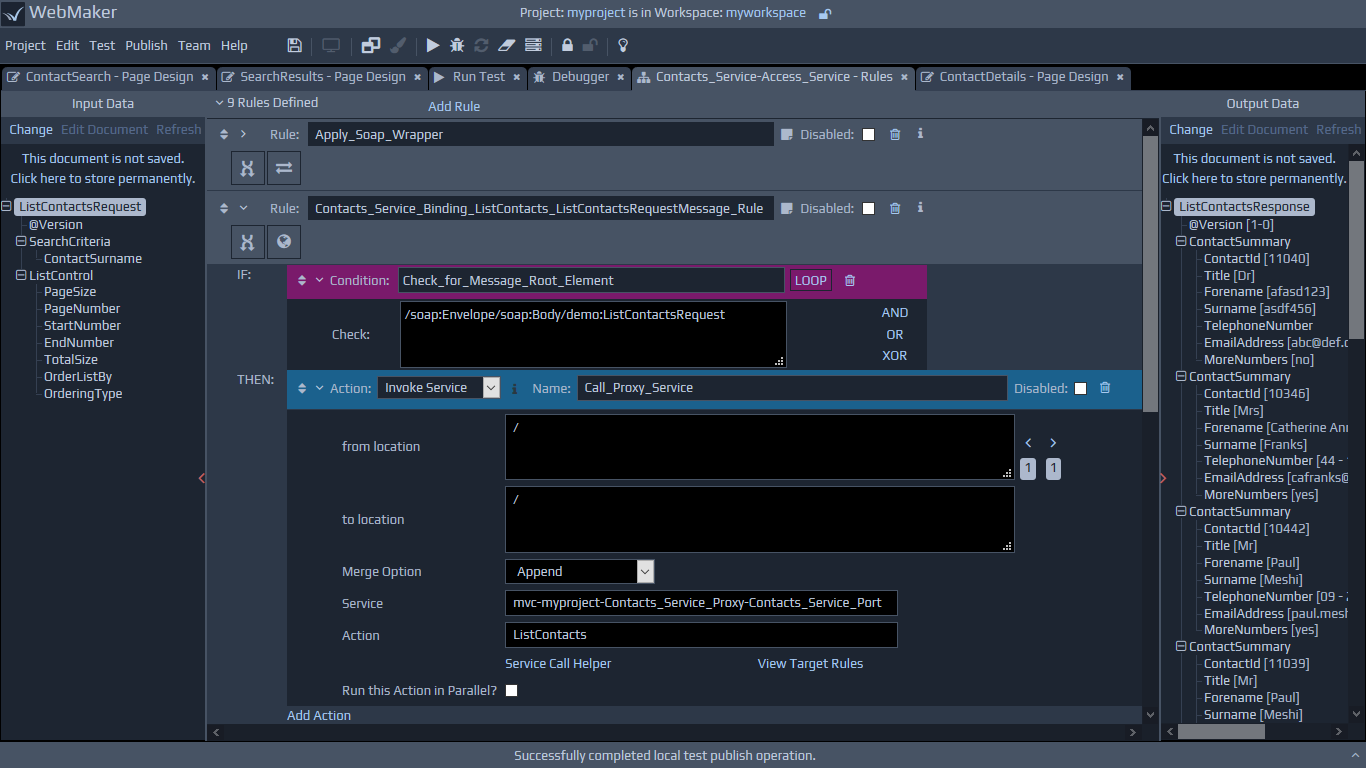
link from the Debugger tab, which will show the Rules with the actual incoming runtime data on the left, and the outgoing data on the right. This displays the actual data, processed by the rules as the application executes in design mode (Run Test menu option). The screen below illustrates an example of a log entry viewed within the Debugger, showing the data on the left before the rule was processed, and the resulting output data on the right, that is the required format after rule processing.
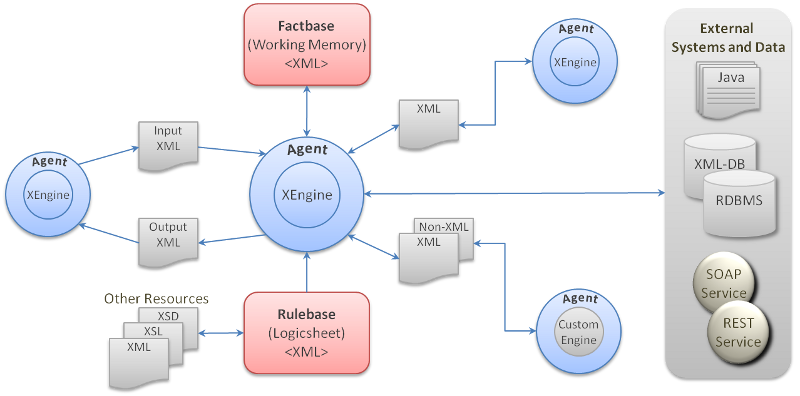
 The following image illustrates the various components of controllers that work together to receive data, execute the rules and also orchestrate with other controllers and system components to build complete applications.
Document Oriented Approach
Each controller uses an XML document for its working memory or data. The working memory is called the FactBase. This FactBase is constructed from the XML document initially passed to the controller and is retained in memory until rules processing is complete. It is then returned to the calling process or controller. The FactBase is updated as the rules are processed to reflect changes to the data. The FactBase can be altered by a range of available actions, including XSLT. The rendering of HTML pages is actually a transform of the XML data in the FactBase to HTML, before being sent to the Browser.
Normally, the structure of the FactBase will be in the same format as the action submission binding structures. This is detailed under the Designing Web Pages documentation, within the Bindings Tabs section.
Variables
As well as the main FactBase, each controller can define additional Variables, which can contain XML content. Whenever this documentation refers to querying or updating the FactBase, this can equally apply to Variables.
Variables are only temporary documents that exist during rules processing.
Checking Document Content
WebMaker rules generally manipulate XML data. WebMaker provides views for both the incoming data and outgoing data, as shown in the following screenshot.
WebMaker will attempt to display relevant documents for you automatically. The general aim of the rules is to manipulate the data shown on the left so that it matches that shown on the right.
When opening from the Debugger, you will see the actual data present at runtime. The exact information you see will depend on the type of log entry that was clicked. In this case, the information displayed is not permanently stored anywhere. You have the option to save the document for later use if required.
Regardless of what documents are initially displayed, you can use the Change buttons to select a different document to display on either side to assist with the creation of your rules.
XPath Entry
XPaths are used to query and manipulate XML data. You can create XPaths by dragging elements from the XML Tree Views and dropping them into the required XPath text areas in the middle.
XPaths can also be entered directly into the text areas, or edited after being constructed by the drag and drop operations. XPaths are typically validated as you type.
More information on common XPath queries is available on forum entry: A Guide to Useful XPath Queries.
WebMaker attempts to link the value to the current input
and output
documents. Next to each XPath, a count will be displayed indicating the number of elements the XPath matches in both documents. Clicking on either count will open that document, and highlight the elements that have been matched. This allows you to see if your XPath is selecting the elements within the documents, as intended. Note: If an XPath is evaluated, but the data does not match then there will be no highlighting. Sometimes XPaths may simply seek to determine the presence of elements, or that an element has a particular value.
Rules contain logic that enables applications to make decisions on the server. They also contain a range of actions that can operate natively on XML information, to enable such information to be validated, transformed, stored, distributed, etc.
Rules are based on an IF ... {condition} THEN ... {action} structure. Conditions are optional.
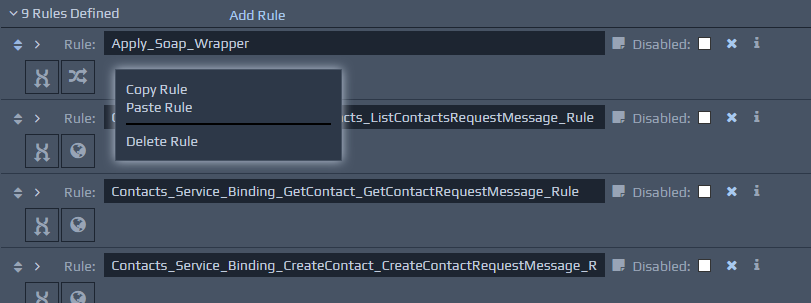
Adding a New Rule
A new rule can be added by clicking the Add Rule link in the rules header strip. Alternatively you can use the Copy-Paste rule feature. New rules appear dimmed until a name has been entered.
The top-level details that can be entered for each rule are:
Rule - This field should contain the name of the rule. The entered value can contain alphanumeric characters along with spaces, underscores (_) and hyphens (-). The name needs to be unique across the RuleBase.
Rule Notes - Optional, additional information about the rule and its intended purpose.
Disabled - Ticking this checkbox indicates that this rule should be disabled. This means that as long as the disable RuleBase Setting is turned on, then this rule will never fire in the runtime application.
As you add conditions and actions to each rule you will notice that a strip of summary icons is displayed along the rule header, providing a summary of the logic within the rule. You can click on these icons to go directly to that part of the rule.
A rule can be deleted by clicking the cross icon on the right of the rule header strip.
Each rule requires a number of XPaths to be specified (in both conditions and actions). Please see the previous section on checking document content for more information.
Copying and Pasting Rules
It is possible to copy and paste rules within the same RuleBase and between different RuleBases across projects. You can right-click on a rule and select the Copy Rule option. To paste a rule from the clipboard, right click on a rule (or the rule's container) and select the Paste Rule option. If forward chaining is set, then the pasted rule will maintain its original priority, which will be used to position it within the rules that may already be present, unless you click on an existing rule first. In that case, the pasted rule will inherit the priority of the selected rule.
These features are also available via the Edit menu, or as keyboard shortcuts described on the menu options list.
If you are copying a rule into a different controller, any file parameters on actions within the rule will need to be reselected after pasting, to ensure the controller has references to the required resource files. In addition, when copying between projects, the target of any Invoke Service
actions, as well as database connection information from any SQL Statement
actions will need to be specified again. These areas will be marked as errors when you try and save the rules until they are resolved.
 It is also possible to copy rules, conditions and actions within the same RuleBase by clicking and dragging the "move" arrows on the top left hand corner of the source component and dropping it in the target location, while holding down the Ctrl key. If the Ctrl key is not pressed, then the dragged component will be moved instead of copied.
Conditions determine when rules can be fired. Each condition contains XPaths, which are evaluated against the FactBase. The condition is met if the XPaths collectively return a true value.
It is also possible to copy rules, conditions and actions within the same RuleBase by clicking and dragging the "move" arrows on the top left hand corner of the source component and dropping it in the target location, while holding down the Ctrl key. If the Ctrl key is not pressed, then the dragged component will be moved instead of copied.
Conditions determine when rules can be fired. Each condition contains XPaths, which are evaluated against the FactBase. The condition is met if the XPaths collectively return a true value.
For conditions, an XPath is considered to return true if:
It evaluates to a non-empty node set
It returns the boolean value true.
It returns a string that does not have the text value false
Conditions can be simple, typically containing just one XPath, or complex, with a number of parts joined using boolean operators AND, OR, and XOR.
If a rule does not contain a condition, it fires as soon as it is encountered.
Simple Conditions
The simplest type of condition consists of just one check against the data. Such conditions can be created by opening up the relevant rule (by clicking the arrow icon on the left) and then clicking the Add Condition link under the IF part of the rule.

The Condition text box should be used to provide a name for the condition. The name can contain alphanumeric characters, spaces, underscores, and hyphens
The Check field should contain the XPath that needs to be true
for the rule to fire.
A condition can be removed by clicking the cross icon on the right of the condition name.
Complex Conditions
Complex conditions can be created by combining multiple parts, using AND, OR and XOR operators. Each operator can also contain other operators to allow very complex conditions to be created.
 To add a new operator, you first need to add a simple condition, and then click one of the AND, OR or XOR buttons on the right of the condition. You will need to open up the condition check to see these buttons. Clicking one of these buttons will wrap the condition within an operator of the relevant type and create a second blank condition within it for you to populate.
Each operator must have at least two children and you can add additional conditions by using the link at the bottom of the box e.g. Add AND Condition. You can delete operators by clicking the cross button on the right hand side. If the operator has two or more children then they will all be deleted, but if the operator only has one component within it, it will not delete the child component, but will move it into the place of the operator being deleted.
To add a new operator, you first need to add a simple condition, and then click one of the AND, OR or XOR buttons on the right of the condition. You will need to open up the condition check to see these buttons. Clicking one of these buttons will wrap the condition within an operator of the relevant type and create a second blank condition within it for you to populate.
Each operator must have at least two children and you can add additional conditions by using the link at the bottom of the box e.g. Add AND Condition. You can delete operators by clicking the cross button on the right hand side. If the operator has two or more children then they will all be deleted, but if the operator only has one component within it, it will not delete the child component, but will move it into the place of the operator being deleted.
Each operator can contain as many children as required, and the resulting logic is described below.
AND - All components contained by an AND operator must evaluate to true for the operator to give a true value.
OR - At least one of the components contained by an OR operator must evaluate to true for the operator to yield a true value.
XOR - At least one, but not all, of the components contained by an XOR operator must evaluate to true for the operator to yield a true value.
Looping
A condition can have a loop property activated. This is used to indicate that the condition XPath will return a set of values and the rule should fire for each of the items in that set.
During execution, the context point for each XPath will be the current entry in the node set. This feature therefore allows you to handle repeating sets of data.
To activate looping, click the LOOP button to the right of the condition name. This will update the condition display as shown below. This button can be clicked again to deactivate looping.
 Only one condition within a rule can have the loop property activated.
The Actions are contained in the THEN part of the rule. WebMaker provides a range of actions for performing many common server-side tasks.
A new action is added by clicking the Add Action link within the relevant rule container. An action can be removed by clicking the cross button on the right hand side.
Only one condition within a rule can have the loop property activated.
The Actions are contained in the THEN part of the rule. WebMaker provides a range of actions for performing many common server-side tasks.
A new action is added by clicking the Add Action link within the relevant rule container. An action can be removed by clicking the cross button on the right hand side.
 The list of actions is available in the Action drop-down.
The actions are displayed within the rule in the order in which they will be executed. You can drag and drop actions to reorder them as required.
You can disable actions by ticking the
The list of actions is available in the Action drop-down.
The actions are displayed within the rule in the order in which they will be executed. You can drag and drop actions to reorder them as required.
You can disable actions by ticking the disabled
tick-box. As long as the disable RuleBase Setting is turned on, then disabled actions will never be processed at runtime.
Table of Available Actions
|
Action
|
Description
|
Assign
|
Sets the value of an element or attribute within the FactBase.
|
Compare
|
Compares two XML fragments and details the differences between them.
|
Copy
|
Copies XML fragments from one location to another.
|
Copy Directory
|
This is used to copy files or directories on the file system from one location to another.
|
Delete
|
Deletes an XML fragment from the FactBase.
|
Delete File
|
This is used to delete a file or directory from the file system.
|
File Information
|
This is used to retrieve information about a file or directory on the file system.
|
Insert
|
Parses an XML document or fragment into the FactBase.
|
Insert Attribute
|
Enables the addition of attributes against elements.
|
Invoke Service
|
This is the main orchestration action. A Service call can be made to any other controller within the Platform. The target controllers may be native to the WebMaker Platform or proxies to remote web services. This action always assumes it is calling a named native controller, but the physical manifestation of this controller can be specified during deployment of the application.
|
Java Method
|
This is used to invoke arbitrary Java methods, usually within external libraries.
|
Log
|
Enables the logging of XML information to the underlying Platform logging system.
|
Move
|
Moves XML fragments from one location to another.
|
Record Cache
|
Caches a named XML fragment either in Request, User Session or Application scope.
|
Remove Cache
|
Clears cached XML information.
|
Retrieve Cache
|
Retrieves named XML information from the cache.
|
Rename
|
Renames an element or attribute.
|
Save
|
Saves specified FactBase information to a file on the file system.
|
SQL Statement
|
This provides the ability to define and execute SQL statements against relational databases.
|
Terminate
|
This action stops the processing in the current controller and returns to the calling controller or application. The response that will be returned is specified by the RuleBase return XPath.
|
Transform
|
This is an XSLT operation on specified FactBase content using a specified XSL file.
|
Validate
|
This validates specified FactBase information using an XSD file.
|
XML String
|
This is used to convert between XML formatted strings and actual XML data.
|
Merge Option
For every action that inserts new content into the FactBase it is possible to specify a Merge Option setting, to control how the new information will actually be inserted.
The available merge options are:
Append - This is the default option, and will add the content being inserted as a new child element of the element matched by the target XPath.
Replace - This option will replace the element matched by the target XPath with the new content being inserted. Any existing content in the target location will be lost.
Insert Before - This option will insert the new content as a new sibling immediately before the element matched by the target XPath.
Delete and Append - The Replace option, as described above, should be used instead of this option. This option was actually called Replace in earlier WebMaker versions, and is maintained here purely for backwards compatibility. This option is similar to the Replace setting in that the element matched by the target XPath will be deleted, and the new content inserted. However, if the target element was one of a number of sibling elements, then the new content will be added as the very last sibling, regardless of where the target was located.
Examples
For these examples, assume the document content is as shown below:
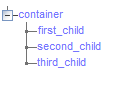 Given a target XPath of
 /container/second_child
, then the following image shows the result of inserting new_content
for the different merge options:
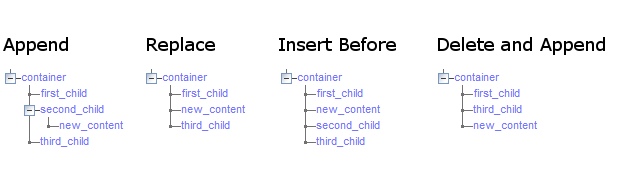 The Assign action writes a value to the FactBase. It sets values by using two parameters. The first specifies the value to write. This parameter can be either a string value specified directly, or an XPath that locates the value in the FactBase. The second parameter is an XPath which identifies the location in the FactBase where the value should be written.
A third parameter, Create if it does not already exist? may be present. If this is set, and the XPath yields no matching element, a new structure will be create if possible. For example, given the XPath below
The Assign action writes a value to the FactBase. It sets values by using two parameters. The first specifies the value to write. This parameter can be either a string value specified directly, or an XPath that locates the value in the FactBase. The second parameter is an XPath which identifies the location in the FactBase where the value should be written.
A third parameter, Create if it does not already exist? may be present. If this is set, and the XPath yields no matching element, a new structure will be create if possible. For example, given the XPath below /mvc:eForm/mvc:Data/target
an element called target
would be created under the existing mvc:Data element and new value assigned to it. If the target element already exists then no new elements would be created, and the value of the existing element will be updated with the new supplied value. Note: this feature will only work for simple 'to location' XPaths that do not make use of predicates or functions etc.
If this setting is not ticked then the location, to which the value is being written, must already exist for the Assign action to complete successfully. If required, you can use the Insert or Insert Attribute actions first to create the required structure to hold the new value.
 The Compare action is used to check for differences between two fragments of XML data.
The two sets of XML data (source and target) can be specified in one of three ways. They can be provided as file names that contain the XML data. The files can be selected using the Choose File option (source file / target file). The second option allows the file names to be derived from the data in the FactBase, by specifying XPaths that locate the file names (XPath to source file / XPath to target file). Finally, XPaths can be used to locate XML fragments within the FactBase directly, that contain the data required for comparison (source location / target location).
The results of the comparison are contained within an XML fragment. This fragment will be inserted into the FactBase at the location specified by the output location field.
Finally, the detailed output parameter can be set to
The Compare action is used to check for differences between two fragments of XML data.
The two sets of XML data (source and target) can be specified in one of three ways. They can be provided as file names that contain the XML data. The files can be selected using the Choose File option (source file / target file). The second option allows the file names to be derived from the data in the FactBase, by specifying XPaths that locate the file names (XPath to source file / XPath to target file). Finally, XPaths can be used to locate XML fragments within the FactBase directly, that contain the data required for comparison (source location / target location).
The results of the comparison are contained within an XML fragment. This fragment will be inserted into the FactBase at the location specified by the output location field.
Finally, the detailed output parameter can be set to true
or false
to indicate whether detailed information is required.
If detailed output is false
, then the result of the comparison will only indicate whether the two sets of XML are 'identical', 'similar', or 'different'. The XML fragments will be considered 'similar' if they have the same content, but the ordering or whitespace information is different.
If the detailed output is set to true
, then the output will still contain the summary information, but also contain information on every difference between the two fragments.
The compare action also supports the Merge Option setting to indicate how the information will be inserted into the FactBase.
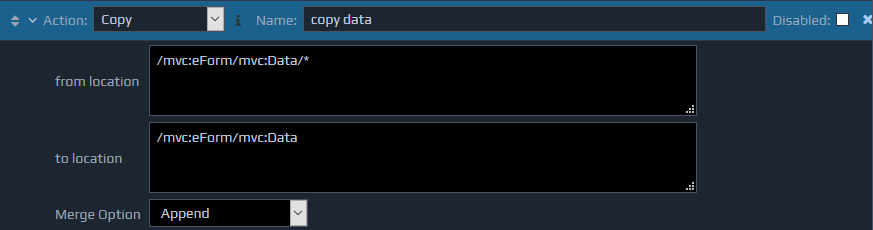
 The Copy action copies a portion of the FactBase to a new location in the FactBase.
The Copy action takes two parameters. The first (from location) is the XPath used to locate the XML element to be copied. The second (to location) is the XPath that identifies the location in the FactBase where the copied XML fragment will be inserted.
This performs a deep copy, with all children of the source element being copied across as well.
The copy action also supports the Merge Option setting to determine how the copied information will be inserted.
The Copy action copies a portion of the FactBase to a new location in the FactBase.
The Copy action takes two parameters. The first (from location) is the XPath used to locate the XML element to be copied. The second (to location) is the XPath that identifies the location in the FactBase where the copied XML fragment will be inserted.
This performs a deep copy, with all children of the source element being copied across as well.
The copy action also supports the Merge Option setting to determine how the copied information will be inserted.
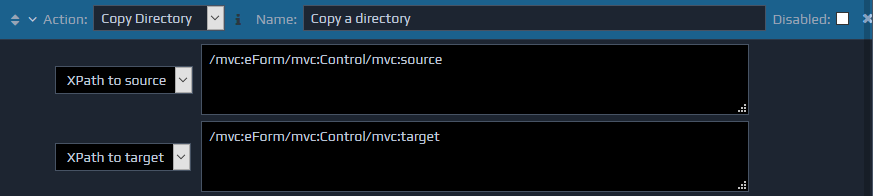
 The Copy Directory action is used to copy directories (or single files) from one location on the file system to another.
The first parameter (source) specifies the directory or file that should be copied, and the second parameter (target) specifies the location to copy it to.
Both parameter values can be determined dynamically if required by using the XPath to source and XPath to target parameter types, and entering the appropriate XPaths values.
If a relative file location is entered, this is assumed to be relative to the deployed location of this controller at runtime.
The Copy Directory action is used to copy directories (or single files) from one location on the file system to another.
The first parameter (source) specifies the directory or file that should be copied, and the second parameter (target) specifies the location to copy it to.
Both parameter values can be determined dynamically if required by using the XPath to source and XPath to target parameter types, and entering the appropriate XPaths values.
If a relative file location is entered, this is assumed to be relative to the deployed location of this controller at runtime.
 The Delete action deletes XML information from the FactBase.
The Delete action takes one parameter (from location) which is an XPath, identifying the element in the FactBase to delete. All children of this element will also be deleted.
The Delete action deletes XML information from the FactBase.
The Delete action takes one parameter (from location) which is an XPath, identifying the element in the FactBase to delete. All children of this element will also be deleted.
 The Delete File action is used to delete a file (or directory) from the file system.
This action only requires a single parameter which specifies the file (or directory) to delete. This value can be entered directly or determined dynamically by evaluating an XPath against the FactBase.
If a relative file location is entered, this is assumed to be relative to the deployed location of this controller at runtime.
The Delete File action is used to delete a file (or directory) from the file system.
This action only requires a single parameter which specifies the file (or directory) to delete. This value can be entered directly or determined dynamically by evaluating an XPath against the FactBase.
If a relative file location is entered, this is assumed to be relative to the deployed location of this controller at runtime.
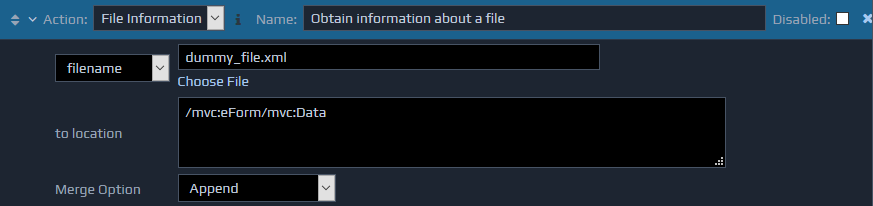
 The File Information action is used to return information about a file (or directory) on the file system.
The first parameter specifies the location of the file or directory to retrieve information about. This can either be entered directly (filename) or determined dynamically at runtime by evaluating an XPath against the FactBase (XPath to file). If a relative file location is entered, this is assumed to be relative to the deployed location of this controller at runtime.
The second parameter (to location) sets the location in the FactBase to place the information. This supports the Merge Option setting to determine how the information will be inserted.
The File Information action is used to return information about a file (or directory) on the file system.
The first parameter specifies the location of the file or directory to retrieve information about. This can either be entered directly (filename) or determined dynamically at runtime by evaluating an XPath against the FactBase (XPath to file). If a relative file location is entered, this is assumed to be relative to the deployed location of this controller at runtime.
The second parameter (to location) sets the location in the FactBase to place the information. This supports the Merge Option setting to determine how the information will be inserted.
 If the first parameter points to a file, information similar to the following will be placed in the FactBase at the specified location:
<File_Information xmlns="">
    <Exists>true</Exists>
    <isDirectory>false</isDirectory>
    <isFile>true</isFile>
    <isHidden>false</isHidden>
    <isReadable>true</isReadable>
    <isWriteable>true</isWriteable>
    <Last_Modified>2012-05-29T16:35:14</Last_Modified>
    <Last_Modified_Milliseconds>1338305714235</Last_Modified_Milliseconds>
    <Size>59157</Size>
</File_Information>
If the parameter points to a directory, information similar to the following will be inserted into the FactBase:
<File_Information xmlns="">
    <Exists>true</Exists>
    <isDirectory>true</isDirectory>
    <isFile>false</isFile>
    <isHidden>false</isHidden>
    <isReadable>true</isReadable>
    <isWriteable>true</isWriteable>
    <Last_Modified>2012-05-29T16:35:14</Last_Modified>
    <Last_Modified_Milliseconds>1338305714235</Last_Modified_Milliseconds>
    <Size>0</Size>
    <FileList dir="c:\test">
        <DirName Last_Modified="2012-03-01T11:13:08" isHidden="false">testdir1</DirName>
        <DirName Last_Modified="2011-04-13T16:27:04" isHidden="false">testdir2</DirName>
        <FileName Last_Modified="2012-05-10T12:04:28" isHidden="false">test_doc1.txt</FileName>
        <FileName Last_Modified="2012-03-23T10:57:10" isHidden="false">test_doc2.txt</FileName>
    </FileList>
</File_Information>
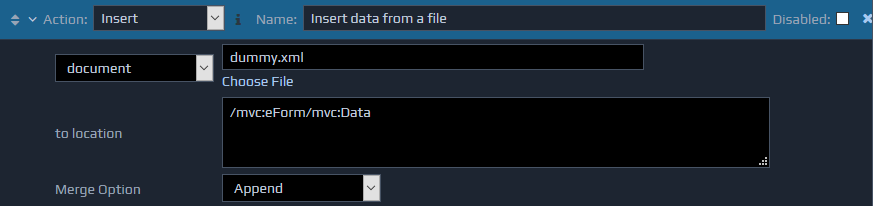
The Insert action loads an XML node into the FactBase to supplement the initial incoming XML message. This node can be described as a fragment of XML within the business rule or it can be loaded from an external XML file.
The insert action takes two parameters. The first specifies the XML to insert. This can be defined in three different ways, either as the filename of the document to parse in, as an XPath pointing to the location in the FactBase where this filename is contained (XPath to document), or finally as an XML fragment embedded directly in the rule. The second (to location) parameter is an XPath to the location in the FactBase where the information will be added.
For the first option, the file can be chosen by clicking the Choose File link and selecting the required file from the Repository Viewer window. If an XML fragment is being entered, then this should be typed directly into the text area. The entered content must be a valid XML fragment.
The insert action also supports the Merge Option setting to determine how the new content will be inserted.
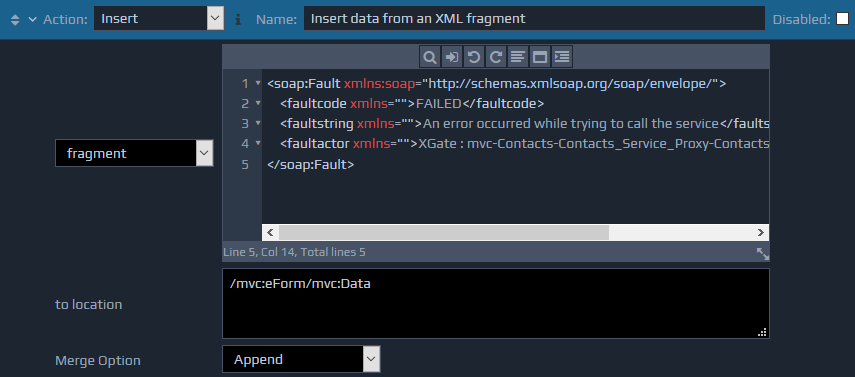
 This second example shows how an XML fragment can be used to define the content to be inserted. In this example, a SOAP Fault structure is being inserted to indicate an error.
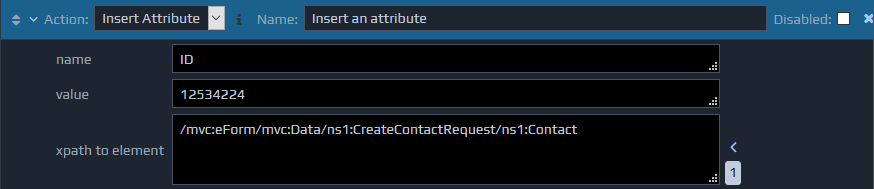
 The Insert Attribute action is used to create a new attribute on an existing element within the FactBase.
Three parameters are required for this action. The first is a string value for the attribute name (name). The second parameter specifies the string value to set as the initial value for the new attribute (value). If you do not want the new attribute to have an initial value, then this second parameter should be left blank. If you want the new attribute to have a dynamic value, you can leave the value parameter blank, and use an Assign action immediately following the Insert Attribute action to set the value. The third parameter is an XPath identifying the element within the FactBase where the new attribute should be added (to location).
The Insert Attribute action is used to create a new attribute on an existing element within the FactBase.
Three parameters are required for this action. The first is a string value for the attribute name (name). The second parameter specifies the string value to set as the initial value for the new attribute (value). If you do not want the new attribute to have an initial value, then this second parameter should be left blank. If you want the new attribute to have a dynamic value, you can leave the value parameter blank, and use an Assign action immediately following the Insert Attribute action to set the value. The third parameter is an XPath identifying the element within the FactBase where the new attribute should be added (to location).
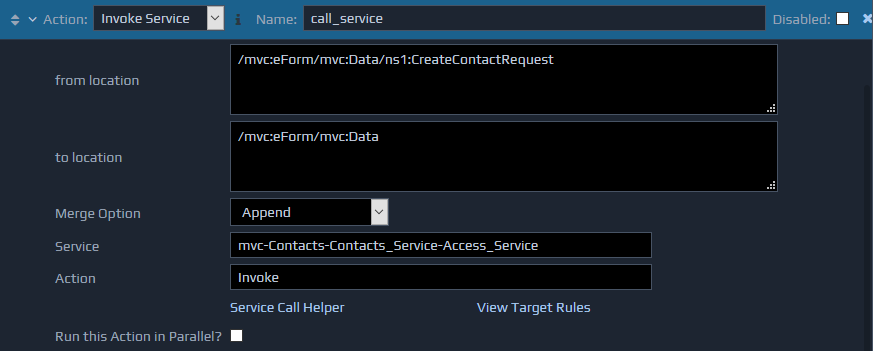
 The Invoke Service action calls a specified service, typically another controller, and updates the FactBase with the response XML.
The Service field should contain the full ID of the controller to call, and the Action field should specify the action to call on that controller.
The Service Call Helper option can be used to find the required agent ID. This should open a new window, providing drop down lists of available controllers. When you have selected the required entry, click the OK button to populate the values required for the action.
Ff you wish to call an external web service, you should create a controller to act as a proxy to that service. You can then specify an Invoke Service rule to call the proxy controller. Then, during deployment, you can designate the proxy controller as a web service proxy and enter the relevant location information of the remote service. By using this approach, you avoid the need to enter external location information within your application logic.
The Invoke Service action has two parameters. The first (from location) indicates the xml node to send as the request to the service, and the second parameter (to location) indicates the location in the FactBase to insert the response. Both of these require XPaths.
The Invoke Service action also supports the Merge Option setting to determine how the returned XML will be inserted.
The Invoke Service action calls a specified service, typically another controller, and updates the FactBase with the response XML.
The Service field should contain the full ID of the controller to call, and the Action field should specify the action to call on that controller.
The Service Call Helper option can be used to find the required agent ID. This should open a new window, providing drop down lists of available controllers. When you have selected the required entry, click the OK button to populate the values required for the action.
Ff you wish to call an external web service, you should create a controller to act as a proxy to that service. You can then specify an Invoke Service rule to call the proxy controller. Then, during deployment, you can designate the proxy controller as a web service proxy and enter the relevant location information of the remote service. By using this approach, you avoid the need to enter external location information within your application logic.
The Invoke Service action has two parameters. The first (from location) indicates the xml node to send as the request to the service, and the second parameter (to location) indicates the location in the FactBase to insert the response. Both of these require XPaths.
The Invoke Service action also supports the Merge Option setting to determine how the returned XML will be inserted.
Parallel Processing
The Invoke Service action also has the ability to perform a non-blocking service call. This starts the service call on a different thread, enabling the rest of this rule, and other rules to continue execution. Once all the rules have been processed, this controller will wait for any parallel calls to also complete, before returning a response.
If you need to perform some functionality when the response from a parallel call has been retrieved, you should add an additional rule that has a condition check looking for this response structure in the FactBase. We recommend enabling Forward Chaining to ensure this functions correctly.
This parallel capability is often useful when you are making multiple calls to third party services. For example, if you are calling two independent web services from a single controller, you could run these both in parallel, and potentially reduce the overall execution time for the controller.
To activate this feature simply click the Run this Action in Parallel? tick box.
XML data can be easily manipulated using a range of server actions in WebMaker. In some instances, you may need more intricate control over the processing of your XML data or desire access to external source code libraries to reuse component functionality that is already available. You can of course access such functionality via Web Services or REST, but there may be occasions where the functionality does not provide web interfaces. The easiest approach for accessing external server-side functionality in its native format is to use the Java Method Action.
Let's use the following basic method for illustration:
/**
 * Simple scenario where a method receives and returns a modified test message.
 * @param msg Message String.
 * @return Returns the incoming message, prefixed with a greeting.
 */
public static String hello(String msg)
{
    return "Hello there, you said: " + msg + ".";
}
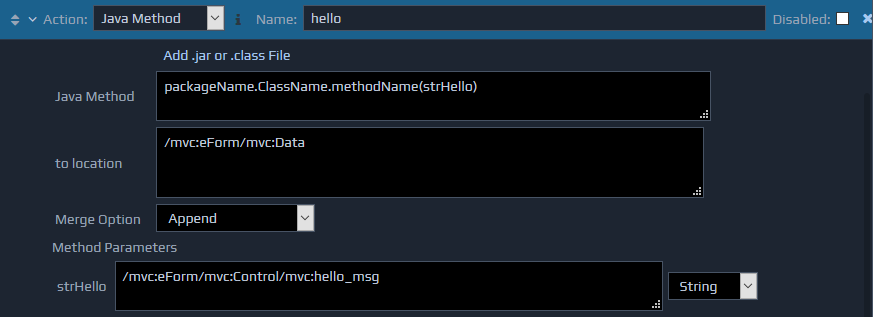
When you select the Java Method Action in one of your rules, you will be presented with a set of fields to complete, similar to all other Actions in WebMaker. For example:
Java Method - Fully qualified method name and signature. For example, com.hyfinity.xengine.effectors.JavaMethod.hello(msg), where the Package name is com.hyfinity.xengine.effectors
, the Class name is JavaMethod
and the Method name is hello
.
to location - Location in the FactBase where the return information will be placed. For example, /mvc:eForm/mvc:Date/mvc:FormData/java_return
. This can be any arbitrary location of your choice.
Method Parameters - {A list of parameters required by the method signature}. For example, msg
. Assuming this is of type String, you can provide any valid XPath, such as 'Hi there Java Method' or provide an XPath such as /mvc:eForm/mvc:Date/mvc:FormData/message_to_java
.
Your FactBase in this instance might look like:
<eForm xmlns="http://www.hyfinity.com/mvc" xmlns:mvc="http://www.hyfinity.com/mvc">
    <Control>
        ...
    </Control>
    <Data>
        <formData>
            <message_to_java>Hi there Java Method</message_to_java>
        </formData>
        <java_return></java_return>
    </Data>
</eForm>
Method Parameters
Once you have defined your method call and click out of the Java Method edit box, WebMaker will parse the method signature and present a list of defined parameters. For each parameter, you can use any valid XPath to bind your data that will be sent to the Java Method.
Data Types and mappings
For each parameter, you can indicate the matching WebMaker data type. The available types are the same as those available in the Page Designer under "Data Constraints|Data Type" and include:
Boolean - Mapped to Java primitive type boolean
.
String - Mapped to java.lang.String
.
Number - Mapped to int
, short
, long
, float
or double
. The Number data type therefore acts a more general wrapper for the underlying Java types. This means that a method call such as myMethod(num), where num is of type Number, could match myMethod(int myInteger), myMethod(float myFloatingPointNum), etc.
Date - Mapped to java.util.Date
. Additionally, dates will be automatically converted between XML Schema Date
and Java Date
formats.
XML - Mapped to org.w3c.dom.Node
. Maps any XML fragment from the FactBase
to a Node
object.
Handling Return Information
WebMaker will automatically determine the return type and attempt to perform the following mappings:
Node - Maps any XML Node, including Document, Element, etc. and inserts it into the FactBase to location
as an XML fragment.
String - Sets the text of the to location
to the returned String value.
Date - Converts the Java Date to an XML Schema Date and sets the text of the to location
to the returned Date value.
Other types - For all other return types WebMaker will perform a toString() operation on the return type and set the text of the to location
to the returned string value, if a value is produced.
Compiling and deploying the Java classes
The .class or .jar files must be in the Java class-path to enable WebMaker to use them. Typically, these files will be located in {WebMaker install location}/.../tomcat-runtime/webapps/{your-app-name}/WEB-INF/classes or {WebMaker install location}/.../tomcat-runtime/webapps/{your-app-name}/WEB-INF/lib respectively. Note: It is recommended that JAR files are generally used for simplicity and for portability.
Wrapping native Java components
Please note that method definitions must be public and static to enable invocation from WebMaker. If you wish to utilise instance methods or methods that accept or return more complex types then you can write your own method that is public and static and handles one of the recognised WebMaker parameter and return types. Your method can then perform the invocation of the arbitrary Java components as required.
Examples
For more detailed examples of Java Method invocations, including methods that wrap other standard Java methods, please search the WebMaker Forum for Barcode
, XML Digital Signatures
and XML Encryption and Decryption
.
Troubleshooting
Debugger Trace and Exceptions - Common with other WebMaker actions, the Java Method Action will produce various logs depending on your log settings. You can view these in the Debugger message logs. The logs will identify issues during the parsing stage of your method call and also any resulting issues that arise during the actual invocation of the method. WebMaker will attempt to catch any Exceptions thrown by the underlying methods and wrap them into the Debugger message trace during invocation.
Statement Parsing - Likely error messages during the parse stage will be due to incorrect names for the Package, Class or Method. The parameters must be of the correct types and in the right order, otherwise WebMaker will not find a match for the method. You will also encounter issues if the method is not declared as public and static.
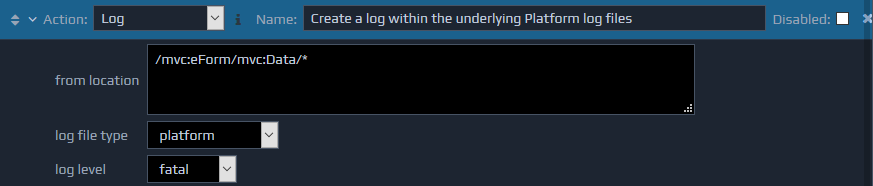
The Log action provides control over logging of information into the underlying platform log files. This is in addition to the automatic logging provided by the platform, and explained elsewhere in the documentation. For example, a web service may return a valid XML document that, within the context of the application, indicates a major error has occurred that needs to be logged accordingly.
This action requires three parameters. The first specifies the location of the XML fragment in the FactBase that should be stored in the log (from location), the second (log file type) indicates which type of log file the output should appear in (platform
, developer
, or administration
), and for platform logs, the third parameter should specify the level at which the details should be logged (log level). This log level should be one of the values debug
, info
, warning
, error
, or fatal
.
Generally we recommend using the platform
log file type, as the developer logging is usually switched off for published applications.
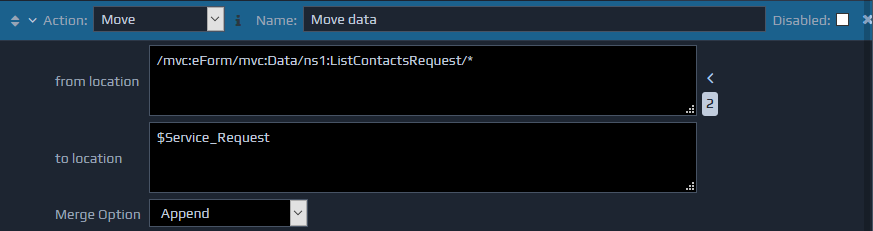
 The Move action moves a portion of the FactBase to a new location in the FactBase. This is similar to the Copy action but the content is removed from the original location.
The Move action takes two parameters. The first (from location) is an XPath, identifying the location of the XML element to be moved. The second (to location) is the XPath, identifying the position in the FactBase where the moved XML fragment should be inserted.
The move action also supports the Merge Option setting to determine how the moved fragment will be inserted in the new location.
The Move action moves a portion of the FactBase to a new location in the FactBase. This is similar to the Copy action but the content is removed from the original location.
The Move action takes two parameters. The first (from location) is an XPath, identifying the location of the XML element to be moved. The second (to location) is the XPath, identifying the position in the FactBase where the moved XML fragment should be inserted.
The move action also supports the Merge Option setting to determine how the moved fragment will be inserted in the new location.
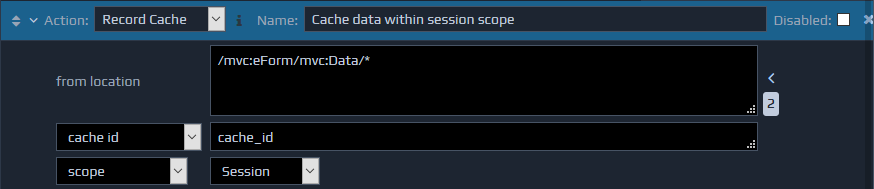
 This is one of three, related, actions used to provide caching capabilities for runtime applications.
The Record Cache action stores a fragment of XML from the FactBase into the cache.
Three parameters are required. The first is the location of the data in the FactBase (from location), the second is a string value specifying the id that will be used to cache the data (cache id), and the third indicates the scope within which the data should be stored. The scope parameter has three levels. Using 'Request' scope means the data will only be available to the current request, and will be removed once it has finished processing. 'Session' scope indicates the data will be linked to the current user's session only, and 'Application' indicates that the cached data will be available to all users of the application.
Both the cache id and scope values can be determined dynamically using XPaths if required.
This is one of three, related, actions used to provide caching capabilities for runtime applications.
The Record Cache action stores a fragment of XML from the FactBase into the cache.
Three parameters are required. The first is the location of the data in the FactBase (from location), the second is a string value specifying the id that will be used to cache the data (cache id), and the third indicates the scope within which the data should be stored. The scope parameter has three levels. Using 'Request' scope means the data will only be available to the current request, and will be removed once it has finished processing. 'Session' scope indicates the data will be linked to the current user's session only, and 'Application' indicates that the cached data will be available to all users of the application.
Both the cache id and scope values can be determined dynamically using XPaths if required.
 The Remove Cache action is used to remove data from the cache.
Two parameters are required. The first is a string value, specifying the id that was used to originally cache the data(cache id), and the second indicates whether the data is currently stored in the application cache, the users session cache, or just this request (scope).
Both the cache id and scope values can be determined dynamically using XPaths if required.
The Remove Cache action is used to remove data from the cache.
Two parameters are required. The first is a string value, specifying the id that was used to originally cache the data(cache id), and the second indicates whether the data is currently stored in the application cache, the users session cache, or just this request (scope).
Both the cache id and scope values can be determined dynamically using XPaths if required.
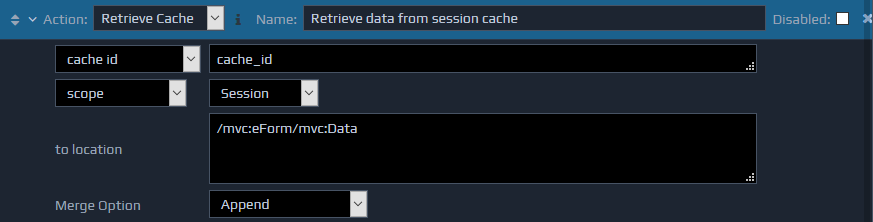
 The Retrieve Cache retrieves data from the cache and inserts it into the FactBase.
Three parameters are required. The first parameter is a string value specifying the id under which the data is cached (cache id). The second parameter indicates whether the data is currently stored in the application cache, the user's session cache, or just this request (scope). The third parameter is the location in the FactBase where the retrieved data should be inserted (to location).
Both the cache id and scope values can be determined dynamically using XPaths if required.
The Retrieve Cache action also supports the Merge Option setting to determine how the retrieved information will be inserted.
The Retrieve Cache retrieves data from the cache and inserts it into the FactBase.
Three parameters are required. The first parameter is a string value specifying the id under which the data is cached (cache id). The second parameter indicates whether the data is currently stored in the application cache, the user's session cache, or just this request (scope). The third parameter is the location in the FactBase where the retrieved data should be inserted (to location).
Both the cache id and scope values can be determined dynamically using XPaths if required.
The Retrieve Cache action also supports the Merge Option setting to determine how the retrieved information will be inserted.
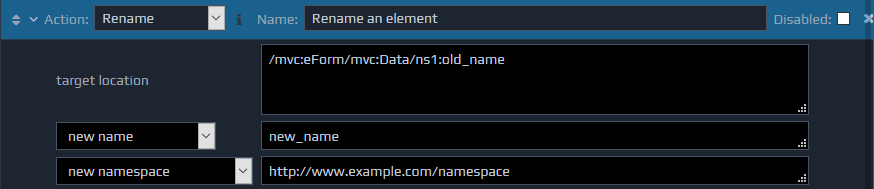
 The Rename action can be used to rename an element or attribute within the FactBase.
The Rename action takes three parameters. The first (target location) is the XPath identifying the XML node to be renamed. The second parameter is the new name for the chosen element or attribute. The final parameter is the new namespace for the element or attribute. The new name and new namespace can be specified as string values or an XPath that locates the name and namespace values within the FactBase.
The Rename action can be used to rename an element or attribute within the FactBase.
The Rename action takes three parameters. The first (target location) is the XPath identifying the XML node to be renamed. The second parameter is the new name for the chosen element or attribute. The final parameter is the new namespace for the element or attribute. The new name and new namespace can be specified as string values or an XPath that locates the name and namespace values within the FactBase.
 The Save action saves XML information from the FactBase to a file.
The Save action takes two parameters. The first (from location) is the XPath, locating the XML node to be saved: the save operator will save the entire document tree under this node. The second parameter is the name of the file to save to, which may either be specified directly (document), or provided as an XPath, locating a string value contained within the FactBase that details the filename (XPath to document).
The filename may be an absolute file path (such as
The Save action saves XML information from the FactBase to a file.
The Save action takes two parameters. The first (from location) is the XPath, locating the XML node to be saved: the save operator will save the entire document tree under this node. The second parameter is the name of the file to save to, which may either be specified directly (document), or provided as an XPath, locating a string value contained within the FactBase that details the filename (XPath to document).
The filename may be an absolute file path (such as C:\myfiles\filetosave.xml
) or it may be relative as in the example below. Names with relative file paths will be saved under the runtime location of this controller.
 The SQL Statement action enables access to relational databases. This provides the ability to define parametrised SQL queries and dynamically populate the parameters from incoming xml data. The resulting information from the queries is also available within the FactBase for further processing using other rules. Queries defined using the SQL Statement are packaged and executed against the RDBMS using JDBC.
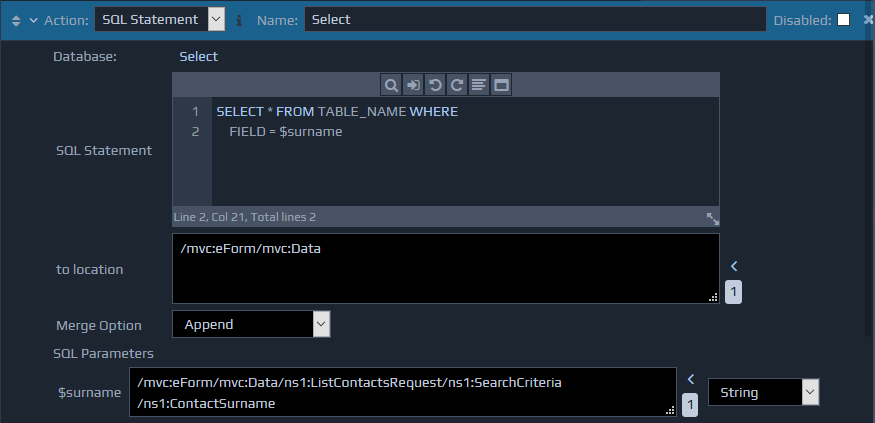 The SQL Statements are entered within the SQL Statement data entry editor. Multiple SQL Queries can be separated by using the
 ;
character and the SQL parameters are denoted by using a $
prefix. An entry box for each parameter will be created automatically under the SQL Parameters section. You can specify an XPath for each SQL parameter to indicate the location of the parameter data in the FactBase. For each dynamic parameter in the SQL statement it is important to set the type of data that this will contain. For example, it may a text, numeric or date value. This can be set using the drop-down at the right of each parameter. If a date type value (date, time or time-stamp) is being used then the value in the XML data must be stored in the W3C Schema format. If the data is originating from a form, then this format can be derived using the in-built 'Value Conversions' functionality within the WebMaker Studio.
You can specify the location where the response from the query should be inserted using the to location parameter. You can use the Merge Option setting to determine how the information will be inserted. The response from the SQL Statements will be wrapped using the following document format:
<sql_result>
    <statement>
        <status outcome="success">
            <record_count>1</record_count>
            <generated_keys>
                <record>
                    <value>2</value>
                </record>
            </generated_keys>
        </status>
    </statement>
    <statement>
        <status outcome="success"/>
        <record>
            <client>1</client>
            <forename>Fred</forename>
            <surname>Bloggs</surname>
            <age>21</age>
        </record>
        <record>
            <client>2</client>
            <forename>Brenda</forename>
            <surname>Bloggs</surname>
            <age>20</age>
        </record>
    </statement>
</sql_result>
The sql_result element wraps the responses from one or more queries. For each statement, you will notice a separate statement element. Within each statement element a status element will indicate the outcome of each query using the outcome attribute. For INSERT and UPDATE queries, there will be additional elements to indicate the number of records that were affected via the record_count element. For INSERT queries you will also notice a generated_keys element. This element will contain details of the generated keys in the database resulting from the INSERT query. For SELECT queries, the ResultSet is returned as a list of record elements.
You may also notice a final statement that can indicate the outcome of an implicit ROLLBACK operation on the database if an error is detected.
Using Stored Procedures
This action also supports calling certain types of stored procedures, using SQL Statement syntax of the form {call procedure_name($param1, $param2)}. It is important to ensure the parameters listed are in the correct order for the Stored Procedure.
When used in this mode, an additional dropdown will be shown alongside each SQL Parameter to indicate whether it is an IN, OUT, or IN OUT parameter. Again, the options selected should match that of the stored procedure being called.
Once the stored procedure call has completed, the values of any OUT or IN OUT parameters will be placed back into the data in the location indicated by the SQL Parameter XPath. This is in addition to having the sql_result fragment added to the data as detailed above. For stored procedure OUT parameters, it is also possible to set the parameter type to a special value of 'Result Set', which should be used if the stored procedure has a result set output parameter. In this case, the appropriate 'record' XML structure will be placed at the indicated location in the data.
COMMIT and ROLLBACK
All SQL statements for the same Database, contained within a RuleBase, will execute in the same transaction. Once all the rules have been processed, a ROLLBACK will be automatically issued, and any uncommitted changes will be lost.
Therefore, it is very important to include an explicit COMMIT statement in your rules whenever you are performing database insert or update operations. If your rules were initially created for you by any WebMaker wizards, then you should find that a specific COMMIT rule has already been added. You can of course add any other explicit COMMIT or ROLLBACK statements as required.
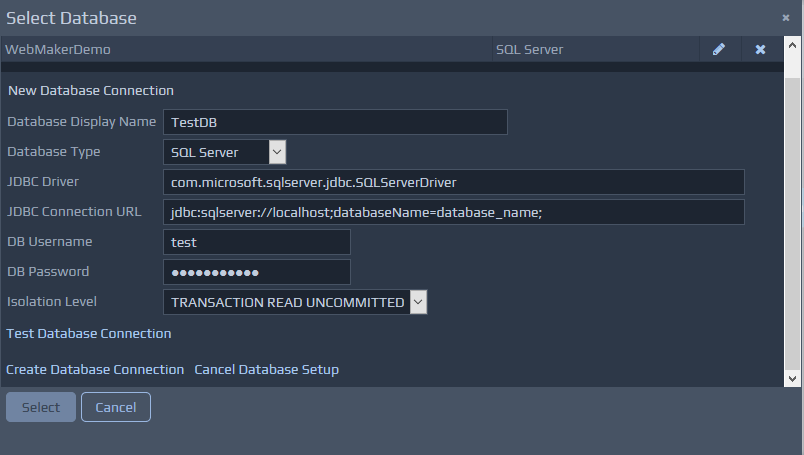
Database Connection
You can use the Select link against the Database field to open the database connection window. To set up a new database click the Setup New Database
link, which will show the following screen for you to provide the relevant information.
 Once you have defined a connection, you can reuse this connection for subsequent actions that use the same database. In this case, you just need to select the entry from the Existing Databases drop down, rather than creating a new connection.
Once a connection has been selected for the SQL Statement action, its name will be displayed against the Database field, and the Change link will appear to allow a different connection to be selected.
If you need to change the details of a database connection (for example, the connection URL or username and password details) then this can also be done via the Database connection window. Just select the edit icon on the right of the existing database entry you wish to adjust.
The Terminate action is used to immediately stop processing in this controller. When this action is encountered, the contents of the FactBase, specified by the return XPath are immediately returned to the calling controller or application.
There are no parameters required for this action.
Once you have defined a connection, you can reuse this connection for subsequent actions that use the same database. In this case, you just need to select the entry from the Existing Databases drop down, rather than creating a new connection.
Once a connection has been selected for the SQL Statement action, its name will be displayed against the Database field, and the Change link will appear to allow a different connection to be selected.
If you need to change the details of a database connection (for example, the connection URL or username and password details) then this can also be done via the Database connection window. Just select the edit icon on the right of the existing database entry you wish to adjust.
The Terminate action is used to immediately stop processing in this controller. When this action is encountered, the contents of the FactBase, specified by the return XPath are immediately returned to the calling controller or application.
There are no parameters required for this action.
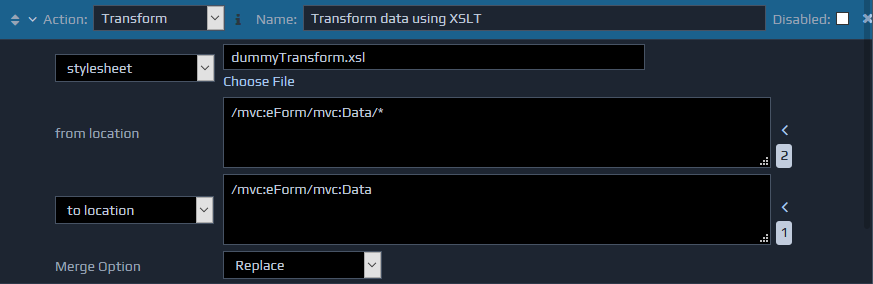
 Transform performs an XSL transformation on the contents of the FactBase using a specified XSL.
This action requires three parameters. The first parameter specifies the XSL file to use for the transformation. This file can be specified directly by using the file name (stylesheet), or the filename can be obtained from the FactBase by using an XPath (XPath to stylesheet). If it is specified directly, the Choose File option can be used to select the required XSL file. The second parameter (from location) selects the XML node within the FactBase that should be transformed, and the third parameter specifies the point at which to insert the result of the transformation (to location).
The results of the transform can also be saved directly to a file by changing the third parameter to document and entering the filename, or to XPath to document and entering the location from which to obtain the filename.
The Transform action also supports the Merge Option setting to determine how the information will be handled if they are being inserted into the FactBase.
Transform performs an XSL transformation on the contents of the FactBase using a specified XSL.
This action requires three parameters. The first parameter specifies the XSL file to use for the transformation. This file can be specified directly by using the file name (stylesheet), or the filename can be obtained from the FactBase by using an XPath (XPath to stylesheet). If it is specified directly, the Choose File option can be used to select the required XSL file. The second parameter (from location) selects the XML node within the FactBase that should be transformed, and the third parameter specifies the point at which to insert the result of the transformation (to location).
The results of the transform can also be saved directly to a file by changing the third parameter to document and entering the filename, or to XPath to document and entering the location from which to obtain the filename.
The Transform action also supports the Merge Option setting to determine how the information will be handled if they are being inserted into the FactBase.
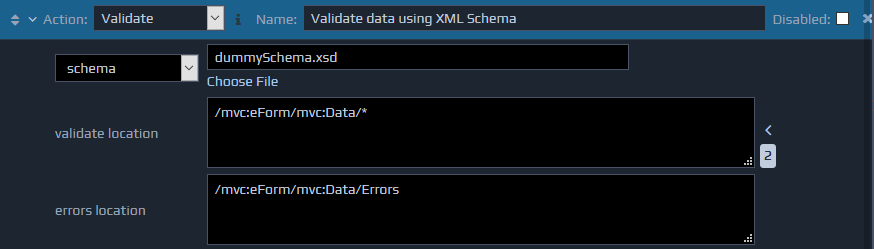
 The Validate action validates the contents of a section of the FactBase against a W3C Schema.
The first parameter indicates the XSD to validate against. The XSD file can either be specified directly (schema), or can be located by using an XPath that identifies the XSD filename in the FactBase (XPath to schema).
The second parameter specifies the validation start point, which enables the isolation of specific portions of the FactBase for validation. As the validation action executes, it may generate errors. These errors will be inserted in the specified location in XML format. The format of these errors is:
The Validate action validates the contents of a section of the FactBase against a W3C Schema.
The first parameter indicates the XSD to validate against. The XSD file can either be specified directly (schema), or can be located by using an XPath that identifies the XSD filename in the FactBase (XPath to schema).
The second parameter specifies the validation start point, which enables the isolation of specific portions of the FactBase for validation. As the validation action executes, it may generate errors. These errors will be inserted in the specified location in XML format. The format of these errors is: <error id="" col="" line="" desc="" />
.
 The XML String action is used to convert between XML formatted strings and actual XML data. This is often required during communication with web services that do not provide full XML data, but instead return a string containing the XML content.
The mode parameter indicates the direction in which the conversion should take place. This can either be from a string into XML, or from an XML structure into a formatted string.
The first mode is usually used on the response received from a remote service and the second mode before calling a remote service.
The location parameter is used to indicate which section of the data the conversion should be applied to. If the
The XML String action is used to convert between XML formatted strings and actual XML data. This is often required during communication with web services that do not provide full XML data, but instead return a string containing the XML content.
The mode parameter indicates the direction in which the conversion should take place. This can either be from a string into XML, or from an XML structure into a formatted string.
The first mode is usually used on the response received from a remote service and the second mode before calling a remote service.
The location parameter is used to indicate which section of the data the conversion should be applied to. If the String to XML
mode is used, then the text content of the node selected by the location XPath will be converted into an XML structure. If the XML to String
mode is used, then the node selected by the XPath will be replaced with it's string representation.

Example
Assume you have called a web service that has returned the following content, which has been inserted into the Data
section of the FactBase.
<ServiceResponse>
<ServiceResult><record><value1>abc</value1><value2>123</value2></record></ServiceResult>
</ServiceResponse>
In this response the ServiceResult
element actually contains an XML formatted string which we want to access. To do this, add an new XML String action after the Invoke Service action, and use a location XPath of /mvc:eForm/mvc:Data/ServiceResponse/ServiceResult
and a mode of String to XML
. This will convert the content in the FactBase to the following.
...
<ServiceResponse>
    <ServiceResult>
        <record>
            <value1>abc</value1>
            <value2>123</value2>
        </record>
    </ServiceResult></quote>
</ServiceResponse>
...
To convert this back to the initial String content you can set the location XPath to /mvc:eForm/mvc:Data/ServiceResponse/ServiceResult/record
and use the XML to String
mode value.
The RuleBase Settings are applicable throughout the RuleBase. This section is located at the bottom, after all the rules. This controls settings that apply across the RuleBase.

RuleBase settings:
Context - This option sets the context within the FactBase, against which XPaths should evaluate. For example, if you are receiving a SOAP message, but know you will only ever be working with the contents of the body section, you could set the context location to the body tag, and then write all your remaining XPaths relative to this. Even if a context point has been set, you can still write XPaths to access the full FactBase by making them absolute, i.e. starting with a /
. The context point will default to a /
to indicate that all XPaths are being evaluated from the root of the FactBase.
Return - This option specifies which part of the FactBase should be returned once this controller has finished processing. This XPath must locate an Element Node, and can make use of Variable definitions if required. This value will default to /
to indicate that all the contents of the FactBase should be returned. This return point will be used after all processing has finished, or a Terminate action is encountered.
Enable Rule Disabling - This flag controls whether disabled rules will be allowed in this RuleBase. If this is not ticked, then even if a rule (or action) is set to be disabled, it will still be executed at runtime, whereas if it is ticked, each rule marked disabled will be ignored.
Enable Forward Chaining - By default this option is disabled and the rules will be fired based on their order within the list of rules. If enabled, the ordering can become much more dynamic, based on the current state of the data. Please see the next section on Forward Chaining for more information on how this works.
By default the rules are processed as they are listed. A more powerful option allows for the Rules Engine to be configured as a forward chaining engine. In this mode, it is much more of a data driven process: it processes its RuleBase using data from the FactBase. During this process, the FactBase will be updated. This can result in more rules being fired.
The forward chaining cycle can be described as follows:
Compare the rules against the data, and determine which rules are eligible to fire. A rule is eligible to fire when the if part of the rule evaluates to true.
Determine a single rule to fire from the set of eligible rules. Each rule has a priority assigned to it, and the one with the highest priority (smallest number) will fire first. If two rules with the same priority become eligible to fire then one will be chosen arbitrarily to fire first.
The selected rule is fired, which means the then part of the rule is executed; this may update the FactBase or call another part of the application.
The above steps are repeated until no more rules are eligible to fire.
This can result in high priority (low number) rules being fired after much lower priority rules have fired. For example, you could write a high priority error checking rule, and a number of lower priority processing rules. If any of the rules causes an error, the high priority rule would be fired next to handle it accordingly.
This forward chaining approach is different from the more traditional procedural approaches, and is disabled by default. You can enable forward chaining by ticking the Enable Forward Chaining option under rulebase settings.
XML documents can contain information in a number of different namespaces to help separate content from different places. In order to be able to handle this, WebMaker allows you to define any number of namespaces for use in each RuleBase. This is done using the namespaces section at the bottom of the Rules Design screen.
Expanding this section will show the details (prefix and namespace URI) of each namespace currently defined. These prefixes should be used in all XPaths within the RuleBase that need to handle namespaces. Generally, you will have at least the mvc
prefix defined as this is used within the default eForm
structure for the data.
 You can manage the list of namespaces and their prefixes, but the
 http://www.hyfinity.com/xengine
namespace cannot be removed because it is required for the RuleBase definition.
The Variables section towards the bottom of the Rules Design screen displays all the Variables that are currently defined. You can learn more about variables in this section.
 You can add and remove variables using the features in this section.
When you wish to refer to a Variable in an XPath, you must use the name of the Variable preceded by a
You can add and remove variables using the features in this section.
When you wish to refer to a Variable in an XPath, you must use the name of the Variable preceded by a $
sign, e.g. $request
and $response
. This tells the engine to look in the appropriate Variables document rather than the main FactBase. For example, you may have a condition check XPath of $response/soap:Envelope/soap:Body[not(soap:Fault)]
to check for a successful SOAP response.
Whenever you want to perform processing that interacts with content in both a variable and the main FactBase, it is important to prefix the parts of your XPaths that check the FactBase with $factbase
in the same way as you do for variables. This is to provide clarity for the rules engine.
Within the Page Design screen you will notice different design options on the Data Source tab on the left hand side.
When you drag and drop fields on to the canvas from a data source, WebMaker will pop up a wizard, to guide you and request additional information about mappings between data sources and page actions and target controllers. WebMaker will assist by linking the data sources to server controllers via page actions and generate appropriate bindings and rules where possible. You can change all this, post generation, to suit your exact requirements.
As you complete such operations, WebMaker will start to create a list of data sources that have been used during the page creation process within the Data Sources tab. You can manage the details of the data source information and the mapping information you selected by selecting the appropriate data source item as required.
Selecting the Database option will enable you to create a database connection. Once the connection is created you can navigate the various tables and field and drag and drop the schema information onto the Page or Layout Views to create WebMaker Pages.
The process of dragging and dropping RDBMS information will also create bindings for field controls and generate default SQL statements within the Controller Rules for database access. The type of SQL statements that are generated will depend on the type of application you are trying to build. For example, reporting type applications may generate SELECT statements, whereas interactive applications may also generate INSERT, UPDATE and DELETE statements for example.
Generally, WebMaker Controls are automatically bound to elements within a structured submission document, which becomes available to server Controllers for processing after submission.
For fields added from the Palette, the default binding setup will link them to the formData
section of the message. This is used to contain a flat list of any values from the form that have not been bound elsewhere.
If elements are added to the page from a Data Source then the bindings will be matched to the structure of the Data Source instead of this default formData section.
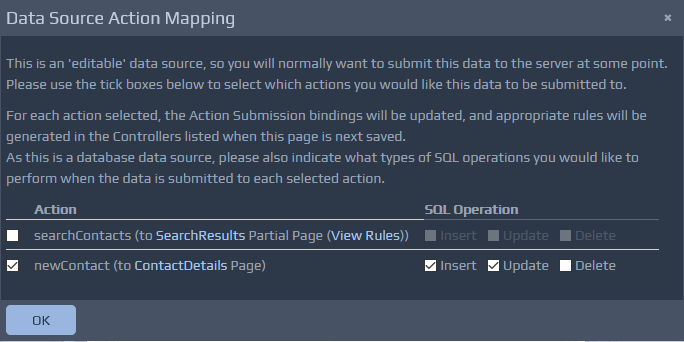
When you drag and drop elements from the Data Source tab the Page Design screen detects whether the dragged elements represent 'editable' information that you are likely to want to submit back to the server (e.g. a web service request structure, or a database edit). In this case you will be asked which actions you would like to map this information to. For each action that is selected WebMaker will create the correct request structures and needed controller rules for calling remote services or for making calls to databases, etc. For any actions that are not selected, the data values will be visible in the formData
section when submitted to that action in the same way as for fields from the palette, and no rules will be generated.
If the Database option was chosen as the data source then you will also be prompted to select the type of database operations that you wish to make for each action. These may be Insert, Update or Delete for example.
 The Import Service wizard examines selected WSDL files and generates controllers that can be used to call the defined web service. Web Service Proxy controllers are created, containing the location information (URL) for remote services, and
 Access Service
controllers are also created, containing rules to ensure correct messages are sent to and received from the external web services.
Other controllers can then use the generated Access Service controllers to interact with the remote web services. As well as the explicit Import Service wizard, remote service proxy controllers and access service controllers are also generated when pages are designed using WSDLs as a data source within the Page Design tab.
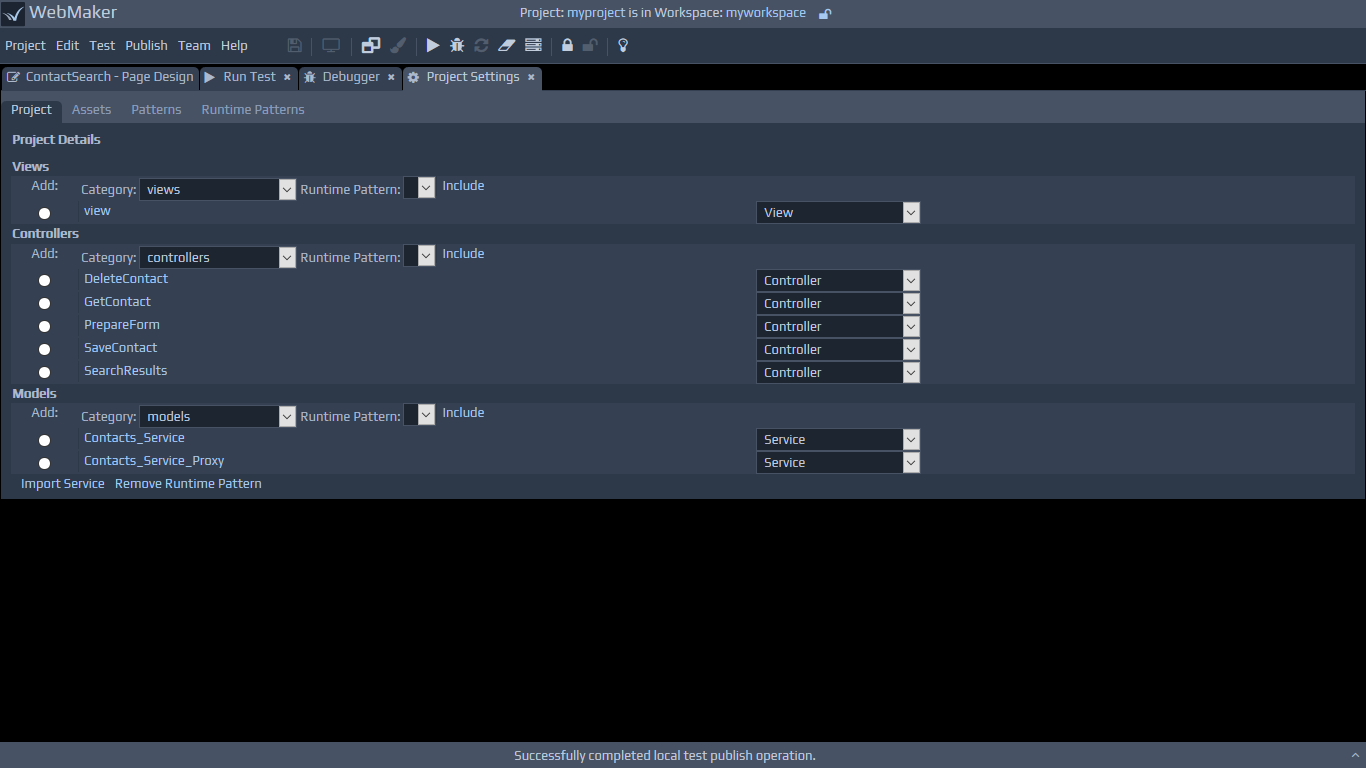 The Import Service wizard can also be accessed to process WSDL files, to generate the various server controllers, without having to design pages first. You can use the Advanced Project Settings menu option and scroll to the bottom of the Project screen. Clicking the Import Service button will show the following screen:
 Select the WSDL file that defines the service you want to use. You can use the Repository Viewer to open a local file or use the Upload From URL tab to load the WSDL from its web location directly.
After you have selected your WSDL file, you can click Next to perform the import process. This should parse and validate the selected WSDL file and generate the required controllers. Once completed, you should see a success message, and a link to return to the Project Screen, which will now show two entries for the generated runtime patterns in your chosen layer.
Note: WebMaker requires valid WSDL files, based on the WSI industry standards.
If a WSDL file fails to parse, a list of errors will be provided.
If a selected WSDL file was parsed previously, or there are unforeseen name conflicts, then WebMaker will prompt you for a Name Prefix to ensure the names allocated for the generated controllers will not conflict with others in the repository.
Once the access service controllers have been created, other controllers can use them. Generally, this will happen automatically where needed, but can be done manually by adding rules from the relevant Controller. You would need to add a rule with an Invoke Service Action, and then use the Service Call Helper option to select the newly created Access Service.
Select the WSDL file that defines the service you want to use. You can use the Repository Viewer to open a local file or use the Upload From URL tab to load the WSDL from its web location directly.
After you have selected your WSDL file, you can click Next to perform the import process. This should parse and validate the selected WSDL file and generate the required controllers. Once completed, you should see a success message, and a link to return to the Project Screen, which will now show two entries for the generated runtime patterns in your chosen layer.
Note: WebMaker requires valid WSDL files, based on the WSI industry standards.
If a WSDL file fails to parse, a list of errors will be provided.
If a selected WSDL file was parsed previously, or there are unforeseen name conflicts, then WebMaker will prompt you for a Name Prefix to ensure the names allocated for the generated controllers will not conflict with others in the repository.
Once the access service controllers have been created, other controllers can use them. Generally, this will happen automatically where needed, but can be done manually by adding rules from the relevant Controller. You would need to add a rule with an Invoke Service Action, and then use the Service Call Helper option to select the newly created Access Service.
Proxy Service Generation
The image below shows the default set of rules that are generated when a WSDL is imported. The import process generates two controllers, one called the Access Service and other known as the Proxy Service. The two controllers are often collectively referred to as the Proxy Service. The proxy controller simply acts as the placeholder for the URL of the remote service and contains no structure or content. The Access Service contains the rules shown on the image below.
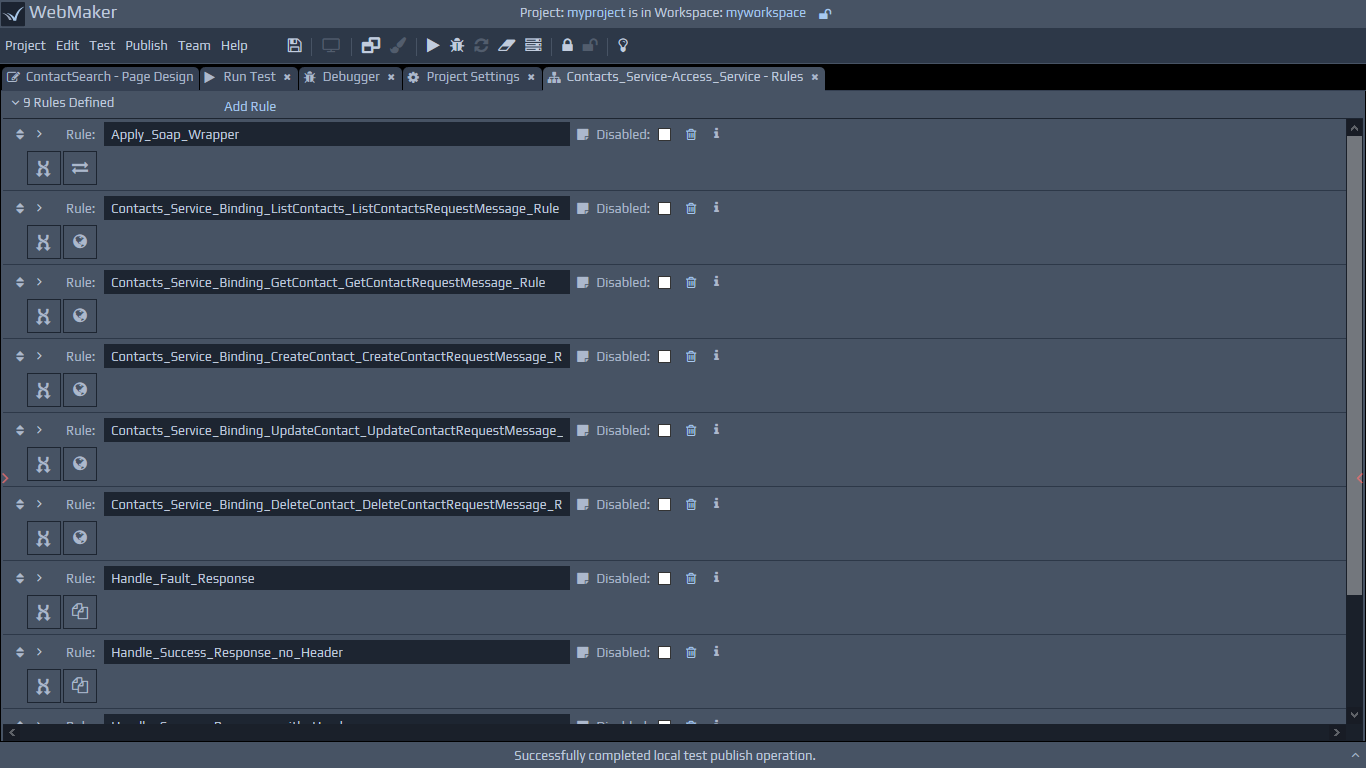 The first rule applies the SOAP Wrapper (Envelope and Body) required for a SOAP Service. This is then followed by a rule for each remote service operation, which will check to see if the factbase has the correct message content before calling the particular service operation endpoint. Towards the bottom of the rules, there should be three further rules generated by default. The first one handles the soap Fault fragment if it is returned from the service, the second one handles a soap response with no Soap Header fragment and the third rule handles a soap response that contains a Soap Header fragment. If a Soap Header is returned the Access Service rules will return the whole Soap Envelope back to the Controller, otherwise it will return the contents of the Soap Body only. You can change these rules as required.
You can setup REST service proxies which can be invoked to receive response data. This response data can be bound to your page controls. In order to create and configure your REST service, click the REST Service button on the Data Sources tab and follow the instructions. REST services are configured using an XML fragment to provide dynamic capabilities, including the ability to determine the POST Method, URL, Header attributes and security settings during runtime.
You can learn more in the REST Services section.
This forum entry provides additional examples, including video tutorials.
WebMaker has the capability to access Rest-based services without any traditional programming. This can be achieved using a simple XML control fragment, which is processed at runtime to define the various dynamic elements such as the location URL, http request method and other parameters for the remote service. This can be achieved using the normal rules mechanism within Controllers.
REST Services designed using WebMaker can handle XML and JSON message formats. This forum entry provides additional examples, including video tutorials.
The first rule applies the SOAP Wrapper (Envelope and Body) required for a SOAP Service. This is then followed by a rule for each remote service operation, which will check to see if the factbase has the correct message content before calling the particular service operation endpoint. Towards the bottom of the rules, there should be three further rules generated by default. The first one handles the soap Fault fragment if it is returned from the service, the second one handles a soap response with no Soap Header fragment and the third rule handles a soap response that contains a Soap Header fragment. If a Soap Header is returned the Access Service rules will return the whole Soap Envelope back to the Controller, otherwise it will return the contents of the Soap Body only. You can change these rules as required.
You can setup REST service proxies which can be invoked to receive response data. This response data can be bound to your page controls. In order to create and configure your REST service, click the REST Service button on the Data Sources tab and follow the instructions. REST services are configured using an XML fragment to provide dynamic capabilities, including the ability to determine the POST Method, URL, Header attributes and security settings during runtime.
You can learn more in the REST Services section.
This forum entry provides additional examples, including video tutorials.
WebMaker has the capability to access Rest-based services without any traditional programming. This can be achieved using a simple XML control fragment, which is processed at runtime to define the various dynamic elements such as the location URL, http request method and other parameters for the remote service. This can be achieved using the normal rules mechanism within Controllers.
REST Services designed using WebMaker can handle XML and JSON message formats. This forum entry provides additional examples, including video tutorials.
Setting up a Rest Service Proxy
The first step is to setup a proxy controller for the remote Rest Service.
In order to achieve this, an 'empty' (no rules processing) Proxy controller needs to be setup. This can be achieved by opening the Project Settings tab and clicking on the Runtime Patterns tab. Typically, click on the Model layer to set-up a Remote Proxy Controller that will be mapped to the physical Rest Service. Type in the New Filename for the reference to the controller you want to call, e.g. {RemoteControllerName_Rest_Proxy}
and click on the Clone Pattern button. This will display another screen that enables the selection of the Base Pattern to be used - In this case the Remote_Service_Proxy.xml
file. Finally, click on the Clone Pattern button to create the controller.
Once this is done, open the Test Settings and select the Agent Types menu option. Click on the Agent Id for the controller just created, and then change its Agent Type to Web Service Proxy
. The Service Type field should be correctly defaulted to HTTP Service
. Enter the Web Service URI as the full URL for the Rest Service. Ensure you tick the Allow Advanced Features option if you need to dynamically alter the URL for the Rest Service at runtime, or need to pass dynamic Parameters
to the service.
Finally, click on the Change Agent Type to commit the changes.
Finally, this proxy controller, in the model layer, can then be configured for invocation from other controllers using an Invoke Service action. This proxy controller acts as a gateway to the actual Rest Service. This means that the URL (or at least the static part of the URL) can be amended in the External Calls section within the Publish Settings for different publication environments.
Setting up Dynamic Rest Service Calls
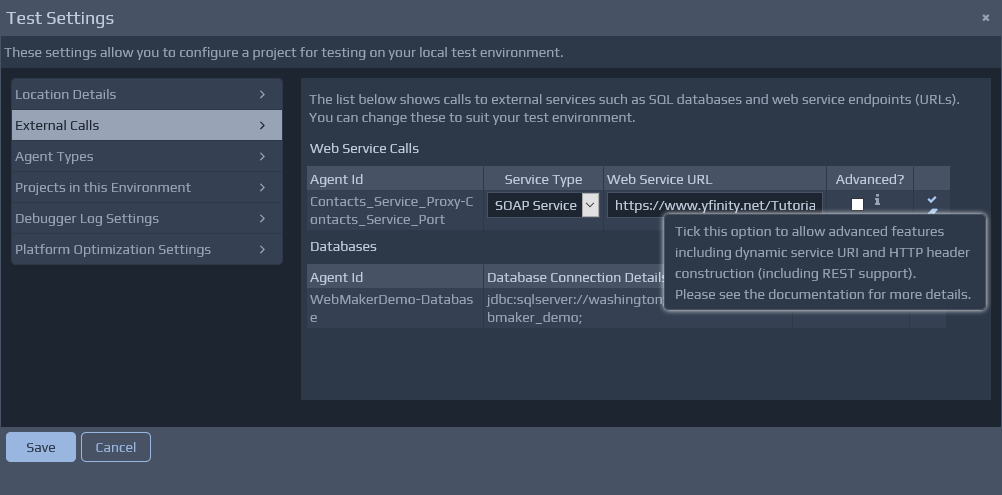 An HttpHeader fragment can be used to dynamically set http header attributes and direct payloads to dynamically constructed URLs. The HttpHeader fragment will typically be created in a controller within the Access Service or Controller layers, calling a proxy to a remote URI. This fragment should be included in the request payload to be sent for the External Call.
If this Advanced? option is ticked then WebMaker will search for the HttpHeader fragment in the FactBase and parse it to create a URI dynamically, set the http attributes before sending the payload. After processing, the HttpHeader fragment is removed from the message before the payload is sent.
The following example XML fragment can be placed within the payload to change the default behaviour:
An HttpHeader fragment can be used to dynamically set http header attributes and direct payloads to dynamically constructed URLs. The HttpHeader fragment will typically be created in a controller within the Access Service or Controller layers, calling a proxy to a remote URI. This fragment should be included in the request payload to be sent for the External Call.
If this Advanced? option is ticked then WebMaker will search for the HttpHeader fragment in the FactBase and parse it to create a URI dynamically, set the http attributes before sending the payload. After processing, the HttpHeader fragment is removed from the message before the payload is sent.
The following example XML fragment can be placed within the payload to change the default behaviour:
<xg:HttpHeader xmlns="http://www.hyfinity.com/xgate" xmlns:xg="http://www.hyfinity.com/xgate">
    <xg:url action="" merge_option="replace" request_method="GET">http://anyValidUrlString</xg:url>
    <xg:params>
        <xg:param name="command">login</xg:param>
        <xg:param name="error_dest">client</xg:param>
    </xg:params>
    <xg:attributes>
        <xg:attribute name="HTTPHeaderAttrib1">attribute value</xg:attribute>
        <xg:attribute name="HTTPHeaderAttrib2">attribute Value</xg:attribute>
    </xg:attributes>
</xg:HttpHeader>
URL attributes
@action - If a non-empty string value is specified then this overrides the static action specified by default. If an empty string value is specified then this still overrides the static action that is specified during deployment and sets the action header attribute with an empty string. If this attribute is missing then the static action value will not be overridden.
@merge_option - options are replace
or append
. When set to replace
the static url specified during web service set-up will be replaced by the URL constructed using this HttpHeader fragment above. If the append
option is specified then the static url supplied will be extended with the dynamic url constructed using this HttpHeader fragment definition.
@request_method - The HTTP request method to fire. This can be one of the strings GET
, POST
, PUT
or DELETE
. If a value is not supplied or an empty string is supplied then the default will be POST
.
The params will be appended to the URL in name=value
pairs separated by "&" after a "?" has been inserted between the URL and the params. e.g. http://anyValidUrlString?command=login&error_dest=client
The attributes will be set in the request http header before a request is made to the URL. The name attribute indicates the name of the http header attribute and the value is the value to be set for this header attribute.
You can supply security information for remote services that require http-based authentication using the optional security element within the HttpHeader fragment. WebMaker parses this fragment negotiates the security steps for the requested service. This feature utilises the Apache Http Client security module and it is this module that will determine how to apply the supplied security credentials based on remote service responses.
<?xml version="1.0" encoding="UTF-8"?>
<xg:HttpHeader xmlns="http://www.hyfinity.com/xgate" xmlns:xg="http://www.hyfinity.com/xgate">
    <xg:security preemptive="true">
        <xg:realm>authenticatingRealmOrDomainName</xg:realm>
        <xg:host>hostNameRequiringAuthentication</xg:host>
        <xg:port>portOnHostRequiringAuthentication</xg:port>
        <xg:username>String</xg:username>
        <xg:password>String</xg:password>
        <xg:client>nameOfClientRequestingAuthentication</xg:client>
    </xg:security>
</xg:HttpHeader>
@preemptive - This boolean attribute determines whether WebMaker should pre-compose the necessary security tokens before first invocation of the service or wait until a service has responded after first invocation, providing details of how to construct the security token. This is useful when certain secure services degrade to a lower access level when security credentials are missing. For example, some services may assume guest access if credentials are missing, thus never returning an HTTP 401 code to indicate the need for authentication. This is generally only applicable to BASIC authentication schemes.
realm - Name of the realm or NT domain.
host - Name of the host requesting authentication.
port - The port number on the host requesting authentication.
username - Username.
password - Password.
client - Name of the client machine requesting authentication.
Depending on the type of authentication required you may not need to provide all of these settings. For example, if using BASIC authentication then only the username
and password
should be required.
WebMaker uses the Apache HttpClient module version 4.2.3 to handle the low-level calls to remote web services.
WebMaker supports some additional settings to provide more advanced control over the external web service calls. These settings are split into two types: additional settings on the xgate HttpHeader fragment, and lower level HttpClient settings via a configuration file.
Advanced HttpHeader Settings
The following additional attributes can be supplied on the root element (xg:HttpHeader) of the HttpHeader fragment used to perform REST calls:
output_response_headers - By default, when the Advanced Features
are enabled for a proxy controller, information about the HTTP response headers will be included automatically in the response message returned to the controller. If the response message already defines a SOAP message, then these headers will be included in an HttpHeader block within the SOAP Header element of the response. If the response was not a SOAP message, then a SOAP wrapper will be created, with the response content in the Body, and the response headers available in the SOAP Header.
If you are not interested in accessing the response headers, then this can cause additional work to remove this extra wrapper. Instead you should add an output_response_headers="false" attribute to the HttpHeader element. If this is present (with a value of 'false') then WebMaker will not attempt to return the response header information, and will not add SOAP wrappers to non-SOAP responses.
maintain_context - If this attribute is provided and set to true
then WebMaker will store the HttpClient HttpContext object for each user session. If the same user makes another call via the same web service proxy controller then this context will be reused. These context objects store state information, and reusing them can provide a performance improvement, especially when dealing with authenticated services. The HttpContext objects are stored in the user's session cache and should be listed in the platform status report available at http://<server>:<port>/<application>/get_xplatform_info.do
.
maintain_cookies - If maintain_context is set to true
then this additional attribute can also be provided. If this is set to true
then the HttpContext object will also store details of any cookies set by the remote service. On any subsequent calls to this service these cookie values will be sent automatically within the outgoing request. This can be useful for example when calling a service that requires an initial logon process, but then issues a session token cookie that should be used for all future requests. this could always be handled manually by setting the appropriate xgate HttpHeader attributes, but this provides a much simpler option.
HttpClient Configuration
In order to configure the underlying HttpClient instance you can provide an additional config file for each web service proxy. This allows configuration of lower level settings such as the number of connections to keep in the pool, what timeout values to use, what User Agent string to send to the remote service etc.
This configuration file should be an XML file split into three sections as shown below
<httpclient_config>
    <connection_manager>
        <max_total_connections>50</max_total_connections>
        <max_connections_per_host>10</max_connections_per_host>
    </connection_manager>
    <client>
        <property name="http.socket.timeout" value="10000" type="java.lang.Integer"/>
        <property name="http.connection.timeout" value="10000" type="java.lang.Integer"/>
        ...
    </client>
    <request>
        <property name="http.useragent" value="New User Agent String" type="java.lang.String"/>
        ...
    </request>
</httpclient_config>
You should save this file into the Other Resources category within the repository for your project with a name ending in httpclient_config.xml. For example, myproxy_httpclient_config.xml
. This allows different configuration files to be used for different proxy controllers if required. You then need to use the Resource Details screen for the proxy controller to add this configuration file as a resource of this controller. To do this, use menu item Project | Advanced Project Settings...You can then locate your controller and click-through to reveal the navigation pattern diagram. At this stage, you can double-click the graphical controller icon. On the next screen, select the View Node Details radio option for the Double Click Action field and then double click the controller on the diagram. On the next screen you can click the View Engine & Resource Details. Finally, you should be able to use the Add Resource link on the next page to add your resource file and press Save.
Both the client
and request
sections can contain any number of property elements. Properties set under the client
section will be applied to the HttpClient object, whereas those listed under the request
section will be applied to each HttpRequest object. For more details on the available settings please refer to the HttpClient tutorial documentation, for example Connection parameters and HTTP request execution parameters.
This configuration file supports properties with types of java.lang.Integer
, java.lang.String
, and java.lang.Boolean
. In addition, you can use a type of java.util.Collection
when providing a comma separated list of strings within the value attribute for properties that require a String collection.
You can access RDBMS data using the SQL Statement action. Please see the SQL Statement action within the Rules Design Reference for more details. Using the WebMaker Data Source capabilities will set-up Rules to process the SQL data for simple actions. For more complex SQL scenarios, it will be necessary to access the Rules to refine the SQL statements.
Within each SQL operation you can either define new database connections or reuse existing database connections that have already been defined. You can also access the database connection information from the WebMaker Studio Deployment screens, accessible from the Project tab.
From version 5.0 you have access to the Java Method action within the Rules Design, which can be used for ad-hoc integration with Java APIs. This is the easiest method for Java Integration and should be used before considering Custom Controllers. Please see the Java Method for more details.
It is possible to write Java Controllers on the server to handle client requests and produce responses. This enables Java Programmers to use Java to access other complex server components such and EJBs, whilst retaining the advantages of fast and easy web page design. Please see section on Server Controllers for more information.
The Test Menu contains options for testing applications on a local test environment.
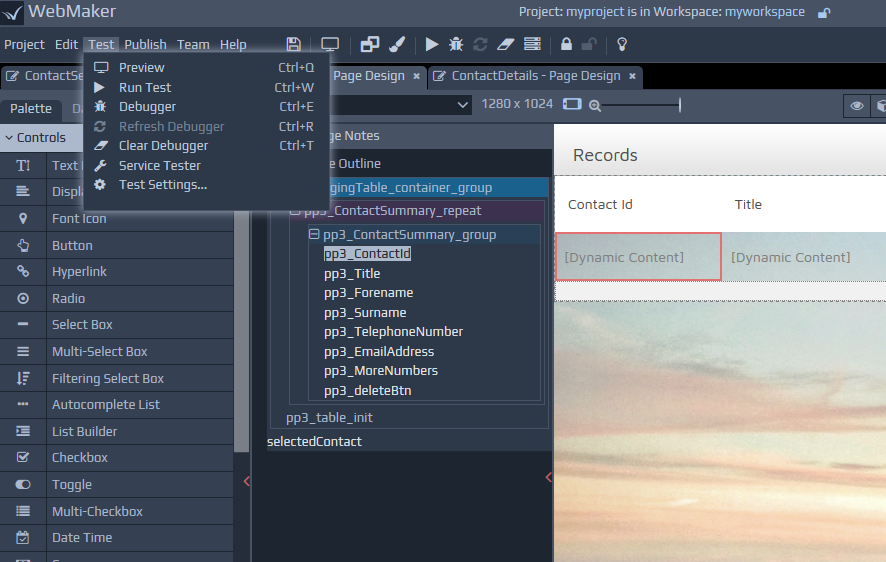 WebMaker produces application logs, which can be configured for different modes of execution and the amount of logging information that is produced and parsed for viewing can be controlled using various settings. This can be very useful during development, testing and live operation. You can use the Test Settings - Debugging Log Details platform logging level from
 Warning
to Debug
, to view full details.
The diagram below illustrates the main processing flow, which is discussed in more detail below:
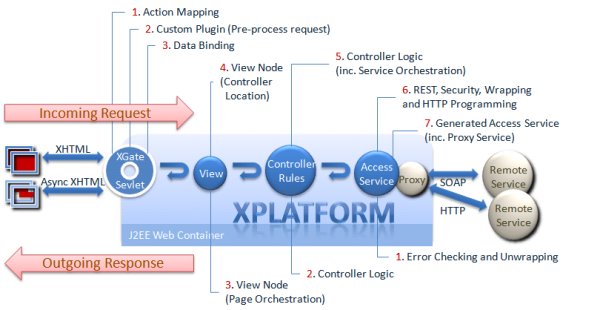
WebMaker Runtime Components and Request and Response stages:
Incoming 1 - Action Mapping. The runtime platform processing starts when theXGate
servlet receives a request from a client browser or server. Upon receipt, XGate will attempt to map the requested action to a server Controller using the mapping.xml file. This file is located at webapps/doc and should be maintenance free for the majority of web applications.
Incoming 2 - XGate Custom Plug-in. Once an action has been mapped, XGate will search for any Custom Plug-ins that may be defined. These are custom Java classes and are described in the xgate.xml file located at webapps/doc. If custom plug-ins are found then the incoming request message will be sent to the plug-ins. Once plug-ins have finished processing, the resulting message will be forwarded to the View Controller for onward processing. An example plug-in may call an LDAP server to obtain security credentials and provide this information as an XML fragment. This information can then be used within the Controllers to restrict access to remote services, validate against remote services, control access to page menus, etc.
Incoming 3 - Binding. The next step binds the incoming name-value pairs to the XML instance documents.
Incoming 4 - View Controller. This is the first native rules-based processing controller of the runtime platform and should be largely maintenance-free, although it has rules capabilities just like any other Controller and its behaviour can be modified if necessary. During the incoming request leg, the View controller inspects the incoming message to determine the target Controller name. It then uses this to forward the message to that controller for further processing. You may notice by this stage there is a default eForm wrapper that has been created by WebMaker. This is applied by XGate and should not require modification. This wrapper enables you to separate 'administrative' header information from the application data. Any information that could not be bound will appear in the /mvc:eForm/mvc:Control section. The other Fields indicate the action and the target Controller and also the name of the next Page. The Page name may be changed by the Controller on the response leg, depending on the execution outcome and which Page needs to be displayed.
Incoming 5 - Controller Logic. Once the request message reaches the controller you can process the message using any number of native XML operations such as copying, deleting, validating, transforming, etc. You can also use the Invoke Service action to call remote services and other Controllers. For a full list of available operations please see the Rules Design Reference guide.
Incoming 6 - Soap, Rest, Remote Service Security and HTTP Programming. WebMaker separates the business application from the technical plumbing required to connect together a SOA application. This includes the transport requirements for communicating with remote services via the XGate communications gateway. There may be occasions when you need more detailed control of the underlying HTTP communication. This can be achieved using an XGate HttpHeader control fragment to manipulate advanced elements of HTTP Headers.
Please see the earlier section on Rest Based Services for more details.
Incoming 7 - Access Services (including Proxy controllers) When a WSDL is parsed, WebMaker automatically sets up an Access Service for each of the services defined in the WSDL. Access services are controllers created in the Model layer that also wrap request messages, call remote services, process the responses and unwrap the responses, ready for processing on the outgoing response leg. The proxy service shown simply acts as a placeholder for the remote service address. This occurs when a controller is designated as a Remote Service Proxy in the Test Settings menu option dialogue (Please see Test Menu - Test Settings section below. Controllers defined as Remote Service proxies have no internal structure or rules capabilities. They simply become a URL endpoint configuration parameter at runtime. All pre and post processing for remote service calls should ideally be performed in the Controller and, if the change applies to all operations of the remote service such as the caching and submission of security tokens, then the Access Service rules can be modified.
Outgoing 1 - Service Error Checking, Unwrapping, caching, etc. When a service call returns, it will typically be wrapped and may include information that needs to be sent back with subsequent requests, such as record ids and security tokens, etc. The Access Service controllers in the Model layer can be used to handle such tasks. By default, rules for Fault checking and message unwrapping are generated by WebMaker when WSDLs are imported.
Outgoing 2 - Controller Logic This presents the opportunity for processing before the information is transformed for output to the next screen or other calls are made to other services. This is also the stage when you can set the page name for the next screen. This is the page name that will be used by the View Controller to locate the XSL transformation to generate the next page. At this stage you should also ensure that the XML instance document that was used for the Page Display Bindings is located in the right place to enable page transformation to perform the correct bindings and display the correct data on the HTML page. If the information is missing or in the wrong format then the screen will contain blank or incorrect data and structures.
Outgoing 3 - View Agent In almost all cases this stage simply transforms the data returned by the Controller using the next Page name to create the next page. You can add generic rules here to redirect to an error page or perform logs, etc. if there are errors present. If a translation parameter was provided during the request then the WebMaker will look for translation files at this stage, to perform language translations.
Outgoing 4 - XGate Custom Plug-in At this stage you should write the output part of Custom Plug-ins if you decided to use one. The response will be forwarded to the plug-in before being sent to the browser. An example plug-in at this stage may be written to simply amend the HTML DOC-TYPE for the page being returned.
The View Controller
The image below shows the default rules that form part of the View controller. The first rule is activated during the incoming request leg of the message flow. This is used to locate and forward the request to the appropriate target Controller. The second rule is activated on the outgoing response leg, which essentially transforms the message response from the controller to create the HTML page. The third rule is the same as the second, but accounts for language translations. The View controller is just like any other Controller, which means you can add your own rules here if required. For example, you may decide to check for an error fragment and respond with a different page if errors are found. This can be done by simply changing the page name to re-direct to an error page.
WebMaker eForm structure - Control and Data Blocks
In the earlier section on the View Controller you will notice a message fragment on the left, which is the default control data. This was captured during the incoming request leg of the journey. You should notice that the posted request information to the server has been wrapped within the /mvc:eForm/mvc:Data element. This is the default wrapper for the data, but can be changed as required. The /mvc:eForm/mvc:Control section of the message contains control information such as the name of the requested Controller, the next Page name, the requested action, etc.
WebMaker will also place unbound form elements within this section. This may be because some bindings are invalid or designed intentionally to appear in the Control section.
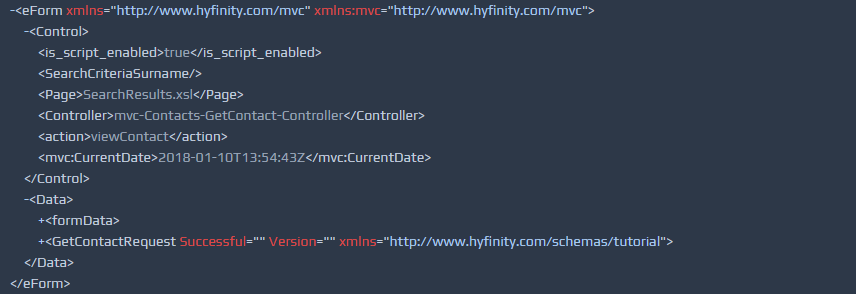 Within each controller you have full access to the wrapped information. The main information of interest typically is the payload contained within the /mvc:eForm/mvc:Data element. Once the message has flowed through the various controllers to the access service, it will be re-wrapped using a SOAP Wrapper by default. This is performed by transforming the contents of the /mvc:eForm/mvc:Data into /soap:Envelope/soap:Body. This transformation is achieved using file SOAP_Wrapper.xsl. You can modify this to suit your exact soap wrapping requirements.
The reverse wrapping and unwrapping is performed during the outgoing response leg of the message flow. Essentially, the /mvc:eForm wrapper is used to wrap and provide a containing element for the unstructured data captured from the client pages and also to contain WebMaker domain-specific information during execution within the WebMaker Platform. The /soap:Envelope is used for SOAP and HTTP requests to remote services. These wrappers and the mappings between them can be altered, but should not be necessary is most cases.
Within each controller you have full access to the wrapped information. The main information of interest typically is the payload contained within the /mvc:eForm/mvc:Data element. Once the message has flowed through the various controllers to the access service, it will be re-wrapped using a SOAP Wrapper by default. This is performed by transforming the contents of the /mvc:eForm/mvc:Data into /soap:Envelope/soap:Body. This transformation is achieved using file SOAP_Wrapper.xsl. You can modify this to suit your exact soap wrapping requirements.
The reverse wrapping and unwrapping is performed during the outgoing response leg of the message flow. Essentially, the /mvc:eForm wrapper is used to wrap and provide a containing element for the unstructured data captured from the client pages and also to contain WebMaker domain-specific information during execution within the WebMaker Platform. The /soap:Envelope is used for SOAP and HTTP requests to remote services. These wrappers and the mappings between them can be altered, but should not be necessary is most cases.

Debugging and tracing your application flow
The WebMaker Platform uses the same logging mechanism and Debugger application within development, user acceptance testing and production environments. The key differences between the types of deployment is determined by the settings of individual parameters for application configuration and logging options. WebMaker automatically logs message flows through an application to enable easier troubleshooting, during application design and execution.
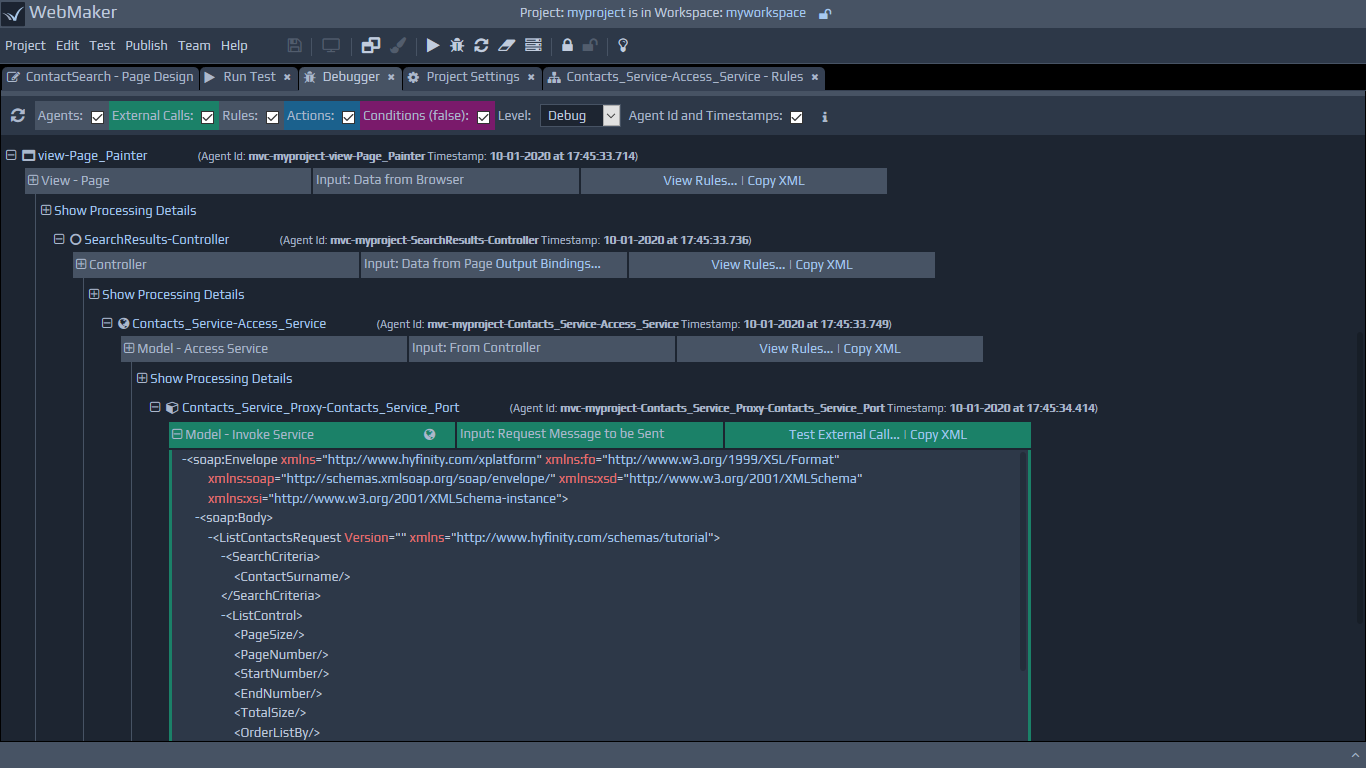 Additional information about the Debugger in available within the Server Platform Administration section.
WebMaker contains a remote Service Tester. This can be accessed from the Test Menu, allowing you to create XML requests to be sent to external web services and view responses.
By default, the Service Tester points to a dummy Hello World Web Service included as part of the WebMaker distribution.
Provided your runtime server is running on the default runtime port 7080, simply click on the Call Service link. The XML response area should show a successful
Additional information about the Debugger in available within the Server Platform Administration section.
WebMaker contains a remote Service Tester. This can be accessed from the Test Menu, allowing you to create XML requests to be sent to external web services and view responses.
By default, the Service Tester points to a dummy Hello World Web Service included as part of the WebMaker distribution.
Provided your runtime server is running on the default runtime port 7080, simply click on the Call Service link. The XML response area should show a successful Hello World!
message.
The Debugger also contains a Test External Call... link, which can load instances of web service request messages into the Request (Payload) area of the Run Service Tester. You can use this feature to perform ad-hoc request/response monitoring and debugging of remote service invocations.
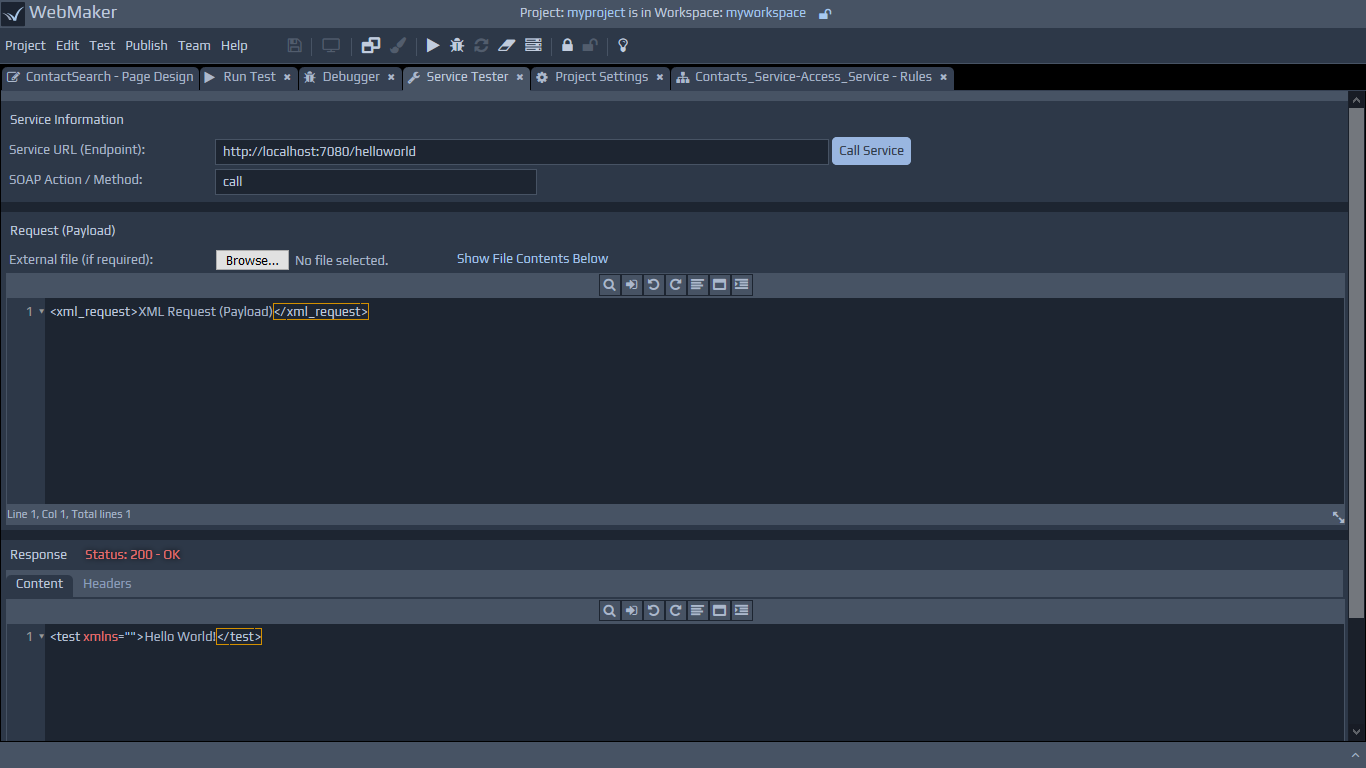 Some Web Services don't require a SOAP action, but may accept proprietary XML data structures. Also, some Web Services may not require any incoming XML at all.
You can use the Service Tester to test these different permutations.
The Test Settings menu option can be used to configure the platform for the test environment that is part of the local machine. You can use this to test applications during development, prior to publication to user acceptance or production environments. The test environment is normally started and executes in the background when the WebMaker Studio is started. The Run Test operation deploys applications to this test environment for execution. Requesting Run Test will either start-up an application that has not been previously tested, or it will restart an application with any changes committed using the Save operation.
If any of the Test Settings are changed, a Run Test action is required for the changes to be applied to the test environment.
Some Web Services don't require a SOAP action, but may accept proprietary XML data structures. Also, some Web Services may not require any incoming XML at all.
You can use the Service Tester to test these different permutations.
The Test Settings menu option can be used to configure the platform for the test environment that is part of the local machine. You can use this to test applications during development, prior to publication to user acceptance or production environments. The test environment is normally started and executes in the background when the WebMaker Studio is started. The Run Test operation deploys applications to this test environment for execution. Requesting Run Test will either start-up an application that has not been previously tested, or it will restart an application with any changes committed using the Save operation.
If any of the Test Settings are changed, a Run Test action is required for the changes to be applied to the test environment.
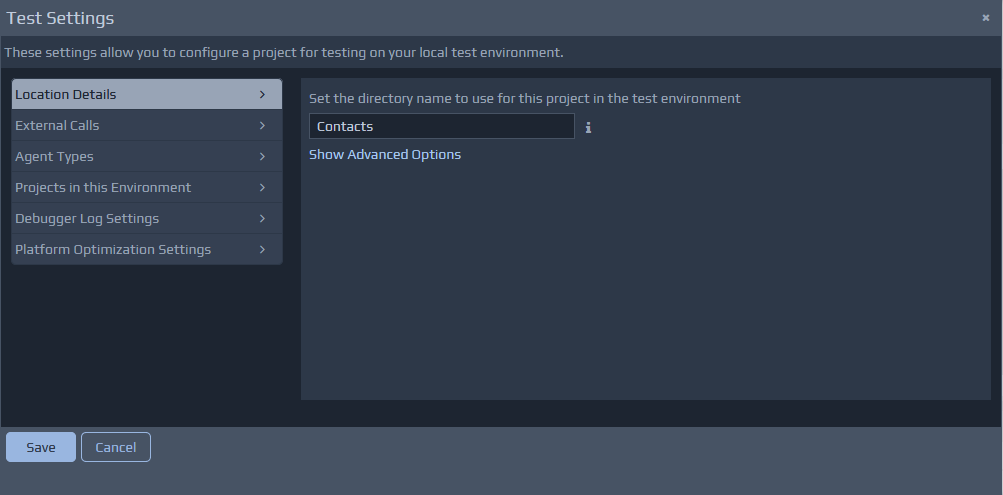 Test Settings:
Location Details - Where the application is actually deployed on the local machine.
External Calls - Shows calls to external services such as SQL databases and web service endpoints (URLs). You can change these to suit your test environment if required.
Agent Types - Shows the various Agents within an application project. Most Agents will be of type Standard
, with special types including Soap Service
, Http Service
, Database
, etc. These details only need to be changed for advanced cases.
Projects in this Environment - Shows all the projects that are currently in this test environment. The list will be updated when you press Run Test, and also when other projects are configured to use the same test environment. This is useful when multiple projects are combined to form a single application. In most cases you will only see details of the current Project.
Debugger Logging Details - These details control the level of logging that will be produced by the running application within the test environment. These logs are used by the Debugger to show the application flow and rules processing.
Platform Optimisation Details - The Platform Run Mode, Pooling options for concurrency, scalability and resource management.
Location Details
The location details define where the test environment is located for a particular application. These settings should not require modification in most scenarios. They will require changes if multiple projects are to be combined into a single application.
Project Directory Name - By default you will only see a directory name, representing the location where your project is deployed. This directory is relative to the web server location and will typically reside within the webapp folder. You can use the Advanced Options link to reveal more detailed settings that are set for you based on the Project Directory Name you select for your deployment. Within Advanced Options you should see the following settings:
Test Settings File Location defines where the _morphyc.xml file will be located, which is the configuration file that holds the runtime test environment details such as log settings, platform optimisation details, etc.
Test Project Destination defines where the location of the runtime files that constitute the runtime application. This will contain all the meta-data files required for the application, including all the Controller definitions, Pages and Rules. This collection of files that forms the specification for the project is often referred to as the application blueprint.
Test Web Server Location defines where the web application elements will be located in the test environment. This is used to define where the Run Test operation will place the CSS files, JavaScript files, images, etc.
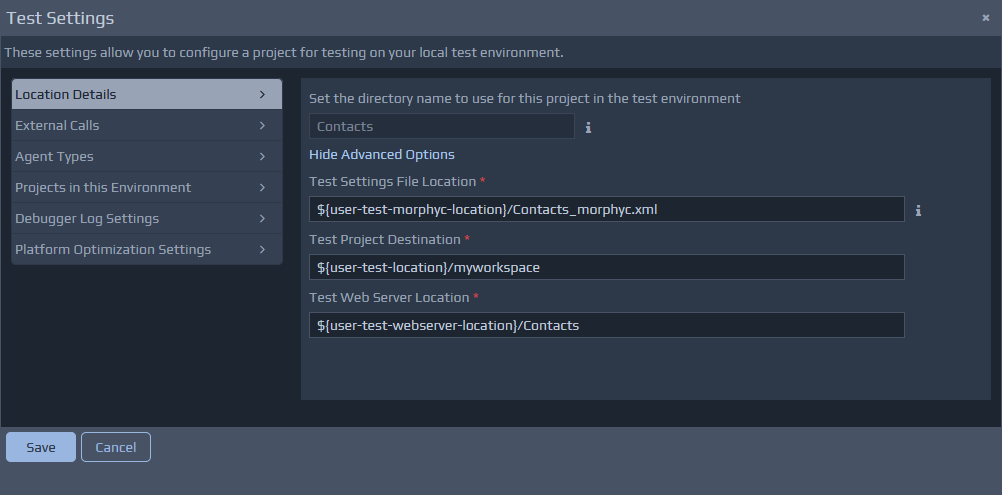
External Calls
The External Calls section will show details of any external resource that will be called from the application. These details will include SQL databases, web services, inter-project calls, etc. These details are generally created in projects when Data Sources are used on the Page Design screen.
A Run Test operation is required for any changes made on this screen to take effect.
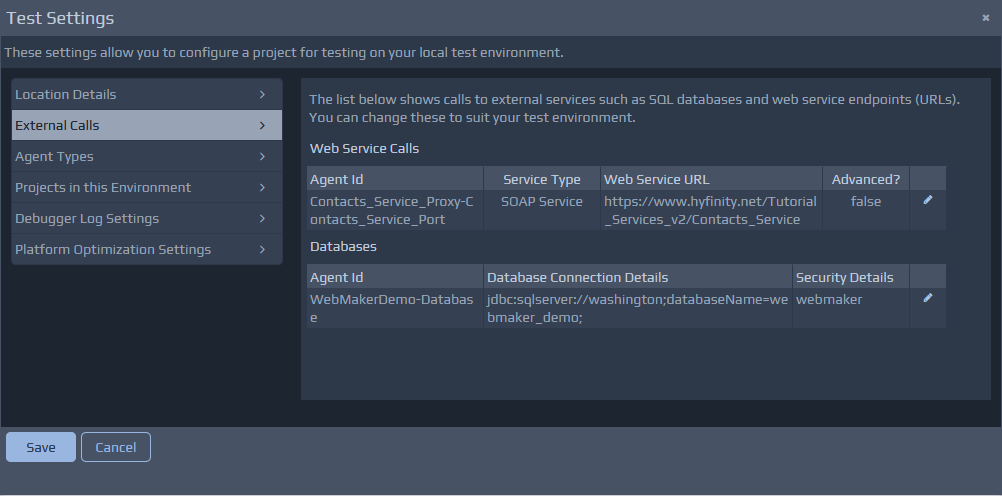 The sections that will be displayed include:
Databases - Shows the connection information for each SQL Database Connection (JDBC driver, connection URL, etc). You can also edit these settings from the Database Selection
popup, available in the Page Design and Rules Design tabs.
Web Service Calls - Shows the endpoint URLs in use for each web service proxy, which can be modified as required. The Advanced Features option enables the processing of an additional HttpHeader fragment in the rules, which can contain information about the method of interaction and security details (if any) for remote services.
Inter-Project Calls - Shows the proxies for the target controllers in external projects that can be called by controllers in this project. For example, there may be a common Controller that is located in a shared project. This section allows you to adjust the target controller that will be called by each proxy. See Managing Multi-Project Applications for additional details.
Agent Types
The list on the left hand side shows the controllers that already exist within the project. Most controllers are of type Standard
(shown as blank in the list). Special Agent Types will be shown such as SOAP Service
, Http Service
, Database
, Inter-Project Proxy
, etc. These details only need to be changed for advanced cases. If changes are required, click on an Agent Id link to show the current details for the Agent on the right hand side. These details can be changed as needed. Firstly, select a different Agent Type and then record the appropriate details. Changes must be saved using the Change Agent Type button, and the Test Settings dialogue should be closed to allow synchronisation of various platform settings. The Test Settings dialogue can be opened again if required.

Projects in this Environment
This section shows details of the projects that are included and constitute this application. Most applications will only consist of a single project. This screen provides the ability to remove entries, but in most cases you will not need to change these details.
Please see the section on Managing Multi-Project Applications for more details.
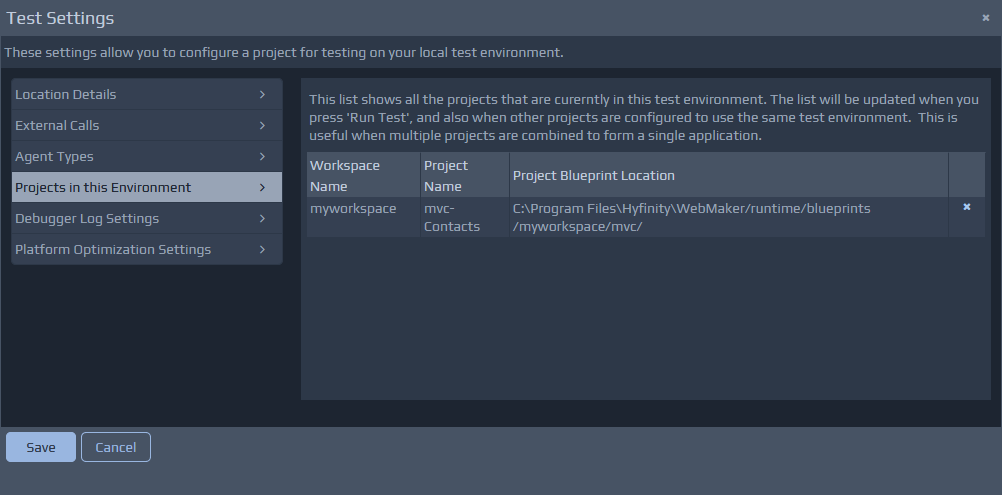
Debugger Log Settings
WebMaker logs are split into three parts, the Platform, Development, and Administration logs. The Enable ... Logging? tick box can be used to enable or disable each type of log. If enabled then the resulting logs can be viewed on the View Debugger tab and additional options are available.
Platform Log Details
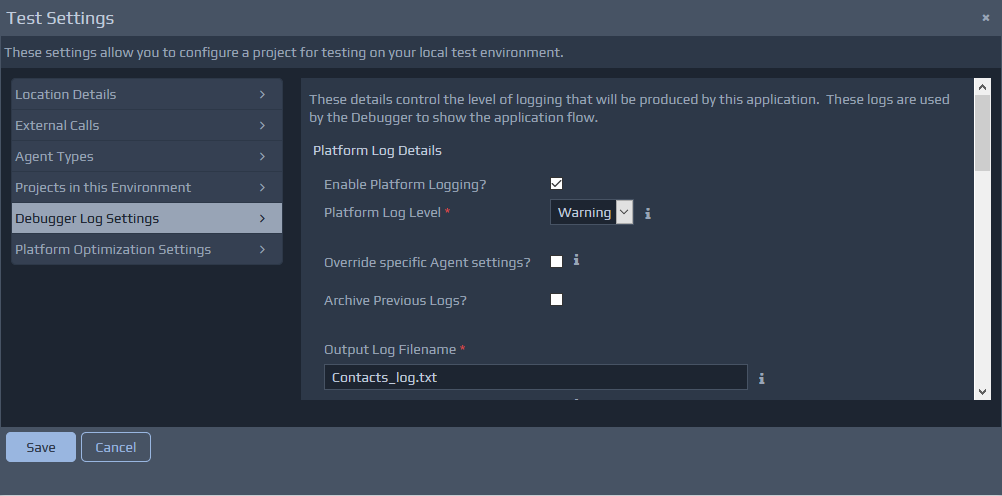 Platform Log Level:
Fatal - Only log critical errors that prevent the on-going operation of the application, e.g. unavailability of soap service or database connection.
Error - A significant error, which can be resolved by further attempts or the application logic handles the error and is able to make a decision to bypass the error, to enable the application to continue. E.g. An instance of a Java method call failure may be an error, but the non-existence of the method may be fatal.
Warning - Potentially a problem that may need to be addressed, but does not affect the fundamental operation of the application. E.g. failure to bind a field.
Info and Debug - Most verbose forms of logging, providing detailed diagnostics during runtime execution or development.
Override specific Agent settings? - For the platform and development logging types it is possible to override the settings on a per Agent basis. This is done by ticking the Override specific Agent settings? and adding details of the Agent for which overrides are required. The Agent ID values that need to be entered here can be found on the View Debugger tab. The ID does not need to be a full value (isolating a specific Agent) and can be used to apply settings to a wider collection of Agents. For example, if you don't want to log anything from the Example project as a whole (in a multi-project application configuration for example), you could just enter mvc-Example
in the Agent ID field, and set the rest of the options accordingly. The override settings will be applied to any agent whose full Agent ID starts with the entered ID value.
This log overriding functionality is very useful for more complex applications where you would otherwise generate very large log files. You can use this capability to filter the logs to just the ones you are interested in, making the resulting files smaller and easier to view and process. It also allows the log levels to differ for some Agents. So, you may wish to only produce Error
logs for some project Agents.
Archive Previous Logs? - If enabled, you need to set the Max Backup Index and Max File Size values. The max backup index attribute indicates the number of rolling archive files to keep and the max file size indicates the maximum size of the log file before it is archived. The max_file_size parameter is stated in bytes, e.g. 1048576 = 1MB
. If the archive previous log is not set then only one log file will be created. By default, this is not set.
Output Log Filename - Name of the file where the logs will be written. The log destination can be set to the same filename for each logging type. This will result in all the logs being output to the same file.
Output to System.out - This option indicates whether logs will also be output to the tomcat runtime screen.
Development Log Details
These logs mainly focus on the XML messages flowing through the application. Different aspects of development logging that can be controlled independently. Agent Messages covers the information flowing between each Agent (incoming and outgoing), Rule Messages detail the state of the FactBase and any Variables before each rule is fired, Action Messages detail the state of the FactBase and any Variables after each action is fired, and Rule Checking Messages indicate when each rule is being checked to see if the conditions are true
and whether the rule should be fired.
The other field options Override..., Archive... and Output ... work in the same manner as those settings previously defined in the Platform Log Details above.
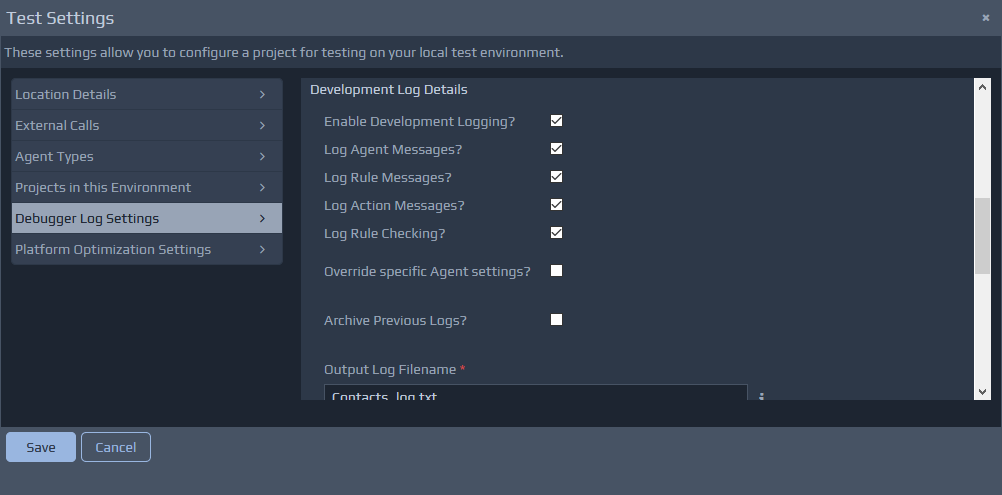
Administration Log Details
Administration logs contain details on session and caching activities performed by the underlying platform. These logs also capture details of the project assets that are cached by the platform.
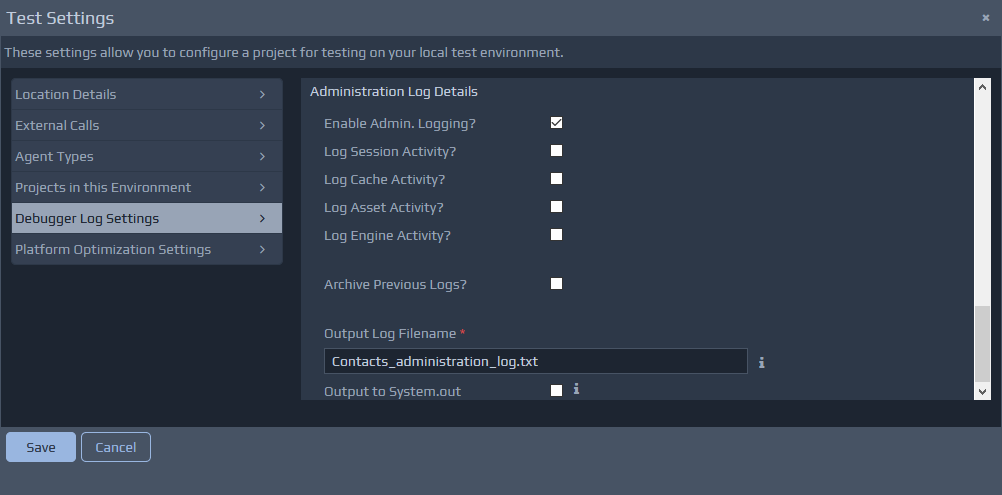
Log Session Activity? - An entry is created for each Agent Session created or destroyed for a user using an application.
Log Cache Activity? - Entries are created for used-defined cache operations within the rules, for Session
and Application
level settings.
Log Asset Activity? - An entry is created for platform-level assets such as XSL transformations. How and when such assets are cached is determined by the Run Mode setting. The key difference between this and the Log Cache Activity setting, is that this setting applies to assets that form the specification of the application and the former setting applies to an application being developed on the platform.
Log Engine Activity? - An entry is created for each Agent Engine that is created and pooled for use. This option is impacted by the Platform Optimisation Settings related to pooling.
The other field options Archive... and Output ... work in the same manner as those settings previously defined in the Platform Log Details above.
Platform Optimisation Details
Normally, you should not need to make changes in this area during development. This are more applicable and useful within the publication settings, when publishing a project for your production server.
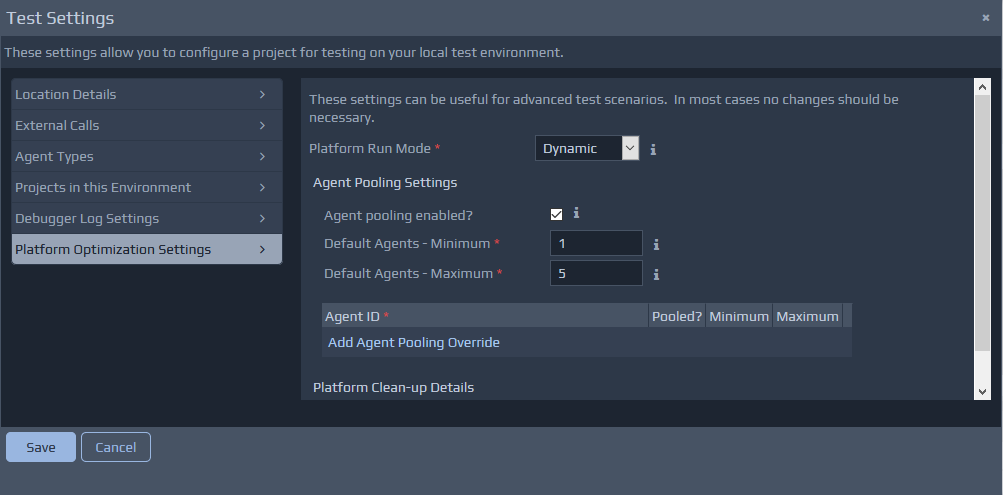 Platform Run Mode - Each application executes on the platform in one of three modes:
Dynamic - This is the recommended mode during development. In this mode, the platform does not cache or reuse any Agent or Asset information. Each Agent and it's corresponding engine instance will be recreated for each request, and any changes to the application specification will be automatically refreshed.
On-demand - In this mode, no Agents are initialised during platform startup. Each Agent is created on first request and cached form then onwards. This can lead to less demand on resources such a system memory, but can be slower for the very first request, compared to the Static mode.
Static - This is generally the recommended mode for production applications. In this mode, the platform will initialise all Agents and corresponding engines when the platform first starts up. Any user requests received will reuse these Agents if they are free. Depending on the pooling settings, more engines may still be created under heavy load. If all engines are currently busy with user requests, and there are no free engines, the requests will be queued until an engine becomes available. The platform will also try to cache assets such as XSLT transforms, XML files, etc., in order to improve performance. This mode yields the best performance, but can be more demanding on system resources such a memory, depending on the settings for Agent Pooling.
Agent Pooling Settings - The pooling section controls how many engines can be maintained for each Agent in the application. These settings are useful for managing concurrent, multi-user applications with large numbers of active users, or for highly variable work loads. There will always be min number of engines available to service user requests, but this may be increased up to the max number, if the load of user requests requires it. Alternatively, engine pooling can be turned off by un-ticking the Agent Pooling enabled?. In this situation, engines will not be maintained, and a new one will be used for each request. This is generally not recommended since it can lead to uncontrolled use of system resources.
One of the major considerations with these settings is the amount of memory on the server to process user requests. The more memory that is available, the higher the level of agent engines that can reside in memory to process user requests. It is difficult to profile these settings in advance, but there is a platform utility that can be used to inspect the server, to obtain information about the agents, engines and assets that are loaded onto the platform at time of inspection. Using URL: http://{server-name}:{port}/{web-application-name}/get_xplatform_info.do an XML document can be obtained in the browser, showing platform usage figures. The information can be used to adjust pooling and clear-down settings. Some further details and considerations can be found on the forum under Performance and Tuning Considerations.
All of these pooling options can be overridden for each Agent in the application as required by adding a pooling override entry. The Agent ids that need to be entered to isolate the Agents for which the overrides are required, can be found within the Debugger log view.
Platform Clean-up Details - You can instruct the WebMaker platform to automatically perform clean-up operations for Agent engines. This can provide better resource utilisation by releasing agent engines that are not being used to process user requests. The Agent clean-up enabled? option is used to instruct the platform to enable or disable engine clean-up. If this option is enabled, the Run Interval should be entered to specify how often the process will run. This value is represented in milliseconds, so a value of 900000
indicates a check every 15 minutes (No. of minutes * 60 * 100)
.
As engines are pooled up to the stated maximum during peak loads, there may be the need to clear down pooled engines to release resources once they are no longer being used. This can be managed using the Idle time before removal option. This sets the idle time (in milliseconds) before engines can be removed. Every time the clean-up process is run, all engines that have been idle for the entered time or longer will be removed (subject to the min pooling constraints set for the agent). This value is captured in milliseconds, so a value of 1800000
represents a check every 30 minutes (No. of minutes * 60 * 100)
.
Once the design and testing is complete you can package applications for Publication to a specific environment, using options within the Publish Settings tab. You can access this tab by using the Publish button on the Toolbar. You can also access details of the publication environments by using the Publish | Publish Settings menu item. Within the Publish Settings tab, you will be presented with a list of currently defined environments if any exist. You can publish to an environment using the Publish link or edit the details of an environment using the Edit icon. You can also use the Copy Environment link to define a new publication environment based on an existing one.
When using the normal Publish link from this screen, or publishing directly from the top menu, the publication process will attempt to publish only the changes made to the application in order to reduce the time taken to Publish. You can however always perform a Clean Publish from this screen which will publish your application from scratch. This can be a useful operation to ensure you don't have any old or redundant files present in the publication environment on the server.
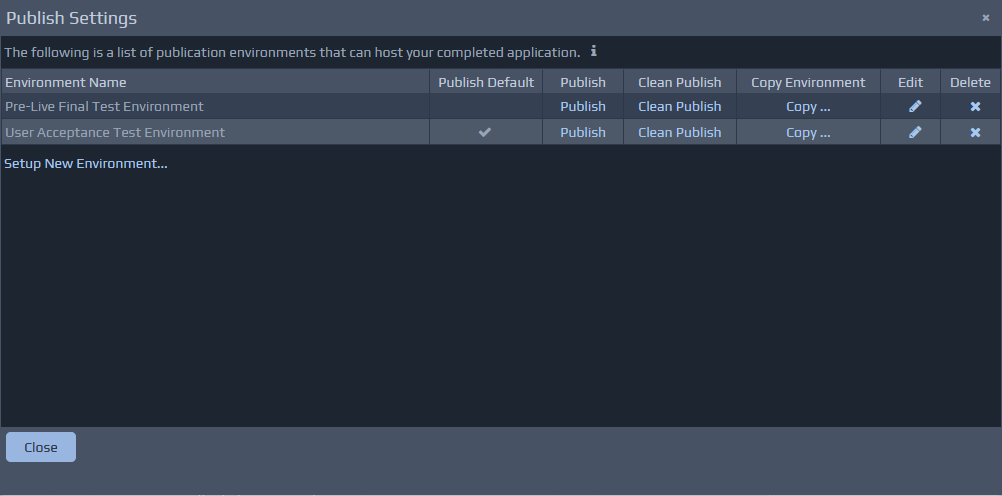 Whether you are setting up a new environment or editing an existing environment you will be presented with the same information within the Environment Details page shown below. You will notice that some of the sections are very similar to those previously defined in the Test Settings screen.
The publication environment details will also include the Environment Name at the top of the screen if you are editing an existing environment.
The publication environments are detailed within underlying configuration files, which work in conjunction with Apache Ant Build process.
Whether you are setting up a new environment or editing an existing environment you will be presented with the same information within the Environment Details page shown below. You will notice that some of the sections are very similar to those previously defined in the Test Settings screen.
The publication environment details will also include the Environment Name at the top of the screen if you are editing an existing environment.
The publication environments are detailed within underlying configuration files, which work in conjunction with Apache Ant Build process.
Location Details
The pre-defined environment types should include Tomcat
and WAR
types as a minimum. Other options may be available, depending on the specific version of WebMaker you are using. The environment details are defined and held against the project specification within the repository. If you setup multiple publication environments, it is also possible to configure a default environment to publish to when the Publish button is pressed on the WebMaker command bar.
 Depending on the environment type selected, there will be a number of required Parameters. These parameters will depend on the target publication environment. For example, you will need a WAR file-name and the output directory for the WAR file. You can use the hint messages for each parameter to get some additional details on what should be entered. The Tomcat environment type allows the application to be published to a remote server. The WAR option will create a WAR file that will then be typically installed onto a remote application server e.g. IBM WebSphere, Oracle, etc.
External Calls
This section allows you to re-configure the details of External Calls. This section displays the Agents that represent database connections, remote web service details, etc. These details are similar to those found on the Test Settings screen. You can change the details for each of these Agents in this section. You will typically change these details to ensure the application is published with the correct runtime details for a server environment. This may mean different database connection details, server URLs for some Agents that are published into different user acceptance, test or live production environments. It is common to have different SQL Database instances or Web Services depending on different types of environments. Only existing External Call information can be edited.
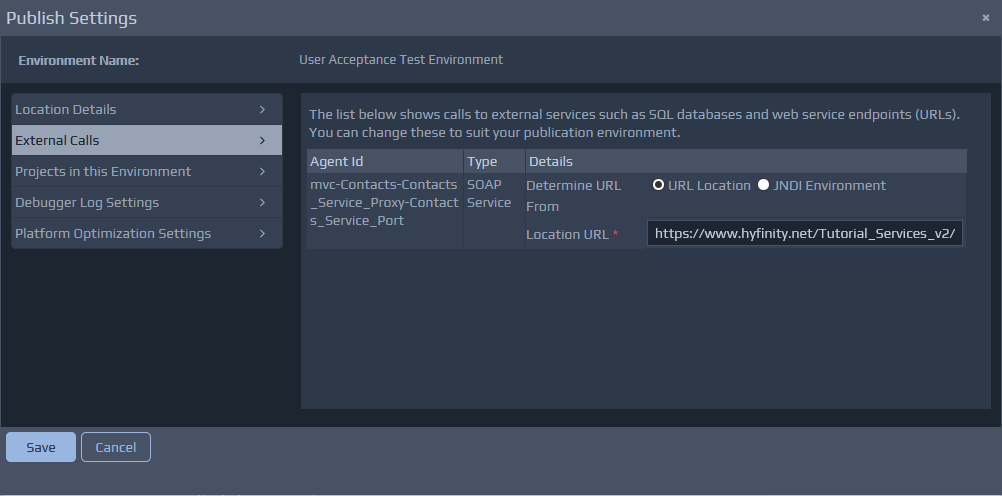 You may also find that some of the details are more secure in these environments and require different setup steps. The publication environments allow you to define JNDI Resource details for SQL Database connections and Web Service URL location details, without the need to hold such details in the application specification. By default, the settings are based on those defined in the Test Settings screen, but can also be altered to JNDI Resource Details if required. If the JNDI Resource details are defined, it is important to ensure that these definitions have already been pre-configured on the J2EE Application Server that hosts the publication environment. The following section covers the configuration of JNDI resources in more detail:
Projects in this Environment
The final specific section on this tab is Projects in this Environment. Within this section, you should see at least the currently selected project. You may also wish to Publish additional projects that are required for the overall published application. Within WebMaker you can define many projects that can be used to breakdown larger applications. These projects may have been linked together via inter-projects proxies. Where an application is composed of multiple projects, you will need to include all such projects within this section. This is totally independent for any multiple-project setup performed for a test environment via the Test Settings screen. By adding the additional projects here, means you only need to publish the one main project to create a WAR (for example) containing all the required projects.
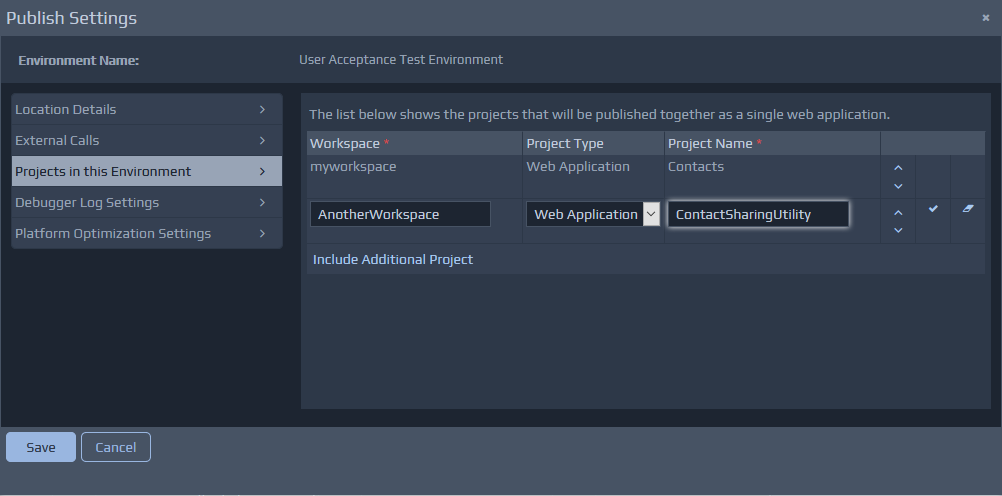 Please note that most of the environment set-up and configuration needs to be setup only once and modified as necessary. Most of the time you will simply be selecting a publication environment and clicking Publish. If new Agents are added to your project that have different External Call details, then you will need to edit the environment to override these as appropriate.
Debugger Log Settings
This section enables you to optimise various settings for the publication environment. You may need to adjust these settings because certain elements will require very different behaviour during design and testing, compared to the live production environments. For example, you will need much more detailed logging during development, compared to the live environment.
For user acceptance and production environments, most of the logging details are switched off. WebMaker will default the settings to appropriate values. For such environments, the platform logs are usually the only details left active, but only to report Platform Log Level of Error
or Fatal
. The development and administration logging is normally turned off by default.
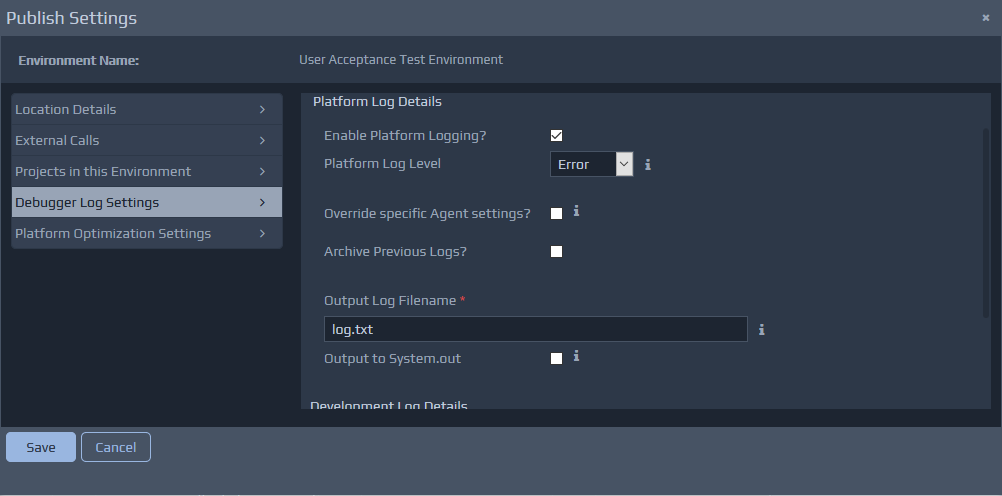
Platform Optimisation Settings
For published applications, one of the more important elements is the Platform Run Mode. This should be set to Static
or On-Demand
rather than Dynamic
.
You may also want to configure pooling settings to finely adapt the live runtime environment to better suit the usage patterns of a particular target environment. If there are hundreds or thousands of concurrent users then it is likely that the pooling defaults will need to be adjusted to ensure the application performance is finely tuned and adaptable. See the Test Settings - Platform Optimisation Details section for more details.
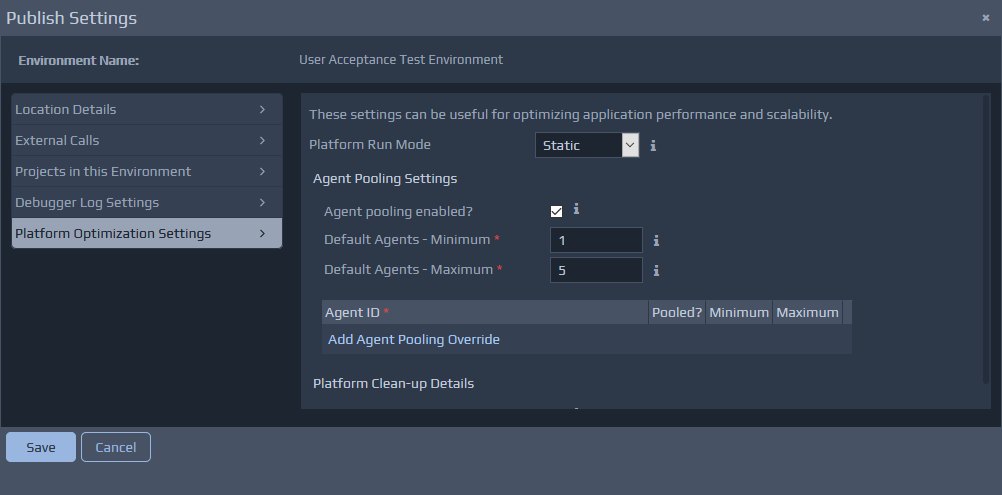 JNDI (Java Naming and Directory Interface) enables Java platform-based applications to access multiple naming and directory services. JNDI is a method of defining Database, Web Service endpoint or Resource locations, that eliminate the need for web applications to hold the specific location and security details. This is done by defining
 Resource Name Identifiers
that are used by applications and referenced within the J2EE Server. The J2EE Server securely holds details for the database connection or endpoint URLs, which are set-up by System Administrators. This means that the web application developer does not need to be aware of the specific details for deployment and publication environments. This also means that web applications can easily be published to each test, user acceptance or production environments without the need to change the location and security details because they are held on the J2EE Application Servers.
The resource reference name must match the resource name specified in the application server container definition. The same resource name would be defined in each J2EE Application Server, but with different environment details. This makes the resource available to your application, but you need to configure the details of the connection in your J2EE application server.
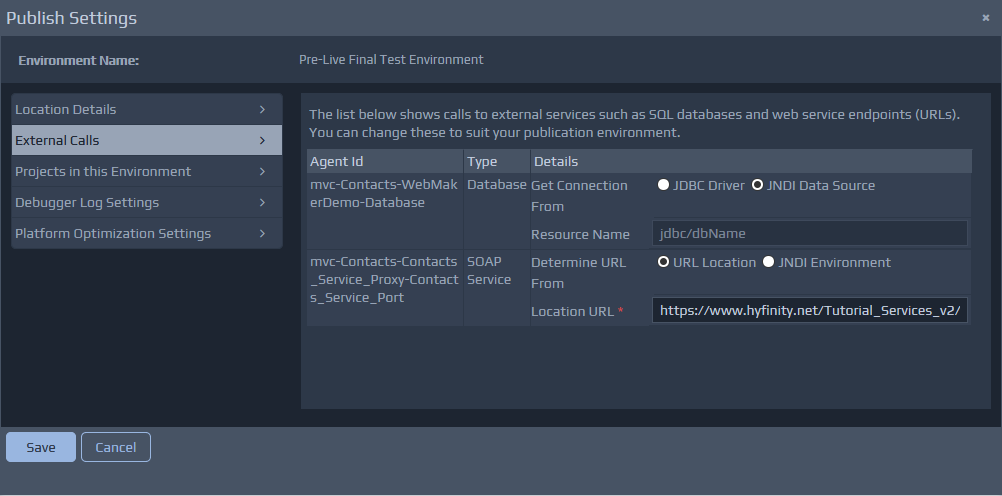
JNDI - Web Application Configuration
Once the JNDI Resource names are set-up in the Publication screens, the next step is to add an entry to the application's web.xml. If this is the first time this is being performed, it may be necessary to set-up a file with the relevant details. The first thing that needs to be considered is the method of publication that will be used. There are some options that need configuration details to be defined in the web application, and others that require configuration on a server. For the publication process to create a WAR file, or publish directly to Apache Tomcat, it is necessary to configure the web.xml within the application. For all other publication locations, the remote server requires manual configuration of the details below.
JNDI - Tomcat and WAR Configuration
At this point in time, the file system needs to be accessed directly to setup these details. Start a Windows Explorer window for the following location: {installation directory}\design\repository\{MyWorkspace}\mvc\{MyProject}\webapp
. If there isn't a directory called WEB-INF
under the webapp
directory, then create the directory. Once created, it is necessary to add a web.xml
file within the newly created directory. To ensure that the file is created with the basic details required, please visit the following directory in another Windows Explorer window: {installation directory}\runtime\tomcat-runtime\webapps\{YourProject}\WEB-INF
. Copy the web.xml
file from the runtime location into the design repository location first visited above.
Now select the file for edit in the design repository. Once the file is open you will need to insert the XML fragment below, and then change the values to your required JNDI settings. Insert the XML fragment below just before the closing </web-app>
element. The relevant resource details appropriate to your environment should be provided by your System Administrator. Once completed, save the file. You may need to repeat these steps if there are a number of JNDI resources that you need for your web application.
The following fragment applies for Database Resources within the web.xml file:
<resource-ref>
    <description>My DB Connection</description>
    <res-ref-name>jdbc/myDBnameInTheContainer</res-ref-name>
    <res-type>javax.sql.DataSource</res-type>
    <res-auth>Container</res-auth>
</resource-ref>
The following fragment applies for Web Service Resource details within the web.xml file:
<env-entry>
    <env-entry-name>serviceURL</env-entry-name>
    <env-entry-value>http://www.hyfinity.net/Tutorial_Services_v2/Contacts_Service</env-entry-value>
    <env-entry-type>java.lang.String</env-entry-type>
</env-entry>
Note: The env-entry-value
will likely be the URL that was defined for the local test deployment. The value above is simply an example, but your value will point to a remote service URL. In practice, this value will be overridden in the following steps based on the specific requirements for set-up depending on the J2EE Application Server you are going to use for your published application.
Note: For BizFlow WebMaker applications the web.xml
details will need to be set-up on the BizFlow Server. The server configuration is shared by all projects deployed to the server, which means the web.xml
will likely already exist on the server. The file should be edited and the additional details added. As the server is shared, it is likely that careful coordination will be required with the System Administrator. However, it is also possible that as many Resource definitions are shared, that the details will likely not need to be set-up for every application to be published.
JNDI - Server set-up of Database Resources
The method to set-up database resource details will vary depending on the application server being used, but as an example, for Apache Tomcat, you can add a Resource entry to the context.xml configuration file, e.g:
<Resource name="jdbc/myDBnameInTheContainer" auth="Container"
        jndi-name="jdbc/myDB"
        type="javax.sql.DataSource"
               maxActive="100" maxIdle="30" maxWait="10000"
               username="uid..." password="pwd..."
        driverClassName="com.driver..."
               url="jdbc connection url..."
               defaultAutoCommit="false"/>
Note: If the application server container has not been configured for JNDI previously, and you are planning to use a Database Connection, then it may be necessary to place the required SQL JAR into the main lib
directory, e.g. for Apache Tomcat 7 the directory might be: C:\Program Files\Apache Software Foundation\Tomcat 7.0\lib
. The SQL JAR will depend on the Databases used by the web applications.
JNDI - Server set-up of Web Service Resources
The method to set-up web service resource details will vary depending on the application server being used, but as an example, for Apache Tomcat, you can add a Resource entry to the context.xml configuration file, which should be located in the conf
directory of the Tomcat installation. Edit the file and add the following xml fragment prior to the </Context>
closing element. Then change the value to the required URL.
<Environment name="serviceURL" value="http://www.hyfinity.net/Tutorial_Services_v2/Contacts_Service" type="java.lang.String" override="false"/>
Installing the Debugger within a remote server environment
Within the WebMaker Studio the Debugger is integrated and available via the Test Settings and Publish Settings menu options. In order to use the Debugger and its server configuration, logging and debugging capabilities within a remote test or production environment, the Debugger needs to be installed locally on the server environment.
A WAR file for deployment on J2EE Servers is available and included as dashboard.war
A download and accompanying installation instructions are available on the WebMaker Forum.
Once the WAR has been installed on the server, The Debugger can be started by using the following URL: {deployment_location}/Dashboard/dashboard.do
. The entry screen enables the ability to open a server configuration file (morphyc file), which contains details for the log files required by the Debugger. It is also possible to link to a specific log file directly. The first option allows the logs to be viewed and the application configuration to be adjusted. The latter only allows the logs to be viewed.
The path entered for either option should be the location of the file on the server, where the Debugger is installed.
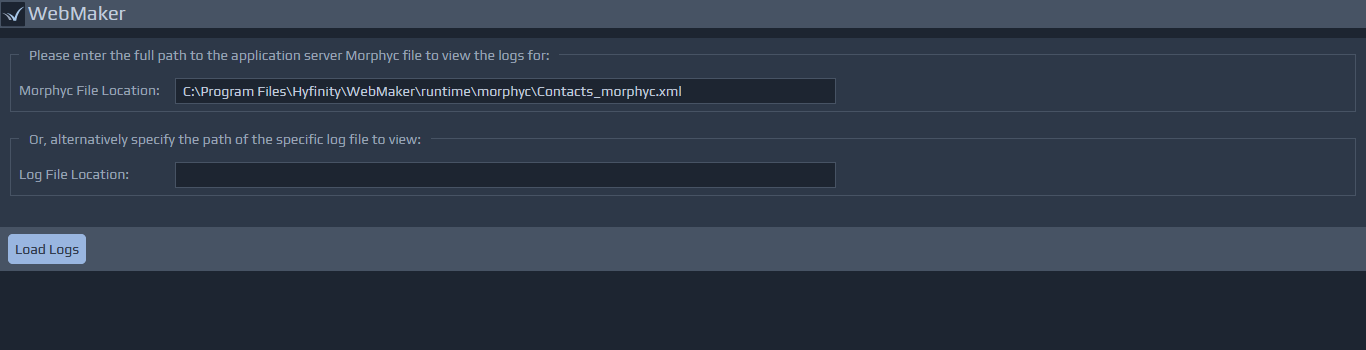 The first tab covers the Debugger log details that is similar to the Debugger tab in the Studio. In the server installation, after a morphyc file has been selected, additional buttons are available for different types of logs. These are usually the developer and platform logs (as seen in the Studio), along with a separate button for the administration logs. By default, the developer and platform logs are shown.
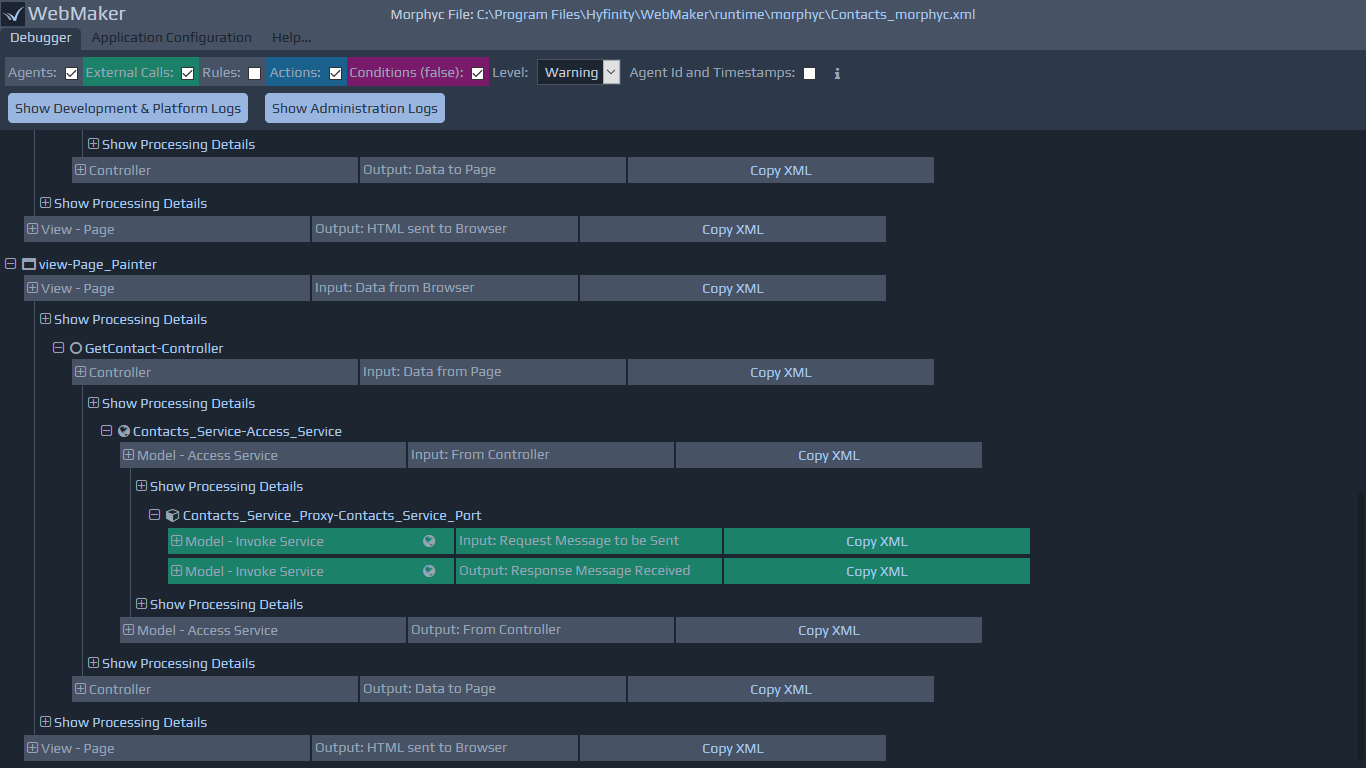 The second tab lists the Application Configuration options, and is only available if a morphyc file has been selected. This provides similar settings as found in the Studio within the Publish Settings menu option, with the server version only providing options for the runtime aspects, including details of the logs and the platform optimisation settings. Some additional details on some of these aspects is available in the following sections:
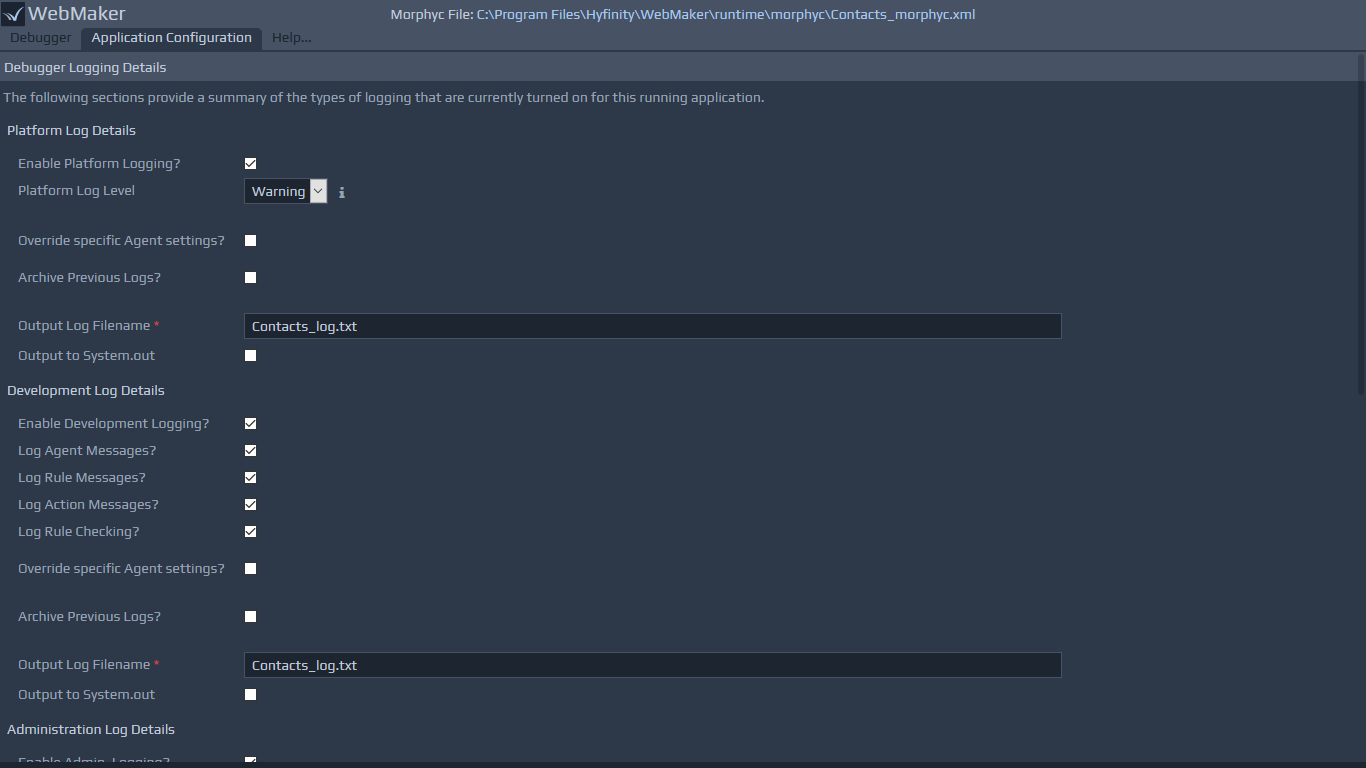 The Debugger screens that are used to manage the various logging parameters and platform optimisation settings such as pooling, runtime mode, etc., use an underlying configuration file. For a local test environment, typically used by the Run Test operation in the Studio, this file will be located at
 {deployment_location}/runtime/morphyc/{application-name}_morphyc.xml
. After publication, this file will typically be called morphyc.xml
and located within the doc
directory of the publication output (e.g. WAR file).
For published applications, the location of the morphyc file can be specified in the web.xml file for the webapp. See section on the XGate Servlet for a sample web.xml file. Alternatively, the location of the morphyc file can be indicated using the morphyc environment variable. This variable will only be used if the entry in the web.xml file is missing.
An example morphyc file is listed below:
<?xml version="1.0" encoding="UTF-8"?>
<morphyc xmlns="http://www.hyfinity.com/xfactory">
    <blueprints>
        <project desc="" location="c:/jprogramfiles/hyfinity/runtime/blueprints/installation_test/mvc/" name="mvc-hello_world" />
    </blueprints>
    <xplatform mode="static">
        <pooling pooled="true" min="1" max="2">
            <!-- <override node_id="mvc-mvcuser-pattern-node" pooled="false" min="4" max="4"/> -->
        </pooling>
        <!-- enable clean up of unused engines
             all times are in milliseconds -->
        <platform_cleanup enabled="true" run_interval="300000">
            <engine_cleardown min_idle_time="600000" />
        </platform_cleanup>
        <platform_logging log="true" check_log_overrides="false" output_to_screen="false">
            <!-- level = fatal | error | warning | info | debug -->
            <log_level>fatal</log_level>
            <log_destination>c:/jprogramfiles/hyfinity/runtime/blueprints/xlog/platform_log.txt</log_destination>
            <!-- The archive element enables rolling logs. The max_backup_index indicates the number of rolling logs to be preserved.
                The max_file_size is indicated in bytes. e.g. 10485760 = 10MB -->
            <archive_previous_log max_backup_index="5" max_file_size="10485760">true</archive_previous_log>
        </platform_logging>
        <development_logging log="false" check_log_overrides="true" output_to_screen="false">
            <log_destination>c:/jprogramfiles/hyfinity/runtime/blueprints/xlog/development_log.txt</log_destination>
            <archive_previous_log max_backup_index="1" max_file_size="10485760">true</archive_previous_log>
            <log_agent_messages>true</log_agent_messages>
            <log_rule_messages>true</log_rule_messages>
            <log_rule_result_messages>true</log_rule_result_messages>
            <log_rule_checking>true</log_rule_checking>
            <!-- <override agent_id="mvc-mvcuser-pattern-node" log_agent_messages="true" log_rule_messages="false" log_rule_result_messages="false" log_rule_checking="false"/> -->
        </development_logging>
        <administration_logging log="false" check_log_overrides="false" output_to_screen="false">
            <log_destination>c:/jprogramfiles/hyfinity/runtime/blueprints/xlog/administration_log.txt</log_destination>
            <archive_previous_log max_backup_index="5" max_file_size="10485760">true</archive_previous_log>
            <log_session_activity>true</log_session_activity>
            <log_cache_activity>true</log_cache_activity>
            <log_asset_activity>true</log_asset_activity>
            <log_engine_activity>true</log_engine_activity>
        </administration_logging>
    </xplatform>
</morphyc>
You can use the Debugger, integrated within the Studio, together with the Test Settings and Publish Settings menu options to manage this file. In runtime server environments, you can use a local installation of the Debugger (as detailed earlier) to manage this file.
For descriptions of the various parameters within the configuration file, please see earlier sections on Test Settings and Publication Settings.